


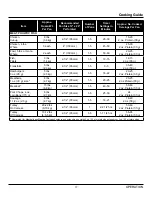


19
MAINTENANCE
Cleaning & Preventative Maintenance
Stainless Steel
To remove normal dirt, grease or product residue from
stainless steel, use ordinary soap and water (with or with-
out detergent) applied with a sponge or cloth. Dry thor-
oughly with a clean cloth. Never use vinegar or any cor-
rosive cleaner.
To remove grease and food splatters or condensed va-
pours that have baked on the equipment, apply cleanser
to a damp cloth or sponge and rub cleanser on the metal
in the direction of the polishing lines on the metal. Rub-
bing cleanser as gently as possible in the direction of the
polished lines will not mar the finish of the stainless steel.
NEVER RUB WITH A CIRCULAR MOTION.
Soil and burnt deposits which do not respond to the above
procedure can usually be removed by rubbing the sur-
face with SCOTCH-BRITE scouring pads or STAINLESS
scouring pads. DO NOT USE ORDINARY STEEL WOOL
as any particles left on the surface will rust and further
spoil the appearance of the finish. NEVER USE A WIRE
BRUSH, STEEL SCOURING PADS (EXCEPT STAIN-
LESS), SCRAPER, FILE OR OTHER STEEL TOOLS.
Surfaces which are marred collect dirt more rapidly and
become more difficult to clean. Marring also increases
the possibility of corrosive attack. Refinishing may then
be required.
To Remove Heat Tint
Darkened areas sometimes appear on the stainless steel
surface where the area has been subjected to excessive
heat. These darkened areas are caused by thickening of
the protective surface of the stainless steel and are not
harmful. Heat tint can normally be removed by the forego-
ing, but tint which does not respond to this procedure calls
for a vigorous scouring in the direction of the polish lines
using SCOTCH-BRITE scouring pads or a STAINLESS
scouring pad in combination with a powdered cleanser.
Heat tint action may be lessened by not applying or by
reducing heat to equipment during slack periods.
DELIMING
Monthly Removal of Scale Deposits
It is recommended that your steamer be delimed once a
month, or more often if necessary.
Should your steamer develop a heavy build-up of lime
scale deposits, use the TOTAL CONCEPT TREATMENT
KIT available from your authorized service agent.
Before beginning deliming procedures, ensure that water
is not overflowing into the cooking compartment.
Deliming Procedures
Both generators must be delimed individually.
WARNING
Read and follow instructions on the TOTAL
CONCEPT bottle. Use plastic or rubber
gloves to avoid skin contact. If TOTAL CON-
CEPT comes in contact with skin, rinse with
clean water.
CAUTION
Do not open deliming caps when unit is in
operation. Do not open or close compartment
doors when deliming caps are not in place.
CAUTION
Do not open or close compartment doors or
operate unit when deliming caps are not in
place.
1. Turn the power switch “OFF” for three minutes, allow-
ing the generators to completely empty.
2. Turn the power switch to the “DELIME” position.
3. Remove caps located on top right of steamer (left cap
for top generator, right cap for bottom generator. Us-
ing a funnel and pouring slowly to avoid spilling, pour
one quart (0.95 liters) of Market Forge’s Total Con
-
cept deliming solution into each generator.
4. Replace the deliming caps and tighten. Turn power
switch to “ON” for five minutes allowing the generator
to completely fill.
5. Turn the power switch to the “DELIME” position. Un-
screw the deliming caps and add one quart (0.05 li
-
ters) of clean water for gas units, 1/2 quart (0.48 li
-
ters) for electric units.
6. Replace the deliming caps and tighten. Turn the
power switch “ON” for 30 minutes.
7. Flush the generators three times. Turn power switch
to “OFF” for three minutes and then “ON” for five min
-
utes.
WARNING
When this appliance is installed with cast-
ers and is connected to the supply piping by
means of a connector for moveable appli-
ances, a restraint to prevent damage to the
connector or quick disconnect device should
have been installed. If disconnection of the
restraint is necessary, reconnect this restraint
after the appliance has been returned to its
originally installed position.


