


EN
5
3.0 Installation
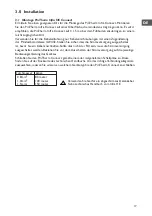
3.1 Mounting PinTherm Infra HE Connect
Determine a suitable place for installing the PinTherm Infra HE Connect. ount the PinTherm Infra
HE Connect on a solid surface that can carry a minimum of 4 kg. We recommend mounting the
PinTherm Infra HE Connect at a height of ±1.5m from the floor, at a well reachable place.
For cable gland use only cable glands fitted with strain relief, with a minimum fire class of UL94V2.
Check that the power supply has been switched off before connecting any wiring. If this is not the
case, the power supply must be switched off before you continue. When switching off the power
supply of the appliance to which connection is to be made, you should also refer to the technical
documentation/operating instructions for the appliance in question.
Connect the PinTherm Infra Connect according to one of the electrical diagrams provided at
the back of this technical manual.
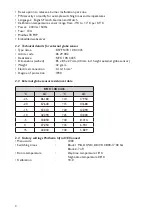
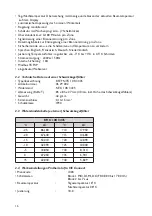
Diameter Length
0.8mm
2
80 meter
1.0mm
2
100 meter
Use a shielded data cable for this.
1.5mm
2
150 meter
See technical book of the Infra HE.
Содержание 0664048
Страница 2: ...2...
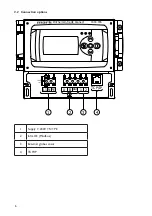
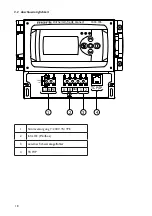
Страница 6: ...6 3 2 Connection options 1 Supply 1 230V N PE 2 Infra HE Modbus 3 External globe sensor 4 TCP IP...
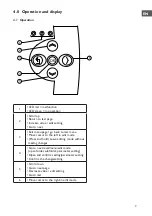
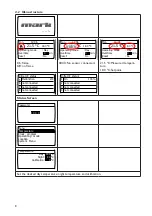
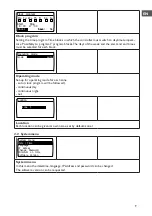
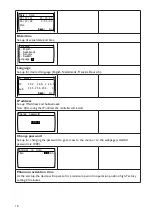
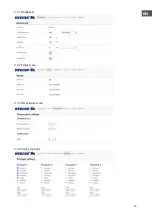
Страница 13: ...EN 13 4 5 1 Dashboard 4 5 2 Status menu 4 5 3Temperature menu 4 5 4 Clock programm...
Страница 25: ...25 DE 4 5 1 Dashboard 4 5 2 Men Status 4 5 3 Men Temperatur 4 5 4 Men Zeitprogramm...
Страница 37: ...37 FR 4 5 1 Dashboard 4 5 2 Statut de l cran 4 5 3 Menu de temp rature 4 5 4 Menu du programme horloge...
Страница 42: ...42 3 2 Aansluitmogelijkheden 1 Voeding 1 230V N PE 2 Infra HE Modbus 3 Aansluiting zwarte bol voeler 4 TCP IP...
Страница 49: ...49 NL 4 5 1 Dashboard 4 5 2 Status menu 4 5 3 Menu temperatuur 4 5 4 Menu klokprogramma...
Страница 54: ...54 3 2 Optiuni de conectare 1 Alimentare electric 1 230V N PE 2 Infra HE Modbus 3 Senzorul glob extern 4 TCP IP...
Страница 61: ...61 RO 4 5 1 Dashboard 4 5 2 Meniul Stare 4 5 3 Meniul de temperatur 4 5 4 Program ceas...
Страница 63: ...63...