background image

29

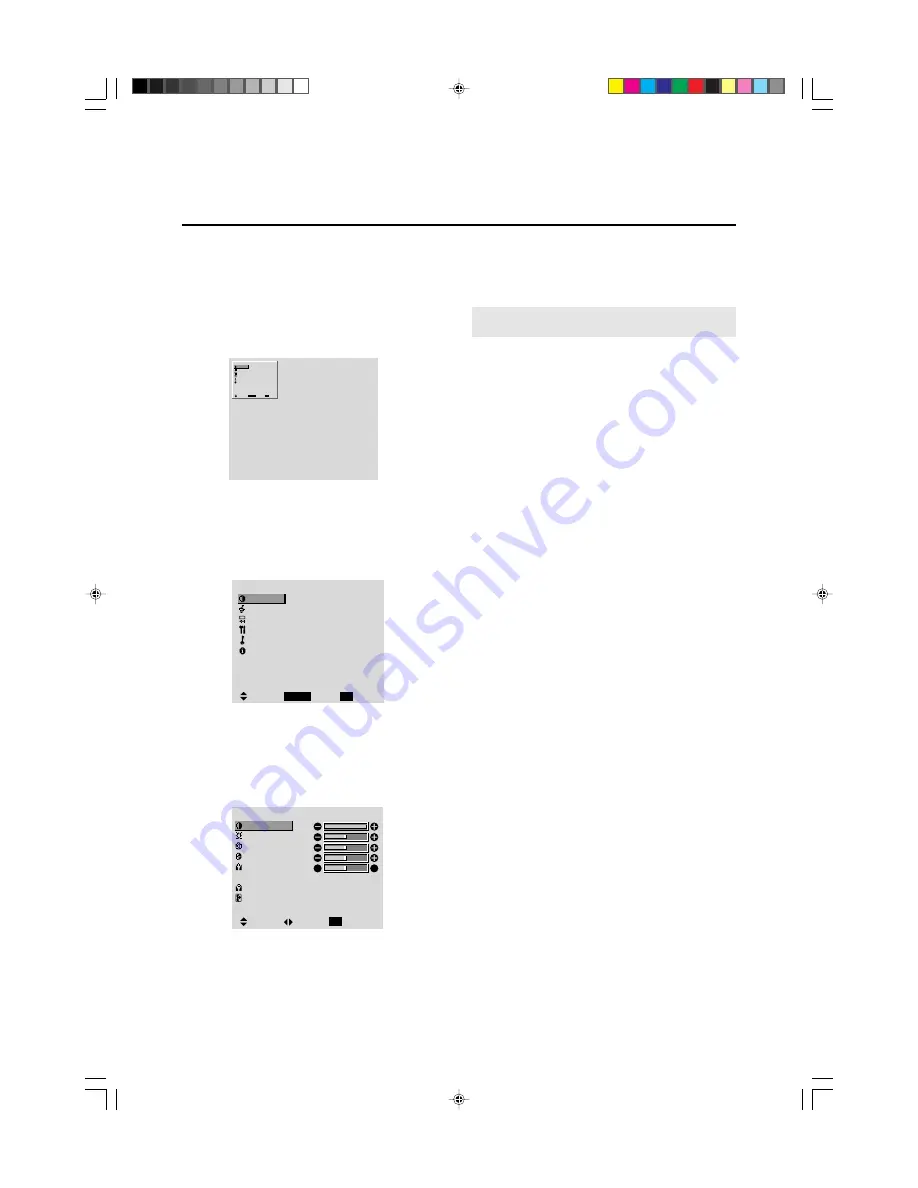
The following describes how to use the menus and the se-
lected items.

1. Press the 

3

-D1(ON) button on the remote controller

to display the MAIN MENU.

2. Press the cursor buttons 

▲ ▼

 on the remote controller

to highlight the menu you wish to enter.

3. Press the 

3

-D1(ON) button on the remote controller

to select a submenu or item.

4. Adjust the level or change the setting of the selected

item by using the cursor buttons 

§ 


©

 on the remote

controller.

OSM

(On Screen Menu)

 Controls

Menu Operations

The OSM window is displayed with respect to the
screen as shown on the diagram.

*

Depending on the screen's mode, the OSM may be dis-
played slightly differently.
In the explanation, the OSM section is shown close up.

M A I N   M E N U

PICTURE
SOUND
SCREEN
FUNCTION
OPTION
INFORMATION

SEL.

OK

EXIT

EXIT

PROCEED

5. The change is stored until you adjust it again.

6. Repeat steps 2 – 5 to adjust an additional item, or press

the EXIT button on the remote controller to return to
the main menu.

M A I N   M E N U

PICTURE
SOUND
SCREEN
FUNCTION
OPTION
INFORMATION

SEL.

OK

EXIT

EXIT

PROCEED

P I C T U R E

CONTRAST
BRIGHTNESS
SHARPNESS
COLOR
TINT
PICTURE MODE
COLOR TEMP.
NR

MEMORY
2
NR-2

:
:
:

R

G

SEL.

ADJ.

RETURN

EXIT

Note:

 The main menu disappears by pressing the 

3

-

D5(OFF) button.

PD4292D-2

00.10.4, 3:11 PM

29

Содержание PD4292D

Страница 1: ...Model PD4292D User Guide Plasma Monitor R PD4292D 1 00 10 4 3 08 PM 1 ...

Страница 2: ...afety and to avoid damage to the unit read carefully and observe the following instructions To avoid shock and fire hazards 1 Provide adequate space for ventilation to avoid internal heat build up Do not cover rear vents or install in a closed cabinet or shelves The unit is equipped with cooling fans If you enclose the unit in a cabinet or rack be sure there is adequate space at the top of the uni...

Страница 3: ...isplay a moving image whenever possible Always power down the monitor when you are finished using it If the SLIM SERIES PLASMA MONITOR is in long term use or continuous operation take the following measures to reduce the likelihood of phosphor burn Lower the Brightness and Contrast levels as much as possible without impairing image readability Display an image with many colors and color gradations...

Страница 4: ...d of entering an image input that may ensure reluctance to the generation of the difference in brightness reduction among the displayed dots The images from TV broadcasting involve a high rate of motion picture displays Therefore thereislesschanceofbeingacauseofdifference in brightness reduction among the cells Even when the fixed patterns are displayed they generally last for a few minutes Sincet...

Страница 5: ... recommendations for minimizing the occurrence of image burn Always enable and use your computer s screen saver function during use with a computer input source Display a moving image whenever possible Always power down the monitor when you are finished using it If the SLIM SERIES PLASMA MONITOR is in long term use or continuous operation take the following measures to reduce the likelihood of pho...

Страница 6: ...l 27 When watching videos or digital video discs 27 When watching high definition video source 27 Watching computer images with a wide screen 28 OSM Controls 29 Menu Operations 29 Picture Settings Menu 31 Adjusting the picture 31 Setting the picture mode according to the brightness of the room 32 Setting the color temperature 33 Adjusting the color to the desired quality 34 Reducting noise in the ...

Страница 7: ...down with the screen face down See Draw ing B Lay the protective sheet which was wrapped around the monitor when it was packaged beneath the screen surface so as not to scratch the screen face This device cannot be installed on its own Be sure to use a stand or original mounting unit Wall mount unit Stand etc See page 2 For correct installation and mounting it is strongly recommended to use a trai...

Страница 8: ...osite and S Video signal compatibility 480P 1080I 720P and HDTV signal compatibility PCs VCRs Laser Disc and DVD player source compat ibility AccuBlend scan conversion automatically convertsVGA SVGA and SXGA signals to the panel s native resolution RGB input 3 Video input 3 DVD HD input 2 Audio input 3 External Control input 1 AccuColor control system provides user selectable on screen color tempe...

Страница 9: ...and RIGHT Enlarges or reduces the image Functions as the CURSOR buttons in the On screen display OSM mode 4 INPUT SELECT EXIT Switches the input in the following order VIDEO1 VIDEO2 RGB3 RGB2 RGB1 VIDEO3 DVD HD Functions as the EXIT buttons in the On screen display OSM mode 5 POWER STANDBY indicator When the power is on Lights green When the power is in the standby mode Lights red 6 Power Turns th...

Страница 10: ... when power ON OFF input selec tion and AUDIO MUTE and other controls are operated externally by external control See also page E 36 for external control C REMOTE CONTROL Connect the supplied remote cable here D CONTROL LOCK When CONTROL LOCK is set ON the buttons on the set s control panel do not function E AC IN Connect the included power cord here G H I J K A B C D E F RGB3 DVI 29pin Inputs a d...

Страница 11: ...t for control of the LD player Press the PLAY button to play an LD ON OFF SOURCE CLONE MACRO MODE MACRO REMOTE L E A R N I N G CONTROL R C 2 0 0 0 M K II ON OFF VOL OSD GUIDE MUTE 1 2 MACRO D1 D2 D3 D4 D5 D6 D7 D8 3 4 POWER LOW USE 1 MD TV LD DVD VCR TUNER CD TAPE AUX AMP CH OK 1 3 2 4 6 5 7 9 8 M C 0 DSS LOW USE LEARN NAME 1 2 3 4 5 K 2 3 6 6 7 7 8 8 9 J A E F G H I M C D B 0 a b j g h c f d e i ...

Страница 12: ...RECT button as explained above 9 FUNCTION Press one of these buttons once or twice to select a par ticular source component For example to set the am plifier or receiver to the laser disc input press the LD button twice within 2 seconds Along with the source selection special functions may become available the DIRECT keys as well as activating the transport func tion keys so that you can now direc...

Страница 13: ... the VCR s transport command func tions etc F CURSOR buttons Some components feature menus that are navigated with up down left and right direction commands The cur sor buttons can be used to navigate within on screen menus for components such as amplifier or receiver PD4292D DSS satellite tuner etc These buttons are also used for certain RC2000MKII programming func tions G MUTE For those componen...

Страница 14: ...ously learned commands and macros will not be erased from the mi croprocessor s memory The RC2000MKII is supplied with a full set of RC 5 remote control codes in permanent non volatile memory Even if the batteries are fully exhausted the RC 5 codes used for Marantz A V components and learned codes will never disappear We recommend that you use a quality brand of alkaline batteries for best results...

Страница 15: ...harp point such as the tip of a paper clip press the opera tion MODE button 1 Within the LCD display the LEARN indica tor will begin blinking 2 Place the laser disc player s supplied infrared remote controller so that its transmitter window usually at the top is facing the infrared sensor window of the RC2000MKII at the bottom about 5 cm 2 inches apart 3 Press the LD function button on the RC2000M...

Страница 16: ... in the previous page are also confirmed in place The name re writing operation must be done on a function by func tion basis that is re write the names for all of the LD direct func tions then switch to another function such asVCR and begin the re writing process anew to re name theVCR direct function commands How to re write the STATUS name Using the same steps as outlined above you can re write...

Страница 17: ...e all clear operation takes about 15 seconds after the OK button is pressed LOW LEARN NAME 1 2 3 4 LOW LEARN NAME 1 2 3 4 LOW LEARN NAME 1 2 3 4 LOW USE LEARN NAME 1 2 3 4 Advanced Programming Techniques Macro mode The word macro is used to describe a series of specific steps carried out in sequence For example a word processing program can use mac ros to carry out common repetitive typing tasks D...

Страница 18: ...tus There is one more important point to note about programming a macro sequence During a macro sequence you may include more than one function selection button to access some transport and or other commands Depending on the macro sequence this might result in the amplifier or receiver s function selection to be inadvertently changed as well when the macro is played back The RC2000MKII has a speci...

Страница 19: ...ACRO 2 button with the tip of a paper clip The RC2000MKII will revert to the normal mode see Figure 16 Figure 16 5 Press the MACRO 6 button you desired RC2000MKII will trans mit the programmed code see Figures 17 18 and 19 Figure 17 Figure 18 Figure 19 Note If you would like to cancel the MACRO function press the STOPE button Now we ll show you another macro programming example with a more sophist...

Страница 20: ...he tip of a paper clip and select the OFF mode Then you ll have two identically programmed RC2000MKII remotes one of which can again be used as your system s primary remote control and you ll have the added confidence of knowing that in the event of inadvertent programming or memory contents being cleared somehow you can simply retrieve the backup RC2000MKII that you ve safely tucked away and with...

Страница 21: ...wish to consider reducing the lighting time s if possible as this can help to extend the battery life Adjustment of the LCD contrast The LCD contrast can be adjusted as follows Set SETUP mode to the RC2000MKII by pressing the MEMO and OK button Press the VOL to increase the LCD contraset Press the VOL to decrease the LCD contrast Press the OK button to end this setting and return the original oper...

Страница 22: ...se 6 AMS automatic music scan 7 REC record 8 PAUS pause DVD 1 MODE1 1 ANGL selects angle 2 TITL selects title menu 3 SUBT selects sub title 4 MENU selects main menu 5 TRAY tray open close 6 SUND selects languages 7 SET selects setup menu 8 RTN return to menu 2 MODE2 1 SLOW slow forward 2 LPLY last play function 3 RNDM shuffle paly function 4 RPT repeat modes 5 A B repeat A to B 6 10 digit entry 10...

Страница 23: ...3 CLR clear programming VCR 3 MENU 4 GOTO go to next item 5 PLUS video PLUS 6 7 8 DSS 1 DSS 1 DISP brings up on screen channel marker for 2 PREV goes to previously selected channel USA 3 CH next channel only 4 CH previous channel 5 FAV favorite users and channel lists 6 ALT alternate audio channel languages 7 FTCH brings up on screen channel logos 8 ANT selects broadcast or cable antenna 2 MODE 1 ...

Страница 24: ...pause 3 PAUS pause 4 STOP stop 5 TAPE command tape no output 6 REC record 7 PAUS pause 8 STOP stop Receiving the remote control codes The RC2000MKII can learn most of the remote control codes from various equipment it learns the full word length of the code it is receiving Due to the sensitivity of the receiving LED the RC2000MKII may also learn noise from fluorescent lights etc which can quickly ...

Страница 25: ...ificial light or if there is an obstacle between the sensor and the remote control unit POWER STANDBY INPUT SELECT POWER 30 30 Approx 7m 23ft 3 Put the lid back on LCD Remote Controller Notes Keep the back light button turned off except when using the LCD remote controller in a dark room Leaving the back light on wears down the batteries faster Handling the LCD remote controller Do not subject to ...

Страница 26: ...er Signal cable To Mini D Sub 15 pin connector on the plasma monitor Monitor adapter for Macintosh IBM VGA or Compatibles Macintosh or Compatibles Desk top type To video S video inputs on the plasma monitor Personal computer with a digital RGB output For Y CB CR connect to the DVD1 or DVD2 terminals For RGB composite sync connect to the DVD2 terminals For composite sync connect to the HD terminals...

Страница 27: ...ctor of the main unit Note that the RGB3 IN DVI terminal does not support analog RGB input source Note 1 Input TMDS signals conforming to DVI standards The TMDS input corresponds to 1 link 2 To maintain display quality use a cable with a quality prescribedbyDVIstandardsthatiswithin5metersinlength Connecting Your Document Camera You can connect your plasma monitor to a document camera To do so simp...

Страница 28: ...the ends of the speaker wires 2 Press down the tabs below the SPEAKERS terminals insert the speaker wire and release the tab to secure the speaker wire connection a Connect the right speaker located at right side of the monitor when viewed from the front positive wire to RIGHT b Connect the right speaker negative wire to RIGHT c Connect the left speaker negative wire to LEFT d Connect the left spe...

Страница 29: ...Document Camera You can connect your Plasma monitor to a document cam era To do so simply 1 Turn off the power to your Plasma monitor and docu ment camera 2 Use a standard video cable to connect your document camera to the Video input on your Plasma monitor 3 Turn on the Plasma monitor and the document camera Note Refer to your document camera s owner s manual for more information about your camer...

Страница 30: ...tal T M D S Data 2 T M D S Data 2 T M D S Data 2 Shield No connection No connection DDC Clock DDC Data No connection T M D S Data 1 T M D S Data 1 T M D S Data 1 Shield No connection No connection 5V Power Ground Hot Plug Detect T M D S Data 0 T M D S Data 0 T M D S Data 0 Shield No connection No connection T M D S Clock Shield T M D S Clock T M D S Clock No connection No connection No connection ...

Страница 31: ...controller or the unit to decrease to the desired level MUTE To cancel the sound Press the MUTE button on the remote controller to cancel sound press again to restore DISPLAY To check the settings 1 The screen changes each time the OSD button is pressed 2 If the button is not pressed for approximately three sec onds the menu turns off DIGITAL ZOOM Digital zoom specifies the picture position and en...

Страница 32: ...3 D7 TIME button once 2 The remaining time is displayed then turns off after a few seconds 3 When five minutes remain the remaining time appears until it reaches zero OFF TIMER30 OFF TIMER28 OFF TIMER0 Canceling the off timer 1 Press the 3 D7 TIME button twice in a row 2 The off timer is canceled Note After the power is turned off with the off timer A slight current is still supplied to the monito...

Страница 33: ...ayed The picture has the same size as video pictures with a 4 3 aspect ratio FULL size screen The image is expanded in the horizontal direction Images compressed in the horizontal direction squeezed images are expanded in the horizontal direction and displayed on the entire screen Normal images are ex panded in the horizontal direction STADIUM size screen The picture is expanded in the horizontal ...

Страница 34: ...ion When using a graphic accelerator board that is capable of displaying 8482480 FULL size screen Information m Supported resolution See page 58 for details on the display output of the various VESA signal standards supported by the monitor When 852 dot2480 line wide VGA signals with a vertical frequency of 60 Hz and horizontal frequency of 31 72 kHz are input select WIDE for the RGB SELECT settin...

Страница 35: ... the screen as shown on the diagram Depending on the screen s mode the OSM may be dis played slightly differently In the explanation the OSM section is shown close up M A I N M E N U PICTURE SOUND SCREEN FUNCTION OPTION INFORMATION SEL OK EXIT EXIT PROCEED 5 The change is stored until you adjust it again 6 Repeat steps 2 5 to adjust an additional item or press the EXIT button on the remote control...

Страница 36: ...ical and horizontal positions of the menu display POWER MGT Sets the monitor for use as an energy saving display when used with a computer GRAY LEVEL In case of 4 3 sets the luminance of both sides PLE INVERSE Set the brightness level to the minimum in conjunction with the inverse function CINEMA MODE Setting the picture to suit the movie RESET Resets all the settings PICTURE SOUND SCREEN FUNCTION...

Страница 37: ...eappears 5 Once the adjustment is completed Press the OK button to return to the main menu To delete the main menu press the OK button once more Note If CAN NOT ADJUST appears When trying to enter the PICTURE submenu make sure PICTURE MODE is set to MEMORY Information m Picture adjustment screen CONTRAST Changes the picture s contrast BRIGHTNESS Changes the picture s brightness SHARPNESS Changes t...

Страница 38: ...ode when watching video in a dark room This mode provides darker finer pic tures like the screen in movie theaters CONTRAST 80 for RESET mode BRIGHTNESS 95 for RESET mode NORMAL Set this mode when watching video in a bright room This mode provides dynamic pictures with distinct differences between light and dark sections CONTRAST 96 for RESET mode RESET Use this to reset the picture to the fac tor...

Страница 39: ...uttons are pressed 1 2 3 PRO See page 35 to set PRO P I C T U R E CONTRAST BRIGHTNESS SHARPNESS COLOR TINT PICTURE MODE COLOR TEMP NR MEMORY 1 NR 2 R G SEL ADJ RETURN EXIT Information m Setting the color temperature 1 High bluer 2 Middle Standard 3 Low redder m Restoring the factory default settings Select RESET under the function menu Note that this also restores other settings to the factory def...

Страница 40: ... the 3 D1 ON button The WHITE BALANCE screen appears 5 Use the and buttons to select RED GAIN WHITE BALANCE GAIN RED GREEN BLUE BIAS RED GREEN BLUE SEL ADJ RETURN EXIT R GAIN 6 Adjusts the white balance using the and buttons WHITE BALANCE GAIN RED GREEN BLUE BIAS RED GREEN BLUE SEL ADJ RETURN EXIT Information m Adjusting the white balance RGB GAIN White balance adjustment for signal level RGB BIAS...

Страница 41: ...utton is pressed within 5 sec onds the current selection is set and the previous screen reappears 5 Once the setting is completed Press the OK button to return to the main menu To delete the main menu press the OK button once more Information m NR NR stands for Noise Reduction This function reduces noise in the picture m Types of noise reduction There are three types of noise reduction Each has a ...

Страница 42: ...n menu press the OK button once more Note If CAN NOT ADJUST appears Set AUDIO INPUT on the OPTION menu correctly Information m Sound settings menu BASS Changes the level of low frequency sound TREBLE Changes the level of high frequency sound BALANCE Changes the balance of the left and right channels m Restoring the factory default settings Select RESET under the function menu Note that this also r...

Страница 43: ... 3 5 Press the 3 D1 ON button The vertical position of the computer s image has now been adjusted 4 Adjust using the and buttons S C R E E N MODE V POSITION H POSITION V HEIGHT H WIDTH AUTO PICTURE FULL ON SEL ADJ RETURN EXIT 2 To adjust the normal mode Use the and buttons to select NORMAL The mode switches as follows when the and but tons are pressed NORMAL FULL V POSITION SCREEN MODE V POSITION ...

Страница 44: ...isplay When using the monitor for presentations etc the moni tor can be set so that the input source screen mode etc do not appear Example Turning the on screen display mode off Press the 3 D1 ON button on the remote controller to display the MAIN MENU on the screen then 1 Use the and buttons to select FUNCTION then press the 3 D1 ON button The FUNCTION screen appears 2 Use the and buttons to sele...

Страница 45: ... OSM OSM ADJ POWER MGT GRAY LEVEL PLE CINEMA MODE RESET ON 1 OFF 3 AUTO AUTO SEL ADJ RETURN EXIT FUNCTION F U N C T I O N OSM OSM ADJ POWER MGT GRAY LEVEL PLE INVERSE CINEMA MODE RESET ON 2 OFF 3 AUTO AUTO SEL ADJ RETURN EXIT 4 Once all adjustments are completed Press the OK button to return to the main menu To delete the main menu press the OK button once more Information m Adjusting the position...

Страница 46: ...ttings Select RESET under the function menu Note that this also restores other settings to the factory defaults 3 To turn the power management function on Use the and buttons to select ON The mode switches as follows each time the or button is pressed ON OFF FU NC TI ON OSM OSM ADJ POWER MGT GRAY LEVEL PLE INVERSE CINEMA MODE RESET ON 1 ON 3 AUTO AUTO SEL ADJ RETURN EXIT 4 Once the setting is comp...

Страница 47: ...tandby mode Operate the keyboard or mouse The pic ture reappears but more time is required than from the standby mode or suspend mode Horizontal and vertical synchronizing sig nals are present from the computer No horizontal synchronizing signals are sent from the computer No vertical synchronizing signals are sent from the computer No horizontal or vertical synchronizing signals are sent from the...

Страница 48: ...OWER MGT GRAY LEVEL PLE INVERSE CINEMA MODE RESET ON 1 OFF 9 AUTO AUTO SEL ADJ RETURN EXIT Setting the brightness level to the minimum Locking this mode allows you to dim the picture Example Setting the PLE INVERSE to LOCK Press the 3 D1 ON button on the remote controller to display the MAIN MENU on the screen then 1 Use the and buttons to select FUNCTION then press the 3 D1 ON button The FUNCTION...

Страница 49: ...ts F U N C T I O N OSM OSM ADJ POWER MGT GRAY LEVEL PLE INVERSE CINEMA MODE RESET ON 1 OFF 3 AUTO AUTO SEL ADJ RETURN EXIT FUNCTION OSM OSM ADJ POWER MGT GRAY LEVEL PLE INVERSE CINEMA MODE RESET ON 1 OFF 3 AUTO ON SEL ADJ RETURN EXIT Resetting to the default values Use these operations to restore all the picture adjustments audio settings to the factory default values Refer to page 17 for items to...

Страница 50: ... VIDEO1 HD DVD1 COMP RGB 1080B 1 SEL ADJ RETURN EXIT Setting the allocation of the audio connectors Setting the AUDIO 1 2 and 3 connectors to the desired input Example Set AUDIO 1 to RGB 2 Press the 3 D1 ON button on the remote controller to display the MAIN MENU on the screen then 1 Use the and buttons to select OPTION then press the 3 D1 ON button The OPTION screen appears 2 Use the and buttons ...

Страница 51: ...nal with a horizontal frequency of 31 72 KHz is in put the image may be compressed hori zontally To prevent this set RGB SELECT to WIDE DTV Set this model when watching digital broad casting 480P m Restoring the factory default settings Select RESET under the function menu Note that this also restores other settings to the factory defaults 3 To set the RGB select mode to VIDEO Use the and buttons ...

Страница 52: ...Adjusting the display position in the RGB3 input mode If the image is not stable when in the RGB3 input mode switch the RGB3 ADJ number to 2 or 3 Example Setting the 1 mode to 2 Press the 3 D1 ON button on the remote controller to display the MAIN MENU on the screen then 1 Use the and buttons to select OPTION then press the 3 D1 ON button The OPTION screen appears 2 Use the and buttons to select R...

Страница 53: ...ton The display language is switched to Deutsch 5 Once the setting is completed Press the OK button to return to the main menu To delete the main menu press the OK button once more LANGUAGE LANGUAGE DEUTSCH ADJ RETURN EXIT OK PROCEED Information Menu Checking the frequencies and polarities of input signals Use this function to check the frequencies and polarities of the signals currently being inp...

Страница 54: ...mation m Video signal formats Different countries use different formats for video sig nals Set to the format used in your current country AUTO1 2 The video signals are automatically de tected and the format is set accordingly AUTO1 3 58NTSC 4 43NTSC PAL SECAM PAL60 AUTO2 PAL M PAL N 3 58NTSC PAL B G This is the standard format used mainly in the United Kingdom and Germany SECAM This is the standar...

Страница 55: ...ade as described below 2 Connector on the external equipment side Serial port RS 232C connector See the specifications of the equipment that is to be connected for the type of connector and the pin assignment 3 Wiring Use a crossed reverse cable Wire the cable so that each pair of data lines cross between the two devices These data line pairs are RXD Receive data and TXD Transmit data DTR DTE side...

Страница 56: ...D 1 and 2 Command 2 Data Length and Data Check Sum Example DFH 80H 60H 47H 01H 01H 08H Command 1 Unit ID 1 Unit ID 2 Command 2 Data Length Data Check Sum Total 208H 2 Error Processing When the communication interval is vacant for more than 4 ms thereafter a received Command 1 will be recognized If at this time meaningful data cannot be recognized that data will not be recognized as valid data An A...

Страница 57: ...ain Flag 05H DATA01 VOLUME Gain Flag 01H DATA02 VOLUME Gain 00H Step 0 0AH Step 10 Default 2AH Step 42 ACK 7FH 60H 80H 7FH 02H DATA00 DATA01 CKS DATA00 USER SOUND Gain Flag 05H DATA01 VOLUME Gain Flag 01H 05 SCREEN MODE Select Function The external control equipment switches the screen mode of the plasma monitor Transmission Data DFH 80H 60H 51H 01H DATA00 CKS DATA00 02H STADIUM 03H ZOOM 04H NORMA...

Страница 58: ...y On 02H Screen display Off ACK 7FH 60H 80H 58H 01H DATA00 CKS DATA00 01H Screen display On 02H Screen display Off Screen display On Off is equivalent to the screen display On Off function of the convenient function settings Operation is as described in the table below 09 COLOR Gain Data Function The external control equipment changes the COLOR gain data of the plasma monitor Transmission Data DFH...

Страница 59: ...ICTURE Gain Flag 01H DATA01 BRIGHT Gain Flag 08H DATA02 BRIGHT Gain E0H 32 FFH 01 00H 0 01H 01 20H 32 ACK 7FH 60H 80H 7FH 02H DATA00 DATA01 CKS DATA00 USER PICTURE Gain Flag 01H DATA01 BRIGHT Gain Flag 08H 14 Input MODE Request Function The display returns the current input information by the external control equipment s request Transmission Data 1FH 80H 60H 41H 00H CKS ACK 7FH 60H 80H 41H 01H DAT...

Страница 60: ...80H 60H 7FH 04H DATA00 to DATA03 CKS DATA00 USER PICTURE Gain Flag 01H DATA01 GREEN Gain Flag 02H DATA02 GREEN Gain 1 Bias D8H 40 FFH 1 00H 0 28H 40 DATA03 GREEN Gain2 Drive D8H 40 FFH 1 00H 0 28H 40 ACK 7FH 60H 80H 7FH 02H DATA00 DATA01 CKS DATA00 USER PICTURE Gain Flag 01H DATA01 GREEN Gain Flag 02H 19 BLUE Gain Data Function The external control equipment changes the BLUE Gain Data of the plasm...

Страница 61: ... DATA02 BLUE Gain Bias D8H 40 FFH 1 00H 0 28H 40 DATA03 COLOR Gain EAH 22 FFH 01 00H 0 01H 01 16H 22 DATA04 TINT Gain EAH 22 FFH 01 00H 0 01H 01 16H 22 DATA05 SHARPNESS Gain F0H 16 FFH 01 00H 0 01H 01 10H 16 DATA06 CONTRAST Gain 00H 0 34H 52 DATA07 BRIGHT Gain E0H 32 FFH 01 00H 0 01H 01 20H 32 DATA08 RED Gain Drive D8H 40 FFH 1 00H 0 28H 40 DATA09 GREEN Gain Drive D8H 40 FFH 1 00H 0 28H 40 DATA0A ...

Страница 62: ...ing ACK 7FH 60H 80H 6FH 03H DATA00 DATA01 DATA02 CKS DATA00 AUDIO 1 DATA01 AUDIO 2 DATA02 AUDIO 3 VISUAL INPUT DATA 01H Video 1 02H Video 2 03H Video 3 05H HD HD1 or DTV or DTV 1 06H HD2 DTV2 07H RGB 1 PC 1 08H RGB 2 PC 2 0CH RGB 3 PC 3 23 PLE_INVERSE Set Function The external control equipment sets the PLE and INVERSE inverse of image brightness of the plasma monitor Transmission Data DFH 80H 60H...

Страница 63: ...he center 2 Only when using a graphic accelerator board that is capable of displaying 8482480 3 Aspect ratio is 5 4 This signal is converted to a 600 dots2480 lines signal NOTE With digital inputs some signals are not accepted The sync may be disturbed when non standard signals other than the aforementioned are input When connecting a composite sync signal use the HD terminal IBM PC AT and VGA are...

Страница 64: ...inside the main unit has become too high and has activated the protector Troubleshooting If the picture quality is poor or there is some other problem check the adjustments operations etc before requesting service Leave some space between the display and the connected components Replace both batteries with new ones Plug the monitor s power cord into a power outlet Press the power button on the mon...

Страница 65: ... 225 5 H 23 5 D inch 1048 W 2648 H 289 D mm 70 6 lbs 32 kg 0 C to 40 C 32 F to 104 F 20 to 80 0 to 1900m 0 to 6230ft 10 C to 50 C 14 F to 122 F 10 to 90 0 to 3000m 0 to 9840ft Power on off Input source select Volume up down OSM control Power on off Input source selct OSM control Volume up down Cursor UP DOWN LEFT RIGHT Pointer Zoom up down Off timer Wireless Wired remote control Picture Contrast B...

Страница 66: ...which is attributed to acts of God 10 Incidental or consequential damages resulting from the product Some states do not allow the exclusion of incidental or consequential damages so the above ex clusion may not apply to you This warranty gives you specific legal rights and you may also have other rights that vary from state to state 11 Commercial or institutional use 12 Any other cause which does ...

Страница 67: ...61 00 09 MIT 314W851210 Printed in Japan is a registered trademark PD4292D 2 00 10 4 3 11 PM 61 ...

Отзывы: