2
Connecting Up
11
English
Home theater video connections
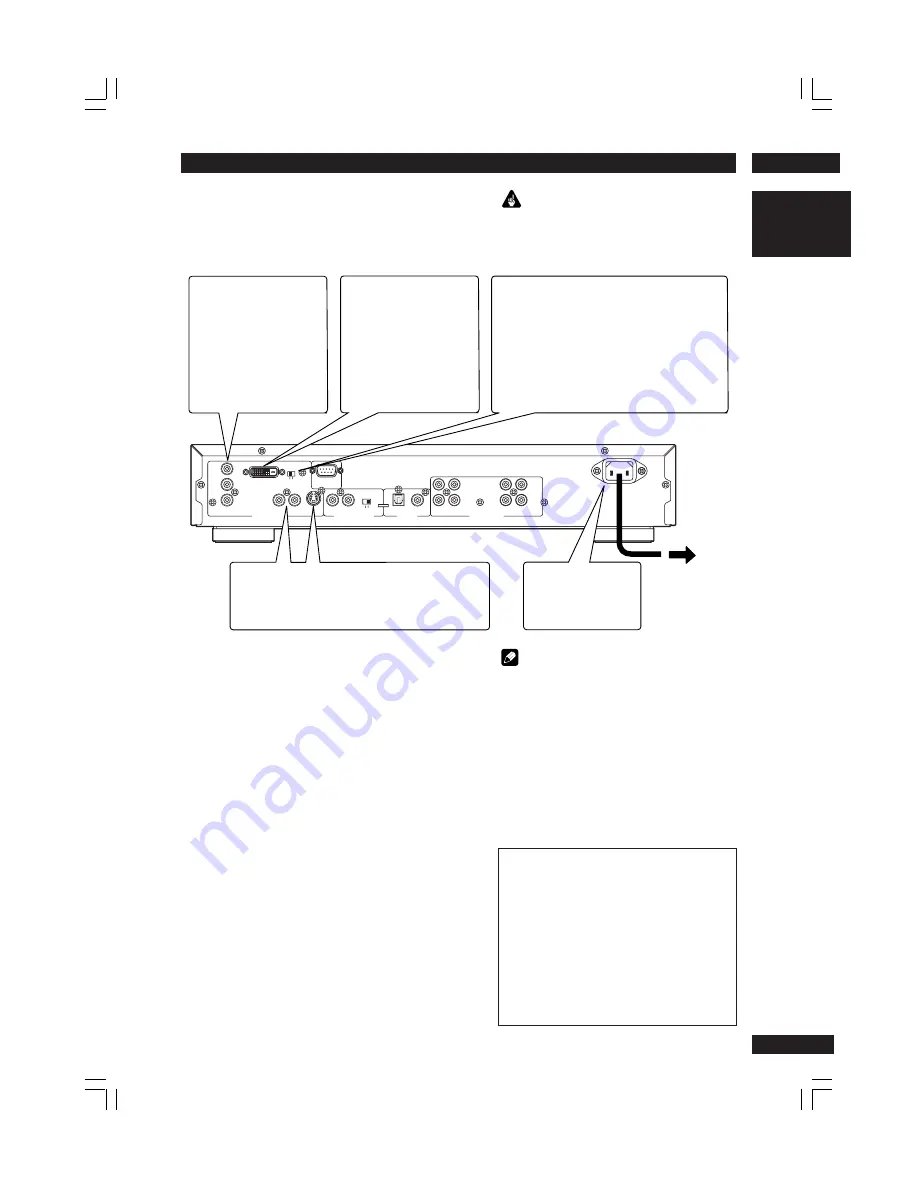
This player outputs video in a number of different
ways. Choose the one most suitable for your
system using the guide below.
Connecting S-Video cables
S-Video cables will only plug in one way, so make
sure the plug is correctly lined up with the jack
before inserting. Be sure to fully insert for a good
connection.
S-Video or composite video?
S-Video should give a better picture, so if you
have an S-Video input, use it. S-Video cables are
available from any good audio/visual dealer.
DVI output format (for NTSC replay)
System
: 480/60p
Resolution
: 720 x 480
Vertical frequency
: 60 Hz
Horizontal frequency : 31.5 kHz
P : Indicates Progressive (progressive scan)
NTSC : A broadcast format using primarily in
Japan, the U.S., Canada, Taiwan and
Korea.
Important
Before making or changing any rear panel connections,
make sure that all components are switched off and
unplugged from the wall outlet.
(HDCP)
DVI V.LEVEL
DVI-D OUT
RS232C
NORMAL
EXPAND
REMOTE CONTROL
OUTPUT
DIGITAL
VIDEO OUTPUT
R
1
AUDIO OUTPUT
OUT
COMPONENT
R
IN
Y
L
INTERNAL
1
CENTER
2
S1/S2
2
SUB W.
FRONT
L
EXTERNAL
B
B
C /P
SURR.
COAXIAL
VIDEO
OPTICAL
C /P
R
R
1
2
3
If your TV has a component
video input, we recommend
using it to connect directly to
the
COMPONENT VIDEO
OUT
of this player. Use the
standard 3-jack component
video ouput.
If a component input is not available to you, connect this
player to your TV or AV receiver using either the
VIDEO
or
S-
VIDEO
jacks.
Plug into a standard AC
wall outlet.
If your TV and projector have a
DVI-D terminal for Video Input,
we recommend using it to
connect directly to the DVI-D
out of this player.
Note
• The DVI output of this unit is HDCP compatible.
When watching DVI output images with this unit,
it is necessary to use a TV or display with HDCP
compatible DVI input.
• There may be no Image output if connected to a
TV or display that is not compatible with the
above format.
• Refer to the instruction manual of the TV or
display to be connected to this unit for detailed
information regarding the DVI-D terminal.
DVI V.LEVEL Switch
When connecting the DVI unit, black may rise to the
surface depending on the display. If that happens,
set the switch to Expand.
The DVI V.LEVEL switch switches between the
following output image data ranges
Normal: 16 (black) – 235 (white)
Expand: 0 (black) – 246 (white)
Notification
Concerning HDCP compatible DVI-D
output
This product is equipped with an HDCP
compatible DVI-D output terminal, but its
output format is not formally authorized at
this time for copyright protection reasons.
Therefore, when it is shipped, this output is
not possible. When the format has been
formally authorized, an upgrade will provide
compatibility necessary to perform this
output.


