


Warning: Do not change the
direction of rotation until the chuck
has completely stopped.
!
!
WARRANTY
ENVIRONMENT
SPECIFICATIONS
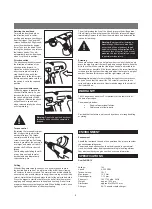
Rotating the dual head
To rotate the dual head place
the direction knob in center
position and remove your fi ngers
from the trigger. Then grip the 2
release knobs with 2 fi ngers and
press them backwards approx.
6mm. Then turn the head. When
turning the head you can release
the release knobs. They will
automatically lock the dual head
when it is placed in position.
Direction switch
The direction switch determines
the direction of rotation of the
chuck pointing forward, i.e.
clockwise or anti clockwise. To
alter the direction of rotation
stop the drill, then, push the
selection lever to the left or right.
Before operation make sure that
the switch is set in the required
position
Trigger with variable speed
When the trigger is pressed the
chuck will rotate slowly. As you
increase the force on the trigger
the chuck will go faster. When
the trigger is released the chuck
will decrease in speed, and
when released totally the chuck
will stop rotating.
Warning:
Do not change the direction of
rotation until the chuck has completely
stopped.
Torque control
By turning the torque adjustment
dial, it is possible to adjust the
amount of torque. The torque
control prevents that e.g. small
screws is over tighten. Fastening
torque is greater as the numerals
are larger, and when set to drill
position the Drill Driver has full
torque.
Overloading and stalling the drill
at any time can lead to motor
burnout and also dramatically
reduce battery live
Drilling
When drilling hard smooth surfaces, use a center punch to mark
the desired hole location. This will prevent the drill bit from slipping
off center as the hole is started. The material to be drilled should be
secured in a vise or with clamps to keep it from turning as the drill bit
rotates. Hold the tool fi rmly and place the bit at the point to be drilled.
Press the trigger to start the tool. Move the drill bit into the material
applying only enough pressure to keep the bit cutting. .Do not force
or apply side pressure to elongate a hole. When drilling metals, use a
light oil on the drill bit to keep it from overheating.
The oil will prolong the live of the bit and improve the drilling action.
If the bit jams in the work piece or the drill stalls, release the trigger
immediately. Remove the bit from the work piece and determine the
reason for jamming.
Warning:
Be prepared for jamming or
breakthrough. When these situations
occur, the drill has a tendency to grab
and kick in the opposite direction, and
can cause loss of control. If you are not
prepared, this loos of control can result
in possible serious injury.
Screwing
When mounting a screw in a hole place the screw over the hole and
press the trigger to start the tool. Apply only enough force to keep the
bit in the screw. Make sure that the torque control is adjusted to as
low a number as possible. If the torque prevents the screw from being
screwed into the right position, stop and adjust the torque to a higher
number. Continue this process until the right torque is found.
Warning:
Do not apply force in the beginning of the screw process,
as it can cause that the screw tilts. The screw bit can then cause
seriously injure to the user or at least make damage to the material
that is worked on.
The 30 day money back less P+H warranty for this tool starts at
the date of purchase.
The warranty includes:
•
Repair of operational failures
•
Replacement of faulty parts
Provided that the failure is not caused by misuse or wrong handling
or storing.
Environment
Should the tool reach the end of its operational live, please consider
the environmental hazards.
Power tools and batteries should not be disposed in your normal
trash, but should rather be disposed according to local regulations.
Your waste authority can give you the necessary information.
DualDrill DD18
Voltage:
18V
Speed:
0-550 RPM
Torque Setting:
19+1
Max torque:
13.5 Nm
Chuck capacity:
1-10 mm.
Power cell: 18V 1700mAh NiCd
Weight: approx. 1950 grs.
Dimensions:
approx. 83x250x320 mm.
Charger: 60-70 minutes
rapid charger
4
Содержание Dual-Drill 19731
Страница 1: ...Made in China ITEM NO 19731...


