Malyan M200 V2 Скачать руководство пользователя страница 8


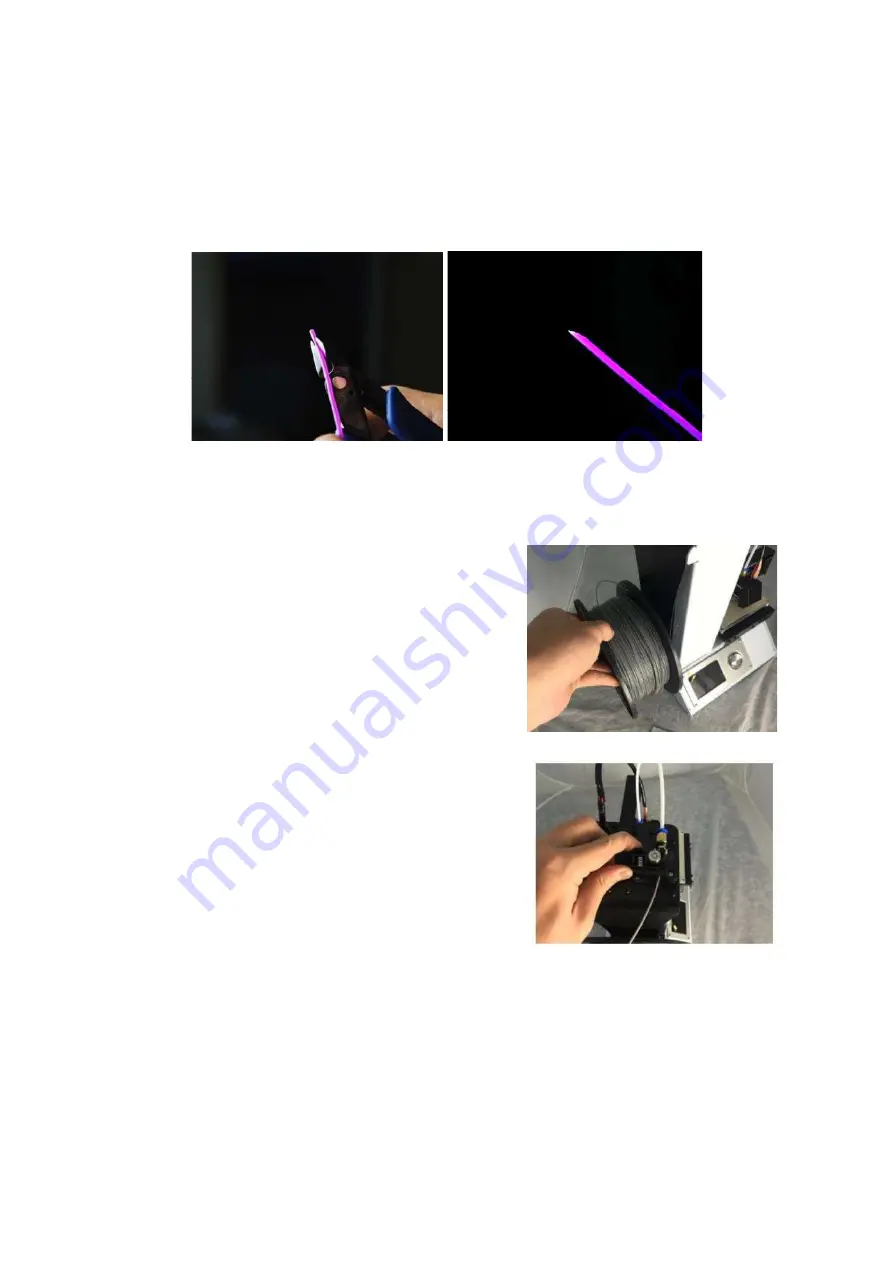
10. While the printer is heating, open your filament. Using a pair of scissors or side 

cutters, diagonally snip the end of the filament to make a point, as shown in the 

images below. 

11. Using the control wheel, navigate to the 

Move

 menu, then select the 

Z Axis 

option and press the wheel. Turn the control wheel counterclockwise to raise the 

extruder off the build platform. 

12. Place the filament reel on the filament rack on the 

left side of the printer.  

13. While squeezing the lever on the feed mechanism, 

insert the filament and push it into the opening. 

Keep pushing until you feel resistance as it hits the 

extruder, then release the lever. 

14. Using the control wheel, highlight the 

Extruder


entry on the 

Move

 menu. Press the control wheel, 

then turn it counterclockwise to feed filament into 

the extruder. Continue until filament starts to 

extrude out of the nozzle. Wait until filament is no 

longer coming out of the nozzle. 

Содержание M200 V2

Страница 1: ...M200 V2 3D Printer User s Manual...

Страница 2: ...2 CONTENTS Welcome 3 SAFETY WARNINGS ANDGUIDELINES 3 FEATURES 4 PACKAGE CONTENTS 5 PRODUCT OVERVIEW 6 SETUP 7 SOFTWARE INSTALLATION ANDSETUP 10 SPECIFICATIONS 18 REGULATORY COMPLIANCE 19...

Страница 3: ...nect the USB cable when printing from a computer Do not pull or twist the black cable at any time Do not force or tear anything when during unpacking and setup This may cause damage to the printer and...

Страница 4: ...he unit into a power outlet ensure that the outlet provides the same type and level of power required by the device Unplug this device from the power source when not in use Take care to prevent damage...

Страница 5: ...ckage contents to ensure you have all the items listed below If anything is missing or damaged please contact us for a replacement 1x 3Dprinter 1xFilament Rack 1xPlastic Scraper 1x USB Cable 1x Memory...

Страница 6: ...6 PRODUCT OVERVIEW 1 Feed Mechanism 2 Filament Rack 3 Extruder 4 LCD Screen 5 USB port and memory card slot 6 Input Power Jack and Power Switch...

Страница 7: ...y AC power outlet 4 Insert the included memory card into the slot on the right side of the printer 5 Turn the printer on by depressing the I side of the power switch on the rear panel 6 Once the print...

Страница 8: ...ld platform 12 Place the filament reel on the filament rack on the left side of theprinter 13 While squeezing the lever on the feed mechanism insert the filament and push it into the opening Keep push...

Страница 9: ...first layer with the images in the table below to determine whether the build platform needs to be leveled or not If it does need adjustment turn off the printer and re adjust the platform height as...

Страница 10: ...like to createtheirownmodel usingan opensource program suchasCura or Repetier Host which are pre installed on the memory card that comes with the printer Installing Cura 1 Use a card reader to read th...

Страница 11: ...11 3 Ensure that all boxes are checked and then click Install button to continue...

Страница 12: ...ck the Next button to complete the installation 12 les have been extracted and the Cura installation is complete the driver installation wizard will launch Click Next button to continue Then to comple...

Страница 13: ...button to launch the program 7 Select your language and click the 13 Ensure that the box next to the Start Cura 15 04 6 is checked and then launch the program elect your language and click the Next b...

Страница 14: ...s below then button to continue 14 option and then click the Next button to continue option then click the Next button to continue Change the settings to match those shown in the images below then but...

Страница 15: ...one end into the USB port on the printer then plug the other end into an available USB port on your computer Watch the right hand corner of the screen A bubble will appear in the lower right corner of...

Страница 16: ...16 Repetier Host The screenshots below show the proper Repetier Host settings to use for this printer in Repetier Host...

Страница 17: ...17...

Страница 18: ...ea 4 7 x 4 7 x 4 7 120 x 120 x 120 mm Supported Materials ABS PLA PETG wood copper fill steel fill bronze fill and othermaterials Filament Diameter 1 75mm Maximum Print Speed 75mm sec Layer Thickness...

Страница 19: ...rsuant to Part 15 of the FCC Rules These limits are designed to provide reasonable protection against harmful interference in a residential installation This equipment generates uses and can radiate r...

Страница 20: ......

Отзывы: