


16 ENGLISH
Introduction of separately sold items
CAUTION:
These accessories or attachments
are recommended for use with your Makita tool
specified in this manual.
The use of any other
accessories or attachments might present a risk of
injury to persons. Only use accessory or attachment
for its stated purpose.
For details of separately sold items, refer to the catalog
or contact the dealer or our sales office.
•
Multifunction adapter
•
Dust bag
•
Makita genuine battery and charger
NOTE:
Some items in the list may be included in the
tool package as standard accessories. They may
differ from country to country.
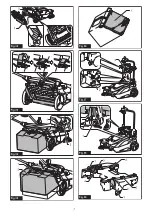
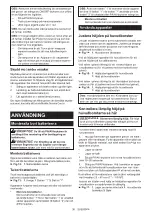
PREPARATIONS
FOR USE
Assembly
CAUTION:
Before operating the appliance,
make sure the ON/OFF switch is turned off and
the batteries have been removed.
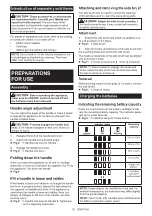
Handle angle adjustment
You can adjust the angle of the handle to make it easier
to operate the appliance. At the factory shipment, the
handle is folded down.
CAUTION:
Properly engage the handle lock
lever.
If the handle collapses or falls over, there is a
danger of injury.
1.
Release the lock of the handle lock lever.
2.
Adjust the handle to the desired angle.
►
Fig.2:
1.
Handle lock lever
2.
Handle
3.
Engage the handle lock lever.
►
Fig.3:
1.
Handle lock lever
Folding down the handle
When you stand the appliance on its end for storage/
inspection or when you transport the appliance by lifting
the appliance, fold down the handle.
►
Fig.4
If the handle is loose and rattles
If the handle is loose and rattles even though the handle
lock lever is properly locked, adjust it by tightening the
nut opposite the handle lock lever. If the appliance is
used when the handle is loose and rattles, there is a
danger of collapse or fall over of the handle, possibly
causing injury.
►
Fig.5:
1.
Handle lock lever
2.
Handle
3.
Tightening
nut (for adjusting looseness)
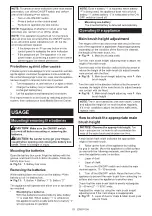
Attaching and removing the side brush
The side brush can be used to extend the cleaning
width and also used to clean the areas along walls.
CAUTION:
Attach the side brush correctly.
If
the brush comes loose, it may contact with persons,
possibly causing injury.
Attachment
1.
Extend the side brush and stand the appliance on
its end as shown in the figure.
►
Fig.6:
1.
Side brush
2.
Align the hooks (2 locations) of the side brush with
the mounting holes and attach the side brush.
The hooks (2 locations) of the side brush can be aligned
with any of the 6 holes.
►
Fig.7:
1.
Hooks (2 locations)
2.
Holes (6 locations)
NOTE:
To make it easier to engage the hooks and
holes, rotate the side brush counterclockwise while
the side brush lever is lowered.
Removal
While pinching inward on the grips of the hooks, remove
the side brush.
►
Fig.8:
1.
Grips of hooks
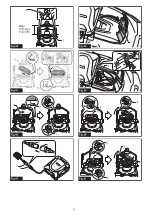
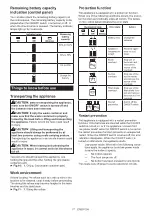
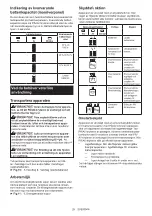
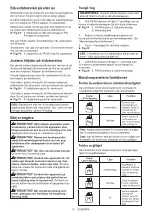
Charging the batteries
Indicating the remaining battery capacity
Press the check button on the battery cartridge to indi-
cate the remaining battery capacity. The indicator lamps
light up for a few seconds.
►
Fig.9:
1.
Indicator lamps
2.
Check button
Indicator lamps
Remaining
capacity
Lighted
Off
Blinking
75% to 100%
50% to 75%
25% to 50%
0% to 25%
Charge the
battery.
The battery
may have
malfunctioned.
NOTE:
Depending on the conditions of use and the
ambient temperature, the indication may differ slightly
from the actual capacity.
NOTE:
The first (far left) indicator lamp will blink when
the battery protection system works.
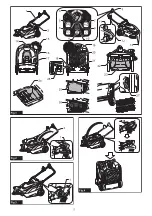
Содержание VS001G
Страница 3: ...3 1 2 3 Fig 5 1 Fig 6 1 2 Fig 7 1 Fig 8 1 2 Fig 9 1 2 Fig 10...
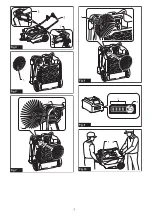
Страница 4: ...4 1 Fig 11 1 Fig 12 2 3 1 Fig 13 1 Fig 14 1 2 Fig 15 1 2 Fig 16...
Страница 5: ...5 1 3 2 Fig 17 1 2 3 Fig 18 2 1 Fig 19 1 Fig 20 1 Fig 21 1 2 3 Fig 22 Fig 23...
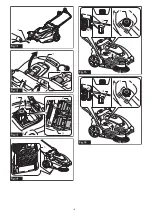
Страница 6: ...6 1 2 Fig 24 1 1 Fig 25 1 Fig 26 1 Fig 27 1 2 Fig 28 1 2 Fig 29 1 2 Fig 30 1 2 Fig 31...
Страница 7: ...7 1 3 2 Fig 32 Fig 33 2 1 Fig 34 1 2 Fig 35 1 Fig 36 1 2 3 Fig 37 1 Fig 38 2 2 1 1 3 4 4 Fig 39...
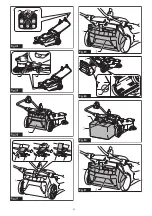
Страница 9: ...9 1 2 Fig 48 1 2 Fig 49 Fig 50 Fig 51 Fig 52 1 1 A B Fig 53 Fig 54 Fig 55...
Страница 10: ...10 1 2 3 2 3 Fig 56 1 Fig 57 Fig 58 Fig 59 Fig 60 1 2 Fig 61 1 2 Fig 62...
Страница 11: ...11 1 2 Fig 63 1 2 3 4 Fig 64 1 2 3 4 Fig 65 1 2 3 Fig 66 1 2 Fig 67...
Страница 110: ...110 VS001G 15 6 1 1 920 2 2 600 2 480 650 36 40 830 x 677 x 1 146 830 x 677 x 467 44 0 1 BL4025 29 9 IPX4 1 4...
Страница 112: ...112 7 8 9 10 11 12 13 14 15 16 17 18 19 20 21 22 23 24 25 26 1 2 3 4 5 6 130 C 7...
Страница 115: ...115 Makita Makita 1 2 2 1 2 3 3 1 4 5 1 2 3 1 6 1 2 2 2 6 7 1 2 2 6 8 1...
Страница 116: ...116 9 1 2 75 100 50 75 25 50 0 25 3 50 100 20 50 0 20 10 1 2 11 1...
Страница 117: ...117 1 2 3 Makita 12 1 13 1 2 1 3 2 1 1 2 1 2 1 2...
Страница 118: ...118 14 1 15 1 2 16 1 2 1 2 15 30 3 25 40 1 1 9 16 17 1 2 3 18 1 2 3 19 1 2 20 1 21 1...
Страница 119: ...119 1 I 22 1 2 3 2 3 23 4 O 24 1 2...
Страница 120: ...120 15 25 1 30 26 1 1 2 27 1 3 28 1 2 1 29 1 2 2 30 1 2 1 31 1 2 2 32 1 2 3 3 33 4 34 1 2...
Страница 123: ...123 52 1 2 53 1 3 4 5 54 6 55 7 56 1 2 3 8 57 1 9 58 7 10 59 1 2 60 3 1 2 61 1 2...
Страница 124: ...124 3 HEPA HEPA 62 1 HEPA 2 4 HEPA 63 1 2 HEPA 5 HEPA 64 1 HEPA 2 3 4 6 65 1 2 3 4 1 2 66 1 2 3 3 4 1 2 67 1 2 3 Makita...
Страница 125: ...125...
Страница 126: ...126...
Страница 127: ...127...


