background image

8

ASSEMBLY

 CAUTION:

• Always be sure that the tool is switched off and 

unplugged before carrying out any work on the tool.

Installing or removing depressed center 
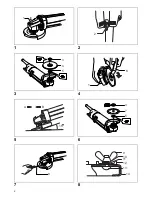
wheel (Fig. 3)

Screw the inner flange onto the spindle. Fit the wheel on 
the inner flange and screw the lock nut onto the spindle.
To tighten the lock nut, press the shaft lock firmly so that 
the spindle cannot revolve, then use the lock nut wrench 
and securely tighten clockwise. 

(Fig. 4)

To remove the wheel, follow the installation procedure in 
reverse.

 WARNING:

Only actuate the shaft lock when the spindle is not 
moving.

OPERATION

 WARNING:

• It should never be necessary to force the tool. The 

weight of the tool applies adequate pressure. Forcing 
and excessive pressure could cause dangerous wheel 
breakage.

• Continued use of a worn-out wheel may result in wheel 

explosion and serious personal injury. Depressed 
center wheel should not be used after it has been worn 
down to 75 mm in diameter. Use of the wheel after this 
point is unsafe and it should be removed from service 
and rendered unusable by intentional destruction. 

(Fig. 5)

ALWAYS hold the tool firmly with one hand on rear handle 
and the other on the side handle. Turn the tool on and 
then apply the wheel or disc to the workpiece. In general, 
keep the edge of the wheel or disc at an angle of about 
15 degrees to the workpiece surface. During the break-in 
period with a new wheel, do not work the grinder in the B 
direction or it will cut into the workpiece. Once the edge of 
the wheel has been rounded off by use, the wheel may be 
worked in both A and B direction.

Installing or removing diamond wheel 
(optional accessory)

 CAUTION:

• Make sure that the arrow on the tool should point in the 

same direction as the arrow on the diamond wheel. 

(Fig. 6)

Screw the inner flange onto the spindle. Fit the diamond 
wheel on over the inner flange and screw the lock nut onto 
the spindle. Notice that flat side of the lock nut should face 
the diamond wheel in case the diamond wheel is used.

 WARNING:

Only actuate the shaft lock when the spindle is not 
moving.

Base (optional accessory)

When you wish to use a diamond wheel, install the base 
on the tool. Loosen the screw on the wheel cover with a 
screwdriver. Move the wheel cover to a convenient 
position and secure it by tightening the screw. 

(Fig. 7)

Install the base on the wheel cover using the hole in the 
wheel cover. 

(Fig. 8)

Secure the base in place by tightening the wing nut. 

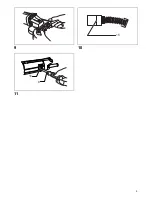
(Fig. 9)

MAINTENANCE

 CAUTION:

• Always be sure that the tool is switched off and 

unplugged before attempting to perform inspection or 
maintenance.

• Never use gasoline, benzine, thinner, alcohol or the 

like. Discoloration, deformation or cracks may result.

Replacing carbon brushes


(Fig. 10) 

Remove and check the carbon brushes regularly. Replace 
when they wear down to the limit mark. Keep the carbon 
brushes clean and free to slip in the holders. Both carbon 
brushes should be replaced at the same time. Use only 
identical carbon brushes.
Use a screwdriver to remove the brush holder caps. Take 
out the worn carbon brushes, insert the new ones and 
secure the brush holder caps. 

(Fig. 11)

To maintain product SAFETY and RELIABILITY, repairs, 
any other maintenance or adjustment should be 
performed by Makita Authorized Service Centers, always 
using Makita replacement parts.

OPTIONAL ACCESSORIES

CAUTION:

• These accessories or attachments are recommended 

for use with your Makita tool specified in this manual. 
The use of any other accessories or attachments might 
present a risk of injury to persons. Only use accessory 
or attachment for its stated purpose.

If you need any assistance for more details regarding 
these accessories, ask your local Makita Service Center.
• Wheel guard (Wheel cover)
• Inner flange
• Depressed center wheels
• Lock nut (For depressed center wheel)
• Rubber pad
• Abrasive discs
• Lock nut (For abrasive disc)
• Lock nut wrench
• Wire cup brush
• Wire bevel brush 85
• Side grip
• Diamond wheel

NOTE:

• Some items in the list may be included in the tool 

package as standard accessories. They may differ 
from country to country.

Содержание N9500N

Страница 1: ...GB Angle Grinder Instruction manual ID Gerinda Sudut Petunjuk penggunaan VI Maùy maøi goùc Taøi lieäu höôùng daãn TH เครื องเจียไฟฟ า คู มือการใช งาน N9500N ...

Страница 2: ...2 1 2 3 4 5 6 7 8 1 2 3 4 5 6 1 A B 15 3 7 5 8 9 10 11 12 13 14 ...

Страница 3: ...3 9 10 11 15 16 8 ...

Страница 4: ...e atmospheres such as in the presence of flammable liquids gases or dust Power tools create sparks which may ignite the dust or fumes 3 Keep children and bystanders away while operating a power tool Distractions can cause you to lose control Electrical safety 4 Power tool plugs must match the outlet Never modify the plug in any way Do not use any adapter plugs with earthed grounded power tools Unm...

Страница 5: ...l s operation If damaged have the power tool repaired before use Many accidents are caused by poorly maintained power tools 23 Keep cutting tools sharp and clean Properly maintained cutting tools with sharp cutting edges are less likely to bind and are easier to control 24 Use the power tool accessories and tool bits etc in accordance with these instructions taking into account the working conditi...

Страница 6: ...ces Always use auxiliary handle if provided for maximum control over kickback or torque reaction during start up The operator can control torque reactions or kickback forces if proper precautions are taken b Never place your hand near the rotating accessory Accessory may kickback over your hand c Do not position your body in the area where power tool will move if kickback occurs Kickback will prop...

Страница 7: ...or flying sparks Hold the tool so that sparks fly away from you and other persons or flammable materials 23 Do not leave the tool running Operate the tool only when hand held 24 Do not touch the workpiece immediately after operation it may be extremely hot and could burn your skin 25 Always be sure that the tool is switched off and unplugged or that the battery cartridge is removed before carrying...

Страница 8: ...he lock nut should face the diamond wheel in case the diamond wheel is used WARNING Only actuate the shaft lock when the spindle is not moving Base optional accessory When you wish to use a diamond wheel install the base on the tool Loosen the screw on the wheel cover with a screwdriver Move the wheel cover to a convenient position and secure it by tightening the screw Fig 7 Install the base on th...

Страница 9: ...gan sumber listrik jala jala berkabel atau baterai tanpa kabel Keselamatan tempat kerja 1 Jagalah tempat kerja selalu bersih dan berpenerangan cukup Tempat yang berantakan atau gelap mengundang kecelakaan 2 Jangan mengoperasikan mesin listrik dalam atmosfer yang mudah meledak seperti bila ada cairan gas atau debu mudah menyala Mesin listrik menimbulkan percikan api yang dapat menyalakan debu atau ...

Страница 10: ...yang tepat untuk keperluan Anda Mesin listrik yang tepat akan menuntaskan pekerjaan dengan lebih baik dan aman pada kecepatan sesuai rancangannya 19 Jangan gunakan mesin jika saklar tidak bisa menghidupkan atau mematikannya Mesin listrik yang tidak dapat dikendalikan dengan sakelarnya adalah berbahaya dan harus diperbaiki 20 Cabut steker dari sumber listrik dan atau baterai dari mesin listrik sebe...

Страница 11: ...menarik aksesori ke tubuh Anda 13 Bersihkanlah lubang udara mesin listrik ini secara teratur Kipas motor mesin ini akan menyedot masuk debu ke bagian dalamnya dan akumulasi serbuk logam yang berlebihan dapat menimbulkan bahaya kelistrikan 14 Jangan menggunakan mesin listrik di dekat bahan yang mudah menyala Bunga api dapat menyalakan bahan tersebut 15 Jangan gunakan aksesori yang membutuhkan caira...

Страница 12: ...an di bawah benda kerja di dekat garis potong dan di dekat tepi benda kerja pada kedua sisi roda f Ekstra hati hatilah saat membuat irisan kantung pada dinding yang sudah berdiri atau tempat lain yang tak terlihat bagian belakangnya Roda yang menjorok keluar dapat mengiris pipa gas atau air jaringan kawat listrik atau benda benda yang dapat menyebabkan tendangan balik Peringatan Keselamatan Khusus...

Страница 13: ... posisi mati Untuk menghidupkan alat gerakkan tuas sakelar ke posisi ON Untuk mematikan alat gerakkan tuas sakelar ke posisi OFF PERAKITAN PERHATIAN Selalu pastikan alat sudah dimatikan dan stekernya dicabut sebelum melakukan pekerjaan apa pun pada alat Memasang atau melepas roda nap cekung Gb 3 Sekrupkan flensa dalam pada spindel Pasangkan roda pada flensa dalam dan pasang mur pengunci pada spind...

Страница 14: ...ik Gunakan obeng untuk melepas tutup borstel arang Lepaskan borstel arang yang sudah aus masukkan borstel baru dan kencangkan tutup borstel Gb 11 Untuk menjaga KEAMANAN dan KEHANDALAN perbaikan perawatan lain atau penyetelan harus dilakukan oleh Pusat Servis Resmi Makita dan gunakan selalu suku cadang Makita AKSESORI TAMBAHAN PERHATIAN Aksesori atau alat tambahan ini dianjurkan untuk digunakan den...

Страница 15: ...vaän haønh duïng cuï maùy trong moâi tröôøng chaùy noå ví duï nhö moâi tröôøng coù söï hieän dieän cuûa caùc chaát loûng khí hoaëc buïi deã chaùy Caùc duïng cuï maùy taïo ra tia löûa ñieän coù theå laøm buïi hoaëc khí boác chaùy 3 Giöõ treû em vaø ngöôøi ngoaøi traùnh xa nôi laøm vieäc khi ñang vaän haønh duïng cuï maùy Söï sao laõng coù theå khieán baïn maát khaû naêng kieåm soaùt An toaøn veà ñi...

Страница 16: ... maùy naøo Nhöõng bieän phaùp an toaøn phoøng ngöøa naøy seõ giaûm nguy cô khôûi ñoäng voâ tình duïng cuï maùy 21 Caát giöõ caùc duïng cuï maùy khoâng söû duïng ngoaøi taàm vôùi cuûa treû em vaø khoâng cho baát kyø ngöôøi naøo khoâng coù hieåu bieát veä duïng cuï maùy hoaëc caùc höôùng daãn naøy vaän haønh duïng cuï maùy Duïng cuï maùy seõ raát nguy hieåm neáu ñöôïc söû duïng bôûi nhöõng ngöôøi du...

Страница 17: ...ùng ngöôïc vôùi höôùng quay cuûa phuï tuøng taïi ñieåm bò keït Ví duï neáu ñóa maøi bò vöôùng hoaëc keït vaøo phoâi caïnh cuûa ñóa maøi ñang ôû choã keït coù theå caém vaøo beà maët vaät lieäu laøm cho ñóa maøi naåy ra hoaëc vaêng ra Ñóa maøi coù theå naåy ra xa hoaëc veà phía ngöôøi vaän haønh tuyø vaøo höôùng chuyeån ñoäng cuûa ñóa maøi taïi ñieåm bò keït Ñóa maøi cuõng coù theå bò vôõ trong nhö...

Страница 18: ...aëc bieät laø beà maët laép raùp hoaëc ñai oác haõm Laøm hoûng nhöõng boä phaän naøy coù theå daãn ñeán vôõ ñóa maøi 19 Ñaûm baûo raèng ñóa maøi khoâng tieáp xuùc vôùi phoâi gia coâng tröôùc khi baát coâng taéc 20 Tröôùc khi söû duïng duïng cuï naøy treân phoâi gia coâng thöïc teá haõy ñeå duïng cuï chaïy trong ít phuùt Theo doõi söï rung hoaëc laéc coù theå cho thaáy laép raùp keùm hoaëc ñóa maøi...

Страница 19: ...ï tuøng tuyø choïn THAÄN TROÏNG Ñaûm baûo raèng muõi teân treân duïng cuï chæ cuøng moät höôùng vôùi muõi teân treân ñóa kim cöông Hình 6 Sieát chaët vaønh trong leân truïc quay Laép ñóa kim cöông leân treân vaønh trong vaø sieát ñai oác haõm vaøo truïc quay Löu yù raèng maët deït cuûa ñai oác haõm phaûi aùp vaøo ñóa kim cöông trong tröôøng hôïp söû duïng ñóa kim cöông CAÛNH BAÙO Chæ vaän haønh kh...

Страница 20: ... Daønh cho ñóa maøi Chìa vaën ñai oác haõm Choåi maøi hình coác Choåi sôïi hình coân 85 Tay naém beân Ñóa kim cöông CHUÙ YÙ Moät soá muïc trong danh saùch coù theå ñöôïc bao goàm trong goùi duïng cuï laøm caùc phuï kieän chuaån Caùc muïc naøy ôû moãi quoác gia coù theå khaùc nhau ...

Страница 21: ...ือไฟฟ า มีสาย ที ทํางานโดยใช กระแสไฟฟ า หรือเครื องมือไฟฟ า ไร สาย ที ทํางานโดยใช แบตเตอรี ความปลอดภัยของพื นที ทํางาน 1 ดูแลพื นที ทํางานให มีความสะอาดและมีแสงไฟสว าง พื นที รก ระเกะระกะหรือมืดทึบอาจนําไปสู การเกิดอุบัติเหตุได 2 อย าใช งานเครื องมือไฟฟ าในสภาพที อาจเกิดการระเบิด เช น ในสถานที ที มีของเหลว ก าซ หรือฝุ นผงที มีคุณสมบัติไวไฟ เครื องมือไฟฟ าจะสร างประกายไฟเพื อจุดชนวนฝุ นผงหรือก าซดั...

Страница 22: ...ครื องมือไฟฟ า หากสวิตช ไม สามารถเป ดป ดได เครื องมือ ไฟฟ าที ใช สวิตช ควบคุมไม ได จัดเป นอันตรายและต องได รับการ ซ อมแซม 20 ถอดปลั กจากแหล งจ ายไฟ และ หรือชุดแบตเตอรีออกจาก เครื องมือไฟฟ าก อนทําการปรับแต ง เปลี ยนอุปกรณ เสริม หรือ จัดเก บเครื องมือไฟฟ า วิธีการป องกันด านความปลอดภัยดังกล าว จะช วยลดความเสี ยงของการเป ดใช งานเครื องมือไฟฟ าอย างไม ตั งใจ 21 จัดเก บเครื องมือไฟฟ าที ไม ได ใช งานให...

Страница 23: ...ประกายไฟอาจทําให วัตถุ ดังกล าวลุกไหม 15 อย าใช อุปกรณ เสริมที ต องมีน ํายาหล อเย น การใช น ําหรือน ํายา หล อเย นอื นๆ อาจทําให ได รับอันตรายจากไฟฟ าดูดหรือไฟฟ าช อต การดีดกลับและคําเตือนที เกี ยวข อง การดีดกลับ คือ ปฏิกิริยาสะท อนกลับที เกิดขึ นทันทีจากการกระทบหรือ การเกี ยวกับใบเจีย แผ นรอง แปรง หรืออุปกรณ เสริมอื นๆ การกระทบหรือ การเกี ยวทําให ทําให อุปกรณ เสริมที กําลังหมุนอยู หยุดทํางานทันที ...

Страница 24: ...ติ อย ากดเส นลวดแรงโดยการลงน ําหนักที แปรง มากเกินไป เส นลวดสามารถแทงทะลุเสื อผ าที มีความบาง และ หรือ ผิวหนังได ง าย b หากมีการแนะนําให ใช ฝาครอบสําหรับการแปรงลวด อย า ปล อยให ฝาครอบเข าไปรบกวนการทํางานของใบเจียลวดหรือ แปรง แปรงหรือแปรงลวดกลมอาจมีเส นผ าศูนย กลางขยายขึ น เนื องจากปริมาณงานและแรงหนีศูนย คําเตือนด านความปลอดภัยเพิ มเติม 16 ในขณะที ใช งานใบเจียศูนย จม ให ตรวจสอบว าได ใช เฉพาะ ใบเจีย...

Страница 25: ...ฝ นและใช แรงกดมากเกินไปอาจทําให ใบเจีย ชํารุดเสียหายได การใช งานใบเจียที มีการสึกหรออยู ต อไปอาจทําให ใบเจียระเบิดและ ทําให ได รับบาดเจ บสาหัสได ไม ควรใช ใบเจียศูนย จมหากมีการสึกหรอ จนเส นผ าศูนย กลางเหลือเพียง 75 มม การใช ใบเจียศูนย จมหลังจากนี เป นสิ งที ไม ปลอดภัย ควรถอดใบเจียออกจากการใช งาน และควรนําไป ทิ งทําลายเนื องจากไม สามารถใช งานได ภาพที 5 ให ถือเครื องมืออย างมั นคงทุกครั ง โดยให มือหน...

Страница 26: ...ือเปลี ยนอะไหล และใช อะไหล แท ของ Makita เท านั น อุปกรณ เสริม ข อควรระวัง ขอแนะนําให ใช อุปกรณ เสริมหรือส วนประกอบเหล านี กับเครื องมือ Makita ของคุณตามที ระบุในคู มือนี การใช อุปกรณ เสริมหรือ ส วนประกอบอื นอาจทําให ผู ใช ได รับบาดเจ บ ใช อุปกรณ เสริมหรือ ส วนประกอบตามที ระบุไว เท านั น หากคุณต องการทราบรายละเอียดเพิ มเกี ยวกับอุปกรณ เสริมดังกล าว โปรดสอบถามศูนย บริการของ Makita ในพื นที ของคุณ ฝ...

Страница 27: ...27 ...

Страница 28: ...ALA Makita Corporation Anjo Aichi Japan 883115 373 www makita com ...

Отзывы: