background image

9 ENGLISH

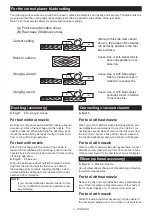
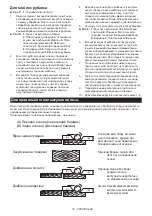
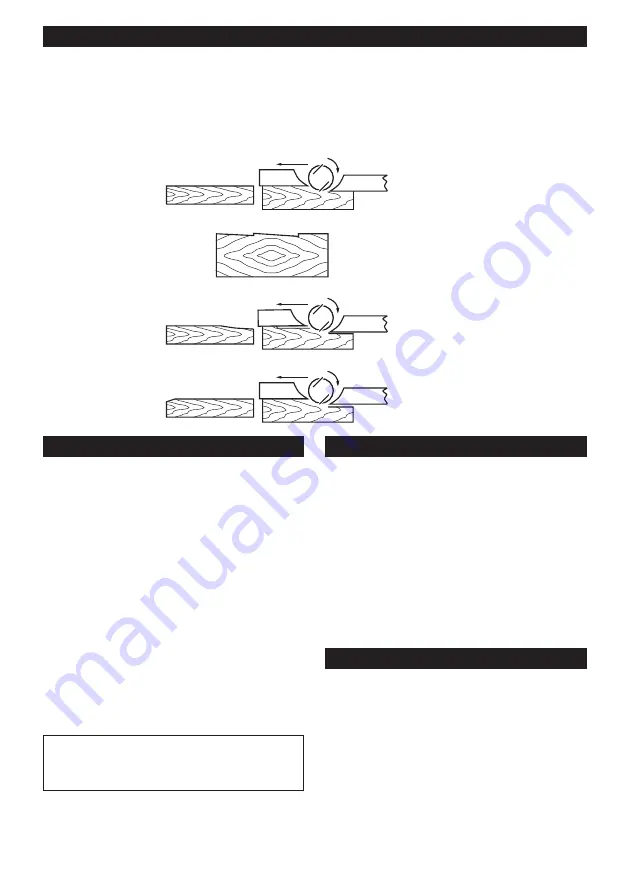
For the correct planer blade setting

Your planing surface will end up rough and uneven, unless the blade is set properly and securely. The blade must be 

mounted so that the cutting edge is absolutely level, that is, parallel to the surface of the rear base.


Refer to some examples below for proper and improper settings.

(A)

(B)

(B)

(A)

(B)

(A)

(A) Front base (Movable shoe)

(B) Rear base (Stationary shoe)

Correct setting

Nicks in surface

Gouging at start

Gouging at end

Although this side view cannot 

show it, the edges of the blades 

run perfectly parallel to the rear 

base surface.

Cause: One or both blades fails to 

have edge parallel to rear 

base line.

Cause: One or both blade edges 

fails to protrude enough in 

relation to rear base line.

Cause: One or both blade edges 

protrudes too far in relation 

to rear base line.

Dust bag (accessory)

► 

Fig.11:


1.

 Dust bag 

2.

 Nozzle

For tool without nozzle

Remove the chip cover and install the nozzle (optional 

accessory). Attach the dust bag onto the nozzle . The 

nozzle is tapered. When attaching the dust bag, push 

it onto the nozzle firmly as far as it will go to prevent it 

from coming off during operation.

For tool with nozzle

Attach the dust bag onto the nozzle. The nozzle is 

tapered. When attaching the dust bag, push it onto the 

nozzle firmly as far as it will go to prevent it from coming 

off during operation.

► 

Fig.12:


1.

 Fastener

When the dust bag is about half full, remove the dust 

bag from the tool and pull the fastener out. Empty 

the dust bag of its contents, tapping it lightly so as to 

remove particles adhering to the insides which might 

hamper further collection.

NOTE:


• 

If you connect a Makita vacuum cleaner to this 

tool, more efficient and cleaner operations can 

be performed.

Connecting a vacuum cleaner

► 

Fig.13

For tool without nozzle

When you wish to perform clean planing operation, con-

nect a Makita vacuum cleaner to your tool. Before con-

necting the vacuum cleaner, remove the chip cover from 

the tool. Then connect a hose of the vacuum cleaner to 

the nozzle (optional accessory) as shown in the figures.

For tool with nozzle

When you wish to perform clean planing operation, connect 

a Makita vacuum cleaner to your tool. Then connect a hose 

of the vacuum cleaner to the nozzle as shown in the figures.

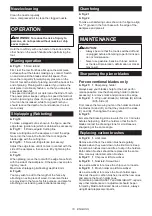
Elbow (optional accessory)

► 

Fig.14:


1.

 Elbow 

2.

 Nozzle

Use of elbow allows change of chip discharge direction 

to perform cleaner work.

For tool without nozzle

Remove the chip cover and install the nozzle (optional acces-

sory). Attach the elbow (optional accessory) on the nozzle of  

the tool by just slipping on it. To remove it, just pull it out.

For tool with nozzle

Attach the elbow (optional accessory) on the nozzle of  

the tool by just slipping on it. To remove it, just pull it out.

Содержание KP0800

Страница 1: ...AL 6 UK 12 PL Strug do drewna INSTRUKCJA OBS UGI 18 RO Ma in de rindeluit MANUAL DE INSTRUC IUNI 24 DE Balkenhobel BEDIENUNGSANLEITUNG 30 HU Gyalu HASZN LATI K ZIK NYV 36 SK Hob ova ka N VOD NA OBSLUH...

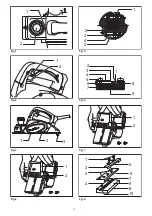
Страница 2: ...1 2 1 2 1 2 3 1 2 1 2 3 4 5 1 2 3 4 5 6 7 8 9 1 2 1 2 3 4 5 6 7 8 9 10 Fig 1 Fig 2 Fig 3 Fig 4 Fig 5 Fig 6 Fig 7 Fig 8 2...

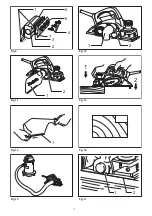
Страница 3: ...1 2 3 4 5 6 7 2 1 1 1 2 1 2 1 2 Fig 9 Fig 11 Fig 12 Fig 13 Fig 14 Fig 15 Fig 16 Fig 17 3...

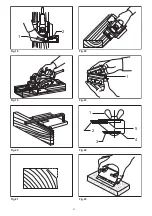
Страница 4: ...1 2 1 1 2 3 4 5 Fig 18 Fig 19 Fig 20 Fig 21 Fig 22 Fig 23 Fig 24 Fig 25 4...

Страница 5: ...1 1 2 1 2 1 2 Fig 26 Fig 27 Fig 28 Fig 29 5...

Страница 6: ...safety mea sures to protect the operator that are based on an estimation of exposure in the actual conditions of use taking account of all parts of the operating cycle such as the times when the tool...

Страница 7: ...he resulting imbalance will cause vibration and shorten tool life 17 Use only Makita blades specified in this manual 18 Always use the correct dust mask respirator for the material and application you...

Страница 8: ...urfaces and the drum cover To remove the blades on the drum unscrew the three installation bolts with the socket wrench The drum cover comes off together with the blades Fig 8 1 Pan head screw 2 Adjus...

Страница 9: ...e nozzle firmly as far as it will go to prevent it from coming off during operation Fig 12 1 Fastener When the dust bag is about half full remove the dust bag from the tool and pull the fastener out E...

Страница 10: ...e by attaching an extra piece of wood Convenient holes are provided in the fence for this purpose and also for attaching an extension guide optional accessory Chamfering Fig 21 Fig 22 To make a chamfe...

Страница 11: ...f you need any assistance for more details regard ing these accessories ask your local Makita Service Center High speed steel Planer blade Tungsten carbide Planer blade For longer blade life Mini plan...

Страница 12: ...12 KP0800 82 2 5 9 1 17000 285 2 7 II EPTA Procedure 01 2014 EN62841 2 14 LpA 85 A LWA 96 A K 3 A EN62841 2 14 ah 2 5 2 K 1 5 2 A...

Страница 13: ...13 1 2 3 4 5 6 7 8 9 10 11 12 13 14 15 16 17 Makita 18...

Страница 14: ...14 1 1 2 2 1 2 3 1 2 3 Makita 4 1 2 5 1 2 3 4 5 6 1 2 3 4 5 6 7 8 9...

Страница 15: ...15 7 1 2 1 8 1 2 3 4 5 6 7 8 9 10 2 3 4 5 9 1 2 3 4 5 6 7 6 7 8 9 10 1 9 A B B A B A...

Страница 16: ...16 11 1 2 12 1 Makita 13 Makita Makita 14 1 2 15 1 2 16 17 1 2 18 1 2 19 9 20...

Страница 17: ...17 21 22 V 23 1 24 1 2 3 4 D 5 D 25 2 3 26 1 27 1 2 28 1 2 29 1 2...

Страница 18: ...tronarz dzia mo e si r ni od warto ci deklarowanej w zale no ci od sposobu u ytko wania narz dzia a w szczeg lno ci od rodzaju obrabianego elementu OSTRZE ENIE W oparciu o szacowane nara enie w rzeczy...

Страница 19: ...gwo dzi Przed przyst pieniem do pracy sprawdzi obrabiany ele ment i usun z niego wszystkie gwo dzie 6 U ywa wy cznie ostrych no y Z no ami nale y obchodzi si ostro nie 7 Przed rozpocz ciem pracy spraw...

Страница 20: ...ie si stopa Zapobiega to uszko dzeniom ostrzy MONTA PRZESTROGA Przed wykonywaniem jakichkolwiek czynno ci na elektronarz dziu nale y upewni si czy jest ono wy czone i nie pod czone do sieci Demonta lu...

Страница 21: ...P ytka dociskaj ca n 6 Za os on na p ytk dociskaj c n kraw d ustala cza i dokr trzy ruby o sze ciok tnych bach z kry zami tak by pomi dzy wa kiem a kraw dzi ustalacza pozosta a szczelina pozwalaj ca...

Страница 22: ...k wyrzutu Aby je od czy wystar czy poci gn Czyszczenie kr ca Regularnie czy ci kr ciec Do czyszczenia zatkanego kr ca nale y u ywa spr onego powietrza DZIA ANIE OSTRZE ENIE Aby ograniczy ryzyko odnies...

Страница 23: ...chodzi w uchwyty Nale y wymienia obydwie szczotki jednocze nie Stosowa wy cznie identyczne szczotki w glowe Rys 27 1 Pokrywa przeciwwi rowa 2 rubokr t Rys 28 1 Dysza 2 rubokr t Os on przeciwwi row lub...

Страница 24: ...ntifica i m surile de siguran pentru a proteja operatorul acestea fiind bazate pe o estimare a expunerii n condi ii reale de utilizare lu nd n considerare toate p r ile ciclului de operare precum timp...

Страница 25: ...e bloca atunci c nd t ia i lemn umed Cur a i a chiile cu o baghet 15 Nu l sa i ma ina n func iune Utiliza i ma ina numai c nd o ine i cu m inile 16 Schimba i ntotdeauna ambele cu ite sau capace de pe...

Страница 26: ...cel lalt cu it Pentru ma inile cu mini cu ite de rindea Fig 7 1 Cheie tubular 2 Bol 1 Demonta i cu itul existent dac ma ina a fost utilizat cur a i cu grij suprafe ele tamburului i capacul tamburului...

Страница 27: ...entru a preveni desprinderea acestuia n timpul utiliz rii Fig 12 1 nchiz toare C nd sacul de praf s a umplut p n la circa o jum tate din capacitate scoate i sacul de praf de pe ma in i extrage i dispo...

Страница 28: ...l prin ad ugarea unei buc i de lemn suplimentare n opritor sunt prev zute orificii convenabile n acest scop precum i pentru ata area unui ghidaj de extensie accesoriu op ional anfrenarea Fig 21 Fig 22...

Страница 29: ...lii referitoare la aceste accesorii adresa i v centrului local de service Makita Cu it de rindea din o el rapid Cu it de rindea cu t i din aliaj dur de tungsten pentru o durat extins de exploatare a c...

Страница 30: ...zeugs kann je nach der Benutzungsweise des Werkzeugs und speziell je nach der Art des bearbeiteten Werkst cks von dem den angegebenen Wert en abweichen WARNUNG Identifizieren Sie Sicherheitsma nahmen...

Страница 31: ...ung 6 Verwenden Sie nur scharfe Messer Behandeln Sie die Messer mit gr ter Sorgfalt 7 Vergewissern Sie sich vor der Arbeit dass die Messerbefestigungsschrauben sicher festge zogen sind 8 Halten Sie da...

Страница 32: ...nnen berzeugen Sie sich immer vorher dass es abgeschaltet und der Stecker aus der Dose gezogen ist Montage und Demontage der Hobelmesser VORSICHT Ziehen Sie die Bolzen zur Messerbefestigung beim Anbri...

Страница 33: ...chskantflanschschrauben 5 Druckplatte 6 Hobelwelle 7 Einstellplatte 6 Setzen Sie die Druckplatte ber die Einstell Feststellplatte und schrauben Sie die drei Sechskantflanschschrauben so fest dass zwis...

Страница 34: ...uss es lediglich herausgezogen werden Reinigen des Absaugstutzens Reinigen Sie den Absaugstutzen regelm ig Verwenden Sie Druckluft zum Reinigen des verstopften Absaugstutzens ARBEIT WARNUNG Um die Ver...

Страница 35: ...Die bei den Kohlen m ssen gleichzeitig ausgewechselt werden Verwenden Sie ausschlie lich gleiche Kohlen Abb 27 1 Spanf nger 2 Schraubendreher Abb 28 1 Stutzen 2 Schraubendreher Entfernen Sie die Spana...

Страница 36: ...l v delm t szolg l munkav delmi l p seket melyek az adott munkafelt telek melletti vibr ci s hat s becs lt m rt k n alapulnak figyelembe v ve a munkaciklus elemeit mint p ld ul a g p le ll t s nak s r...

Страница 37: ...fa megmunk l sa kor Takar tsa ki a forg csot egy bottal 15 Ne hagyja a m k d szersz mot fel gyelet n l k l Csak k zben tartva haszn lja a szersz mot 16 Mindig mindk t k st vagy dobfedelet cser lje me...

Страница 38: ...csal egyenletesen s v ltakozva Ism telje meg a fenti elj r st a m sik k sn l is Mini gyaluk sekkel felszerelt szersz m bra7 1 Dug kulcs 2 Fejescsavar 1 T vol tsa el a felszerelt k st ha a szersz m has...

Страница 39: ...m k d s k zben leessen bra12 1 Szor t Amikor a porzs k nagyj b l a fel ig megtelt t vol tsa el azt a szersz mr l s h zza ki a r gz t t r tse ki a porzs k tartalm t vatosan meg t getve az oldal t az o...

Страница 40: ...l Erre a c lra a vezet furatokkal van ell tva valamint furatokkal ren delkezik egy vezet hosszabb t opcion lis kieg sz t hozz illeszt s hez is llet r s bra21 bra22 Az br n l that llet r v g sokhoz iga...

Страница 41: ...milyen seg ts gre vagy tov bbi inform ci kra van sz ks ge ezekkel a tartoz kokkal kapcsolatban keresse fel a helyi Makita Szervizk zpontot Nagysebess g ac l gyaluk s Wolfram karbid gyaluk s hosszabb l...

Страница 42: ...e ozna i bezpe nostn opatrenia s cie om chr ni obsluhu a to tie ktor sa zakladaj na odhade vystavenia inkom v r mci re lnych podmienok pou vania ber c do vahy v etky s asti prev dzkov ho cyklu ako s d...

Страница 43: ...kou 15 Nenech vajte n stroj v prev dzke bez dozoru Pracujte s n strojom len ke ho dr te v ruk ch 16 V dy vymie ajte obe epele alebo kryty na bubne inak bude n sledn nevyv enos sp sobova vibr cie a skr...

Страница 44: ...epe ak sa n stroj nepou va d kladne vy istite povrch a kryt valca Ak chcete odstr ni epele z valca odskrutkujte pomocou zastrk vacieho k a tri in tala n skrutky Kryt valca vypadne spolu s epe ami Obr...

Страница 45: ...ysku Tryska je ku e ovit Pri pripev ovan vrecka na prach ho o najviac zatla te na trysku aby ste zabr nili jeho zosunutiu po as prev dzky Obr 12 1 Up nadlo Ak je vrecko na prach pribli ne napoly napln...

Страница 46: ...Obr 20 You may wish to add to the length of the fence by attaching an extra piece of wood Pre tento el ako aj pre pripevnenie vodidla pred enia volite n pr slu en stvo sa v ochrannom zariaden nach dz...

Страница 47: ...pr slu enstva obr te sa na va e miestne servisn stredisko firmy Makita Vysokor chlostn oce ov hob ovacia epe Hob ovacia oce z karbid volfr mu pre dlh ivot nos epele Mini hob ovacia epe pln dr iak na b...

Страница 48: ...ti na zp sobech pou it n ad VAROV N Nezapome te stanovit bezpe nostn opat en na ochranu obsluhy podle odhadu expozice ve skute n ch podm nk ch pou it Vezm te p itom v vahu v echny sti provoz n ho cykl...

Страница 49: ...m ujte oba no e nebo kryty na v lci V opa n m p pad v sledn nerovnov ha zp sob vibrace a zkr t ivotnost n ad 17 Pou vejte pouze no e Makita uveden v t to p ru ce 18 V dy pou vejte protiprachovou masku...

Страница 50: ...v lce Chcete li demontovat no e z v lce od roubujte imbusov m kl em t i instala n rouby Spolu s no i odejmete tak kryt v lce Obr 8 1 roub s v lcovou hlavou 2 Vyrovn vac deska 3 Vodic oka v hoblovac m...

Страница 51: ...natla te na hubici co nejd le abyste b hem pr ce zamezili jeho uvoln n Obr 12 1 Upev ovac prvek Je li vak na prach p ibli n z poloviny pln odstra te jej z n stroje a vysu te ven upev ovac prvek Vysyp...

Страница 52: ...9 mm Obr 20 D lku vod tka lze v p pad pot eby zv t it p ipoje n m dodate n ho kusu d eva Pro tento elu jsou na vod tku k dispozici otvory kter tak sou asn slou k p ipevn n prodlu ovac ho vod tka voli...

Страница 53: ...ohledn tohoto p slu en stv obra te se na va e m stn servisn st edisko firmy Makita Vysokorychlostn ocelov hoblovac n Hoblovac n z karbidu wolframu s del ivotnost Mal hoblovac n Sestava dr ku pro ost...

Страница 54: ...54...

Страница 55: ...55...

Страница 56: ...www makita com Makita Europe N V Makita Corporation 3 11 8 Sumiyoshi cho Anjo Aichi 446 8502 Japan Jan Baptist Vinkstraat 2 3070 Kortenberg Belgium 884915D970 EN UK PL RO DE HU SK CS 20181218...

Отзывы: