background image

 6

/ 2

3


[3] DISASSEMBLY/ASSEMBLY
[3] -2. Tool Holder Section

R

epair

DISASSEMBLY

1) Disassemble Chuck section.   (

Figs. 4 - 11

)

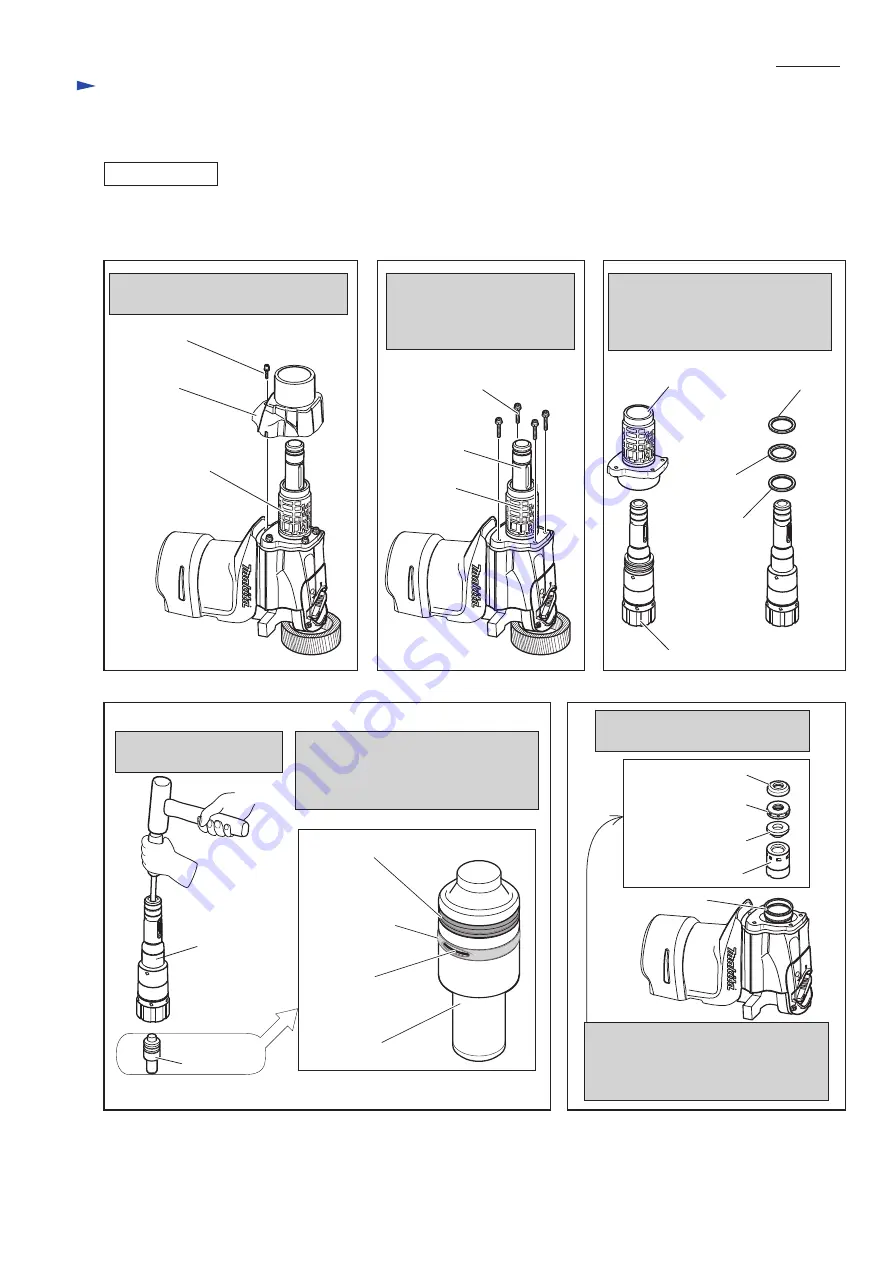
2) Disassemble the Tool holder section in the order of 

Figs. 13 -17

M4x25 Hex socket head bolt

Unscrew M4x25 Hex socket head bolt
and remove Barrel cover complete.

Remove Impact bolt from
Tool holder.

Disassemble Barrel complete
together with Tool holder by
unscrewing M6x30 Hex 
socket head bolts (4 pcs.).

Separate Tool holder from Barrel
complete.  Then remove Flat washer
36 (2pcs.) and Urethane ring 36 
from Tool holder.

M6x30 Hex socket 
head bolt (4 pcs.)

Barrel cover complete

Barrel complete

Barrel complete

Barrel complete

Flat washer 36

Flat washer 36

Urethane
ring 36

Tool holder

Tool holder

Tool holder

X ring 21

All the Rings on Impact bolt have to 
be replaced if O ring 23 (orange)
can be seen through the worn Fluoride
ring 28. 

O ring 23

Fluoride ring 28

(the worn one)

Fig. 13

Fig. 14

Fig. 15

Fig. 16

Fig. 17

Ring 19

Rubber ring 20

Remove the following parts from 
Crank housing.

These parts may come out with Barrel 
complete in the step of 

Fig. 14

In this Case, they are disassembled 
from Tool holder in the step of 

Fig. 16

.

Ring 38

Shoulder sleeve 19

Slide sleeve

Impact bolt

Impact bolt

Содержание HR4501C

Страница 1: ...e been developed as successor models of HR4500C featuring low vibration level and high work efficiency Listed below are their main features Active dynamic vibration absorber Model No Vibration absorbi...

Страница 2: ...Fitting Fluoride ring 28 to Impact bolt Screwing Unscrewing M4x25 Hex socket head bolt of Barrel cover Screwing Unscrewing M6x30 Hex socket head bolt of Barrel Removing Ball bearings Removing Mounting...

Страница 3: ...ture Crank room Lip portion Inner periphery of Plane bearing 59 The component of Crank housing completete Fig 2 Grease R No 00 82 Crank shaft 40 37 49 48 39 99 146 Armature Torque limiter assembly 82a...

Страница 4: ...le section from Motor housing by unscrewing 5x25 Tapping screws 2 Pull off Connector from Controller 3 After removing 4x14 tapping screws disassemble Controller from Motor housing Ring spring 25 While...

Страница 5: ...Fig 12 Reserve the space for Tool retainer removing by pressing down Spring guide And take off Tool retainers 2pcs from Tool holder Disassemble Spring guide and Compression spring 49 from Tool holder...

Страница 6: ...hane ring 36 from Tool holder M6x30 Hex socket head bolt 4 pcs Barrel cover complete Barrel complete Barrel complete Barrel complete Flat washer 36 Flat washer 36 Urethane ring 36 Tool holder Tool hol...

Страница 7: ...nd to Crank housing assemble Straight bevel gear 35 the Driving sleeve section with Link arm Compression spring 39 and Ring 38 Refer to Fig 18 Fig 19 Fig 20 O ring 27 Bulge portion Crank housing side...

Страница 8: ...ethane washer 36 Urethane washer 36 Rubber ring 20 Shoulder sleeve 19 Face the chamfered edge to Impact bolt Face the conical side to Slide sleeve Face the chamfered Side to Shoulder sleeve 19 Insert...
Страница 9: ...il seal 35 Lip portion Barrel complete Note Facing the lip portion of Oil seal 35 to Tool holder cap side fit Oil seal into Barrel complete 1 Fit Oil seal 35 into Barrel complete Refer to Fig 26 2 Sec...

Страница 10: ...as follows Disassemble Active dynamic vibration absorber by levering up with two slotted screwdriver Active Dynamic Vibration Absorber Remove Crank housing cover Then set Change lever to Rotation wit...

Страница 11: ...Fig 31 3 Mount Active dynamic vibration absorber on the both side of Crank housing complete Fig 32 4 Do the reverse step of disassembly in Fig 27 3 5 Crank Cap Section 1 Remove Crank cap section as i...

Страница 12: ...andle installation side by hand If sliding Link plate by hand is impossible Driving sleeve does not engage with Straight bevel gear 35 when assembling Tool holder section Push Driving sleeve to engagi...

Страница 13: ...p section Fig 38 HR4511C only 5A Assemble Control plate by fitting its elliptic Loop portion with the protrusion of Crank lever Then mount Crank cap cover Fig 38A HR4501C and HR4510C only Change Lever...

Страница 14: ...onnecting rod Crank shaft Connecting rod Connecting rod Piston Fig 41 Fig 42 Fig 43 Screwdriver Wooden piece to protect the edge of Crank housing complete Cylinder 34 Cylinder 34 can be removed by lev...

Страница 15: ...d separate Switch box from Handle Now Slide switch can be replaced Leaf spring 4x14 Tapping screw Slide switch Switch box Slide lever complete Slide lever complete ASSEMBLY 1 Passing Connecting rod th...

Страница 16: ...r 12mm Holding Fan 90 with gloved hand remove M8 12 Hex nut using cordless impact driver with M8 Socket bit Remove rear cover from Motor housing Note Turn M8 12 Hex nut clockwise Fan guide Fan 90 Flat...

Страница 17: ...bled as illustrated in Fig 55 Fig 54 HR4510C and HR4511C only Slotted screwdriver Crank housing cover Remove Crank Housing Cover and Active Dynamic Vibration Absorber Remove M6x30 Hex socket head bolt...

Страница 18: ...ining Ring S 14 Retaining ring S 17 Remove Crank shaft by carefully striking the specific position of Crank housing complete as illustrated right while keeping Connecting rod in right angle to the rem...

Страница 19: ...Dust cover support Dust cover Handle cover Separate Handle section from the machine by unscrewing 5x25 Tapping screws Remove another two 5x25 Tapping screws to disassemble Handle in the next step Rem...

Страница 20: ...M4x12 Pan head screw Item No 78 Item No Fastening torque Q ty Description 15 4 7 8 11 7 N m M6x30 Hex socket head bolt M6x30 Hex socket head bolt M4x12 Pan head screw 64 78 4 4 9 7 8 N m 131 1 1 1 8...

Страница 21: ...ome countries instead of black Lead wire of A is blue for some countries instead of white A B Lead unit Wiring diagram Fig D 1 Fig D 2 viewed from Motor housing side Do not to pinch the Lead wires at...

Страница 22: ...from Lock ON Switch in Switch box Lead wires to ON OFF Switch Do not to pinch the Lead wires at this position when assembling Handle Viewed from Motor housing side Motor Housing Handle Switch Box vie...

Страница 23: ...nected exactly to Brush holder unit Wire connecting portion faced to Field side interferes the exact connecting of Carbon brush s Terminal to Brush holder unit Connecting Carbon Brush Field side Rear...

Отзывы: