Makita GCV08PM Скачать руководство пользователя страница 6

6 ENGLISH

FUNCTIONAL DESCRIPTION

CAUTION:


Always be sure that the appliance 

is switched off and the battery cartridges are 

removed before adjusting or checking function on 

the appliance.

Installing or removing battery cartridge

CAUTION:


Always switch off the appliance 

before installing or removing of the battery cartridge.

CAUTION:


Hold the appliance and the bat-

tery cartridge firmly when installing or removing 

battery cartridge.

 Failure to hold the appliance and 

the battery cartridge firmly may cause them to slip off 

your hands and result in damage to the appliance and 

battery cartridge and a personal injury.

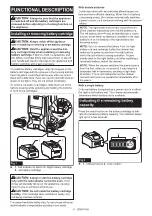
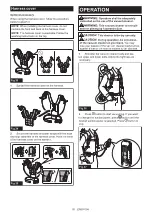
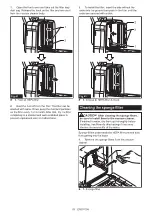
To install the battery cartridges, align the tongues on the 

battery cartridges with the grooves in the housing and slip 

them into place. Insert them all the way until they lock in 

place with a little click. If you can see the red indicators as 

shown in the figure, they are not locked completely.

To remove the battery cartridges, slide them out of the 

battery housing while pressing and holding the buttons 

in front of the cartridges.

2

3

4

1

1

Fig.1

►    

1.

 Red indicator 

2.

 Button 

3.

 Right battery cartridge 

4.

 Left battery cartridge

CAUTION:


Always install the battery cartridge 

fully until the red indicator cannot be seen.

 If not, 

it may accidentally fall out of the appliance, causing 

injury to you or someone around you.

CAUTION:


Do not install the battery cartridge 

forcibly.

 If the cartridge does not slide in easily, it is 

not being inserted correctly.

The cleaner has double battery slots. You can choose with either 

double batteries or single battery according to your needs.

With double batteries

Continuous drive with two batteries allows longer run-

time and more efficient cleaning. When the first battery 

is becoming empty, the cleaner automatically switches 

a power source, so it continues working with the second 

battery.

NOTE:

 The right battery slot (when facing the front 

of the cleaner) has priority over the left battery slot. 

The left battery slot will only be identified as a power 

source, either when no battery is installed in the right 

battery slot or the battery in the right battery slot 

becomes empty.

NOTE:

 You can remove the battery from the right 

battery slot and recharge it after the cleaner has 

switched its power source from the right battery 

slot to the left without ceasing operation. To give 

priority back to the right battery slot after installing a 

recharged battery, restart the cleaner.

NOTE:

 When the cleaner switches the power source 

from the first battery to the second, it may require a 

temporary halt in operations, causing a slight loss 

of suction. This is not malfunction so the cleaner 

recovers and resumes operations immediately after 

the pause.

With a single battery

Only one battery is required as a power source in either 

the right or left battery slot. The cleaner automatically 

determines which battery slot is available.

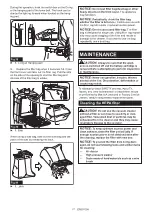
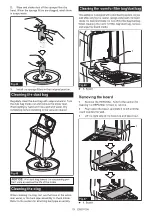
Indicating the remaining battery 

capacity

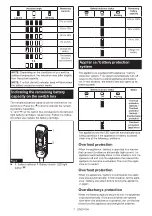
Press the check button on the battery cartridge to indi-

cate the remaining battery capacity. The indicator lamps 

light up for a few seconds.

1

2

Fig.2

►    

1.

 Indicator lamps 

2.

 Check button

Содержание GCV08PM

Страница 1: ...INSTRUCTION MANUAL MANUAL DE INSTRUCCIONES Cordless Backpack Vacuum Cleaner Aspiradora de mochila a bater a GCV08 IMPORTANT Read Before Using IMPORTANTE Lea antes de usar...

Страница 2: ...Charger DC40RA DC40RB DC40RC Some of the battery cartridges and chargers listed above may not be available depending on your region of residence WARNING Only use the battery cartridges and chargers li...

Страница 3: ...urer A charger that is suitable for one type of battery pack may create a risk of fire when used with another battery pack 4 Use appliances only with specifi cally designated battery packs Use of any...

Страница 4: ...that are specially designed to filter out microscopic particles Direct the exhaust air away from your face and body NOTE Read the OSHA regulation on silica dust to understand the requirements needed t...

Страница 5: ...ult in a fire excessive heat explosion or leak of electrolyte 13 If the tool is not used for a long period of time the battery must be removed from the tool 14 During and after use the battery cartrid...

Страница 6: ...erted correctly The cleaner has double battery slots You can choose with either double batteries or single battery according to your needs With double batteries Continuous drive with two batteries all...

Страница 7: ...This system automatically cuts off power to the motor to extend appliance and battery life In this situation the battery indicator lights up as following table Battery indicator status Status On Off B...

Страница 8: ...protection system then contact your local Makita Service Center Switch box position The switch box can be hooked on either side of the lower belt Arrange the cord so that the switch box comes to your...

Страница 9: ...you remove the battery immediately after turning off the appliance while the motor is rotating the cleaner may not start the operation with the same suction power as the last operation LED light LED...

Страница 10: ...t pipe assembly Optional accessory NOTE You don t need to perform this procedure if your model comes with the bent pipe assembly attached to the hose NOTE There are two types of bent pipe assembly the...

Страница 11: ...oth place such as a hard floor Carpet mode suitable for a shaggy place such as a carpet or a rug 1 1 2 3 Fig 18 1 Mode switching button 2 Floor mode 3 Carpet mode NOTE By twisting the nozzle while ins...

Страница 12: ...extension wand 3 Flexible rubber nozzle NOTE The flexible rubber nozzle can be attached to the bent pipe assembly without pipe lock directly The length of the wand can be adjusted Loosen the ring on t...

Страница 13: ...cuff The hose end can be removed by turning it counterclockwise 32 mm with snap on part Replace the hose with the one for dust extraction 28 mm with front cuff Supplied hose diameter Hose end type Ac...

Страница 14: ...leaner Dust bag is usable many times repeatedly by cleaning it out Filter bag is a throw away type Throw away the entire filter bag without emptying when it has become full NOTICE When the filter bag...

Страница 15: ...3 1 Fig 31 1 Slit 2 Brim 3 Dust bag 3 Align the hole of the filter bag with the hose cuff and push the cardboard portion to the end Make sure that the rubber ring on the filter bag goes over the rim...

Страница 16: ...arness Fig 35 OPERATION WARNING Operators shall be adequately instructed on the use of the vacuum cleaner WARNING This vacuum cleaner is not suit able for picking up hazardous dust CAUTION This cleane...

Страница 17: ...n damage to the cleaner If you want to use the bag repeatedly use a dust bag MAINTENANCE CAUTION Always be sure that the appli ance is switched off and the battery cartridge is removed before attempti...

Страница 18: ...dor or malfunctions 3 To install the filter insert the side without the hooks into the groove then push in the filter until the hooks are secured with a click 1 2 3 Fig 42 1 Groove 2 HEPA filter 3 Hoo...

Страница 19: ...eaning the clog remove the hose or the exten sion wand or the bent pipe assembly to check inside Refer to the section for attaching bent pipe assembly Cleaning the room for filter bag dust bag This ap...

Страница 20: ...tery cartridge is removed before carrying out any work on the tool If the battery cartridge is left inserted the cleaner may start unexpectedly and result in injury CAUTION Clean the mesh filter of th...

Страница 21: ...straight pipe are locked properly before restarting operation NOTE If the suction force does not recover even after disposing of the dust and cleaning the mesh filter check whether dust has accumulat...

Страница 22: ...details regard ing these accessories ask your local Makita Service Center Hose for vacuum cleaner type Hose for dust extraction type Extension wand Flexible rubber nozzle T shape nozzle Seat nozzle Co...

Страница 23: ...r a y cargadores enumerados arriba podr an no estar disponibles depen diendo de su rea de residencia ADVERTENCIA Use nicamente los cartuchos de bater a y los cargadores indicados arriba El uso de cual...

Страница 24: ...cidentes 2 Desconecte el paquete de bater as del aparato antes de hacer cual quier ajuste cambiar accesorios o almacenar el aparato Estas medidas de seguridad preventivas reducen el riesgo de poner en...

Страница 25: ...io magnesio titanio zinc f sforo rojo f sforo amarillo celu loide etc y su polvo gases o vapores Objetos afilados cristal cubier tos astillas de madera meta les piedras clavos cuchillas tachuelas etc...

Страница 26: ...Evite cortocircuitar el cartucho de bater a 1 No toque las terminales con nin g n material conductor 2 Evite guardar el cartucho de bater a en un caj n junto con otros objetos met licos tales como cla...

Страница 27: ...idar la garan t a de Makita para la herramienta y el cargador Makita Consejos para alargar al m ximo la vida til de la bater a 1 Cargue el cartucho de bater a antes de que se descargue completamente P...

Страница 28: ...echa de bater a y recargarla despu s de que la aspiradora haya cambiado su fuente de alimentaci n de la ranura derecha de bater a a la izquierda sin dejar de funcionar Para vol ver a dar prioridad a l...

Страница 29: ...ador de bater a Estado Encendida Apagada Parpadeando Protecci n contra sobrecarga bater a Protecci n contra sobreca lentamiento bater a Protecci n contra descarga excesiva Protecci n contra sobreca le...

Страница 30: ...cio Makita Posici n de la caja del interruptor La caja del interruptor puede engancharse en cual quiera de los lados de la correa inferior Coloque el cable de manera que la caja del interruptor quede...

Страница 31: ...atamente despu s de apagar el aparato mientras el motor est girando es posible que la aspiradora no inicie la operaci n con la misma potencia de succi n que la ltima operaci n Luz LED La luz LED se en...

Страница 32: ...n el cuerpo de la aspi radora y g rela en el sentido de las manecillas del reloj Fig 13 1 2 Fig 14 1 Boca de la manguera 2 Cuerpo de la aspiradora Uso como aspiradora Acoplamiento del conjunto de tubo...

Страница 33: ...Conjunto de tubo curvo Ensamble de la boquilla y el tubo Accesorio opcional NOTA El tipo de boquilla y de tubo incluidos en el producto var a seg n el pa s En algunos pa ses la boquilla y el tubo no v...

Страница 34: ...ot n 3 Tubo de extensi n de tipo corredera 4 Boquilla flexible de caucho La longitud del tubo puede ser ajustada Ajuste la longitud del tubo mientras presiona el bot n deslizable La longitud se bloque...

Страница 35: ...do a la manguera extr igalo primero Para conectar una herramienta a la aspiradora hacen falta la manguera especificada y o accesorios adiciona les Dependiendo del modelo de aspiradora necesitar reempl...

Страница 36: ...a la pieza de entrada de la manguera dependiendo de la herramienta que se vaya a conectar 2 Conecte la boca delantera a la salida de extrac ci n de la herramienta 1 2 3 4 Fig 27 1 Junta 2 Boca delant...

Страница 37: ...t n en su abertura cuando instale la bolsa del filtro bolsa recolectora de polvo AVISO La bolsa del filtro bolsa recolectora de polvo de la aspiradora es un componente importante para mantener el buen...

Страница 38: ...la manguera 4 Bloquee la cubierta delantera con seguridad PRECAUCI N Tenga cuidado de no pelliz car sus dedos cuando enganche la aldabilla y al cerrar la cubierta delantera Cubierta del arn s Accesor...

Страница 39: ...Oprima el bot n para comenzar a aspirar Si desea cambiar la potencia de succi n oprima el bot n hasta seleccionar la potencia de succi n deseada Oprima el bot n para parar Fig 37 Durante la operaci n...

Страница 40: ...ser realizadas en centros de servicio autorizados o de f brica Makita empleando siempre repuestos Makita Limpieza del filtro HEPA PRECAUCI N No utilice la aspiradora sin un filtro ni contin e usando...

Страница 41: ...tro HEPA evitan que entre polvo en el motor 1 Retire los filtros de esponja de la aspiradora 1 Fig 43 1 Filtro de esponja 2 Limpie y sacuda el polvo de los filtros de esponja con la mano Cuando los fi...

Страница 42: ...espacio interior de la bolsa del filtro bolsa recolectora de polvo extraiga y limpie el tablero del interior 1 Fig 46 1 Tablero Extracci n del tablero 1 Extraiga el filtro HEPA Consulte la secci n de...

Страница 43: ...ocar su calentamiento o humo AVISO Cuando se coloca el colector cicl nico no use el colector cicl nico en la posici n hori zontal u orientada hacia arriba El hacerlo podr a ocasionar que el filtro de...

Страница 44: ...la se obstruye qu telos y l velos con agua Consulte la secci n Eliminaci n del polvo para el procedimiento de eliminaci n Seque las piezas por completo antes de reinstalarlas y usarlas 1 2 Fig 53 1 Ca...

Страница 45: ...ho Boquilla T Boquilla para asientos Boquilla para esquinas Cepillo para estantes Cepillo redondo Conjunto de tubo curvo Bolsa del filtro Bolsa recolectora de polvo Boca delantera Filtro HEPA Tubo Cub...

Страница 46: ...46...

Страница 47: ...47...

Страница 48: ...ados por el lijado aserrado esmerilado taladrado y otras actividades de la construcci n contienen sustancias qu micas reconocidas por el Estado de California como causantes de c ncer defectos de nacim...

Отзывы: