background image

1

2

3


008246 

 
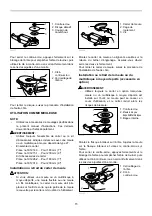
Mount the wheel guard with the protrusion on the wheel 
guard band aligned with the groove on the bearing box. 
Be sure to tighten both screws securely. 
To remove wheel guard, follow the installation procedure 
in reverse. 


Installing or removing depressed center 
grinding wheel/Multi-disc (optional 
accessory) 


WARNING: 

• 

Always use optional guard when depressed center 
grinding wheel/Multi-disc is on tool. Wheel can 
shatter during use and guard helps to reduce 
chances of personal injury. 

1

2

3


008191 

 
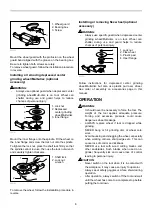
Mount the inner flange onto the spindle. Fit the wheel on 
the inner flange and screw the lock nut onto the spindle. 
To tighten the lock nut, press the shaft lock firmly so that 
the spindle cannot revolve, then use the lock nut wrench 
and securely tighten clockwise. 

1

2


008192 

 
To remove the wheel, follow the installation procedure in 
reverse. 


Installing or removing flex wheel (optional 
accessory) 


WARNING: 

• 

Always use specific guard when depressed center 
grinding wheel/Multi-disc is on tool. Wheel can 
shatter during use and guard helps to reduce 
chances of personal injury. 

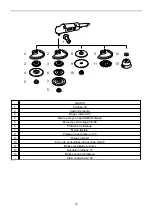
1

4

3

2


008245 

 
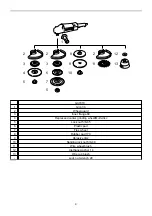
Follow instructions for depressed center grinding 
wheel/Multi-disc but also use plastic pad over wheel. 
See order of assembly on accessories page in this 
manual. 


OPERATION 


WARNING: 

• 

It should never be necessary to force the tool. The 
weight of the tool applies adequate pressure. 
Forcing and excessive pressure could cause 
dangerous wheel breakage. 

• 

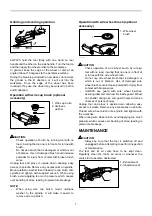
ALWAYS replace wheel if tool is dropped while 
grinding. 

• 

NEVER bang or hit grinding disc or wheel onto 
work. 

• 

Avoid bouncing and snagging the wheel, especially 
when working corners, sharp edges etc. This can 
cause loss of control and kickback. 

• 

NEVER use tool with wood cutting blades and 
other sawblades. Such blades when used on a 
grinder frequently kick and cause loss of control 
leading to personal injury. 

CAUTION: 

• 

Never switch on the tool when it is in contact with 
the workpiece, it may cause an injury to operator. 

• 

Always wear safety goggles or a face shield during 
operation. 

• 

After operation, always switch off the tool and wait 
until the wheel has come to a complete stop before 
putting the tool down. 


1. Lock nut 
2. Flex wheel 
3. Plastic pad 
4. Inner flange 

1. Shaft lock 
2. Lock nut 

wrench 

1. Lock nut 
2. Depressed 

center grinding 
wheel/Multi-disc

3. Inner flange 

1. Wheel guard 
2. Bearing box 
3. Screw 

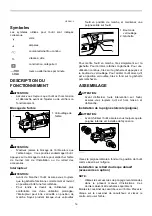
Содержание GA7910

Страница 1: ...ESE INSTRUCTIONS FOR FUTURE REFERENCE AVERTISSEMENT Pour votre propre sécurité prière de lire attentivement avant l utilisation GARDER CES INSTRUCTIONS POUR RÉFÉRENCE ULTÉRIEURE ADVERTENCIA Para su seguridad personal LEA DETENIDAMENTE este manual antes de usar la herramienta GUARDE ESTAS INSTRUCCIONES PARA FUTURA REFERENCIA Sander Grinder Ponceuse Meuleuse Esmeriladora Angular GA7910 008196 ...

Страница 2: ...tions Water entering a power tool will increase the risk of electric shock 7 Do not abuse the cord Never use the cord to carry the tools or pull the plug from an outlet Keep cord away from heat oil sharp edges or moving parts Replace damaged cords immediately Damaged cords increase the risk of electric shock 8 When operating a power tool outside use an outdoor extension cord marked W A or W These ...

Страница 3: ...When using an extension cord be sure to use one heavy enough to carry the current your product will draw An undersized cord will cause a drop in line voltage resulting in loss of power and overheating Table 1 shows the correct size to use depending on cord length and nameplate ampere rating If in doubt use the next heavier gage The smaller the gage number the heavier the cord Table 1 Minimum gage ...

Страница 4: ...ad for about a minute holding tool away from others If wheel is flawed it will likely separate during this test 19 Before using the tool on an actual workpiece let it run for a while Watch for vibration or wobbling that could indicate poor installation or a poorly balanced wheel 20 Use the specified surface of the wheel to perform the grinding SAVE THESE INSTRUCTIONS WARNING MISUSE or failure to f...

Страница 5: ...nut onto the spindle 1 2 3 008247 To tighten the lock nut press the shaft lock firmly so that the spindle cannot revolve then use the lock nut wrench and securely tighten clockwise 1 2 001621 To remove the disc follow the installation procedure in reverse IF USED AS A GRINDER NOTE Use grinder accessories specified in this manual These must be purchased by separate WARNING Always use guard assembly...

Страница 6: ...rsonal injury 1 4 3 2 008245 Follow instructions for depressed center grinding wheel Multi disc but also use plastic pad over wheel See order of assembly on accessories page in this manual OPERATION WARNING It should never be necessary to force the tool The weight of the tool applies adequate pressure Forcing and excessive pressure could cause dangerous wheel breakage ALWAYS replace wheel if tool ...

Страница 7: ...leading to premature breakage NOTE When using wire cup brush mount urethane washer to the spindle It will make it easier to remove wire cup brush Operation with wire wheel brush optional accessory 1 008244 CAUTION Check operation of wire wheel brush by running tool with no load insuring that no one is in front of or in line with the wire wheel brush Do not use wire wheel brush that is damaged or w...

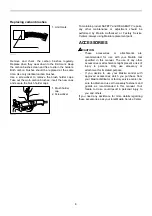
Страница 8: ... Centers always using Makita replacement parts ACCESSORIES CAUTION These accessories or attachments are recommended for use with your Makita tool specified in this manual The use of any other accessories or attachments might present a risk of injury to persons Only use accessory or attachment for its stated purpose If you decide to use your Makita sander with approved accessories which you purchas...

Страница 9: ...d center grinding wheel Multi disc 5 Lock nut 5 8 45 6 Plastic pad 7 Flex wheel 8 Rubber pad 170 9 Abrasive disc 10 Sanding lock nut 5 8 48 11 Wire wheel brush 12 Urethane washer 14 13 Wire cup brush Lock nut wrench 28 2 3 5 2 3 6 7 5 8 9 10 2 11 12 4 13 1 008251 ...

Страница 10: ...GES FROM THE SALE OR USE OF THE PRODUCT THIS DISCLAIMER APPLIES BOTH DURING AND AFTER THE TERM OF THIS WARRANTY MAKITA DISCLAIMS LIABILITY FOR ANY IMPLIED WARRANTIES INCLUDING IMPLIED WARRANTIES OF MERCHANTABILITY AND FITNESS FOR A SPECIFIC PURPOSE AFTER THE ONE YEAR TERM OF THIS WARRANTY This Warranty gives you specific legal rights and you may also have other rights which vary from state to stat...

Страница 11: ...iche de l outil La double isolation élimine le besoin d un cordon d alimentation à trois fils avec mise à la terre ainsi que d une prise de courant mise à la terre 5 Évitez tout contact corporel avec des surfaces mises à la terre tuyauterie radiateurs cuisinières réfrigérateurs etc Le risque de choc électrique est plus grand si votre corps est en contact avec la terre 6 N exposez pas les outils él...

Страница 12: ...enir les outils Les outils de coupe doivent être toujours bien affûtés et propres Des outils bien entretenus dont les arêtes sont bien tranchantes sont moins susceptibles de coincer et plus faciles à diriger 21 Assurez vous que les pièces mobiles ne sont pas désalignées ou coincées qu aucune pièce n est cassée et que l outil n a subi aucun dommage affectant son bon fonctionnement Le cas échéant fa...

Страница 13: ...upteur sous tension 10 Prenez garde aux étincelles qui jaillissent Tenez l outil de sorte que les étincelles ne jaillissent pas vers vous vers une personne présente ou vers un matériau inflammable 11 N abandonnez pas l outil alors qu il tourne Ne faites fonctionner l outil qu une fois que vous l avez bien en main 12 Ne touchez pas la pièce immédiatement après l utilisation elle peut être très chau...

Страница 14: ...z l outil en position de marche et maintenez une poigne solide sur l outil 1 2 008193 Pour mettre l outil en marche tirez simplement sur la gâchette Pour l arrêter relâchez la gâchette Pour une utilisation continue tirez sur la gâchette et appuyez sur le bouton de verrouillage Pour arrêter l outil alors qu il est en position verrouillée tirez à fond sur la gâchette puis relâchez la ASSEMBLAGE ATTE...

Страница 15: ...tie de la meule recouverte par le carter soit du côté de l utilisateur 1 2 3 008246 Montez le carter de meule en alignant sa saillie sur la rainure du boîtier d engrenage Assurez vous d avoir serré les deux vis fermement Pour retirer le carter de meule suivez la procédure de l installation de l autre côté Installation ou retrait de la meule ou du multidisque à moyeu déporté accessoire en option AV...

Страница 16: ...N Ne mettez jamais l outil en marche alors qu il se trouve en contact avec la pièce à travailler pour éviter de vous blesser Portez toujours des lunettes à coques de sécurité ou un écran facial pendant l opération Après l utilisation mettez toujours l outil hors tension et attendez l arrêt complet de la meule avant de déposer l outil Opérations de meulage et de ponçage A B 15 008194 Tenez TOUJOURS...

Страница 17: ...ez l outil et placez le la tête en bas pour permettre un accès facile à l arbre Retirez tous les accessoires de l arbre Enfilez la brosse métallique circulaire sur l arbre et serrez avec les clés Lorsque vous utilisez la brosse métallique circulaire évitez d appliquer une pression telle que les fils seront trop pliés et se casseront plus rapidement que lors d une utilisation normale ENTRETIEN ATTE...

Страница 18: ...mplémentaire peut comporter un risque de blessure N utilisez les accessoires ou pièces qu aux fins auxquelles ils ont été conçus Si vous décidez d utiliser votre ponceuse Makita avec des accessoires approuvés dont vous avez fait l achat auprès d un distributeur de produits Makita ou d un centre de service après vente Makita vous devrez vous procurer et utiliser tous les dispositifs de fixation et ...

Страница 19: ...rou de verrouillage 5 8 45 6 Plateau en plastique 7 Meule flexible 8 Plateau de caoutchouc 170 9 Disque abrasif 10 Écrou de verrouillage de ponçage 5 8 48 11 Brosse métallique à touret 12 Rondelle uréthane 14 13 Brosse coupe métallique Clé à contre écrou 28 2 3 5 2 3 6 7 5 8 9 10 2 11 12 4 13 1 008251 ...

Страница 20: ...IT CET AVIS DE NON RESPONSABILITÉ S APPLIQUE À LA FOIS PENDANT ET APRÈS LA PÉRIODE COUVERTE PAR CETTE GARANTIE MAKITA DÉCLINE TOUTE RESPONSABILITÉ QUANT À TOUTE GARANTIE TACITE INCLUANT LES GARANTIES TACITES DE QUALITÉ MARCHANDE ET ADÉQUATION À UN USAGE PARTICULIER APRÈS LA PÉRIODE D UN AN COUVERTE PAR CETTE GARANTIE Cette garantie vous donne des droits spécifiques reconnus par la loi et possiblem...

Страница 21: ...nstale una toma de corriente polarizada No modifique la clavija de ninguna forma El doble aislamiento elimina la necesidad de disponer de un cable de alimentación de tres hilos conectado a tierra y de un sistema de suministro de corriente conectado a tierra 5 Evite tocar con el cuerpo superficies conectadas a tierra tales como tubos radiadores hornillos y refrigeradores Si su cuerpo está puesto a ...

Страница 22: ...que no se utilicen lejos del alcance de los niños o de personas que no estén capacitadas para manejarlas Las herramientas son peligrosas si están en manos de usuarios inexpertos 20 Dé un cuidadoso mantenimiento a su herramienta Mantenga los implementos de corte afilados y limpios Las herramientas con buen mantenimiento y con los borde de corte afilado son menos propensas a atorarse y más fáciles d...

Страница 23: ...na lijadora estas herramientas con frecuencia retroceden bruscamente y producen la pérdida de control lo que ocasiona heridas personales 6 Sostenga la herramienta con firmeza 7 Mantenga las manos alejadas de las piezas giratorias 8 Tenga cuidado de no dañar el eje la brida especialmente la superficie de instalación ni la contratuerca Los daños en estas piezas podrán ocasionar la rotura del disco 9...

Страница 24: ...ONAMIENTO PRECAUCIÓN Asegúrese siempre de que la herramienta esté apagada y desconectada antes de ajustar o comprobar cualquier función en la herramienta Bloqueo del eje 1 008243 PRECAUCIÓN No accione nunca el bloqueo del eje cuando este se esté moviéndo Podría dañarse la herramienta Presione el bloqueo del eje para impedir que este gire cuando vaya a instalar o desmontar accesorios Accionamiento ...

Страница 25: ... a la inversa SI SE UTILIZA COMO UNA ESMERILADORA NOTA Utilice siempre los accesorios recomendados en este manual Deben adquirirse por separado ADVERTENCIA Utilice siempre el protector de disco o juego de accesorios como se especifica más adelante para el disco de esmerilar de centro hundido multidisco tipo 27 Protector de disco Parte No 191214 3 Para 180 mm 7 Parte No 191215 1 Para 230 mm 9 Juego...

Страница 26: ...ltidisco pero también utilice un plato de plástico sobre el disco Vea el orden de montaje en la página de accesorios de este manual OPERACIÓN ADVERTENCIA No deberá ser nunca necesario forzar la herramienta El peso de la herramienta aplica la presión adecuada El forzamiento y la presión excesivos podrán ocasionar una peligrosa rotura del disco Reemplace el disco SIEMPRE si deja caer la herramienta ...

Страница 27: ...e alambres monte la arandela de uretano en el eje Le resultará más fácil desmontar la carda de alambres Operación con disco de cepillo de alambres accesorio opcional 1 008244 PRECAUCIÓN Compruebe la operación del disco de cepillo de alambres haciendo girar la herramienta sin carga asegurándose de que no haya nadie enfrente ni en línea con el disco de cepillo de alambres No utilice un disco de cepi...

Страница 28: ...ervicio Autorizados por Makita empleando siempre repuestos Makita ACCESORIOS PRECAUCIÓN Estos accesorios o acoplamientos están recomendados para utilizar con su herramienta Makita especificada en este manual El empleo de cualesquiera otros accesorios o acoplamientos conllevará un riesgo de sufrir heridas personales Utilice los accesorios o acoplamientos solamente para su fin establecido Si decide ...

Страница 29: ...undido multidisco 5 Contratuerca 5 8 45 6 Almohadilla de plástico 7 Disco flexible 8 Plato de goma 170 9 Disco abrasivo 10 Contratuerca de lijado 5 8 48 11 Disco de cepillo de alambres 12 Arandela de uretano 14 13 Carda de alambres Llave de tuerca de bloqueo 28 2 3 5 2 3 6 7 5 8 9 10 2 11 12 4 13 1 008251 ...

Страница 30: ...ODUCTO ESTA RENUNCIA SERÁ APLICABLE TANTO DURANTE COMO DESPUÉS DEL TÉRMINO DE ESTA GARANTÍA MAKITA RENUNCIA LA RESPONSABILIDAD POR CUALQUIER GARANTÍA IMPLÍCITA INCLUYENDO GARANTÍAS IMPLÍCITAS DE COMERCIALIDAD E IDONEIDAD PARA UN FIN ESPECÍFICO DESPUÉS DEL TÉRMINO DE UN AÑO DE ESTA GARANTÍA Esta garantía le concede a usted derechos legales específicos y usted podrá tener también otros derechos que ...

Страница 31: ...31 ...
Страница 32: ...NCIA Algunos tipos de polvo creados por el lijado serrado amolado taladrado y otras actividades de la construccion contienen sustancias quimicas reconocidas por el Estado de California como causantes de cancer defectos de nacimiento y otros peligros de reproduccion Algunos ejemplos de estos productos quimicos son plomo de pinturas a base de plomo silice cristalino de ladrillos y cemento y otros pr...

Отзывы: