background image

5

7.

Use auxiliary handle(s), if supplied with the tool.

Loss of control can cause personal injury.

8.

Hold the power tool by insulated gripping sur-
faces, when performing an operation where the
cutting accessory may contact hidden wiring.

Cutting accessory contacting a “live” wire may make
exposed metal parts of the power tool “live” and
could give the operator an electric shock.

SAVE THESE INSTRUCTIONS. 

WARNING:

DO NOT let comfort or familiarity with product
(gained from repeated use) replace strict adherence
to safety rules for the subject product. 
MISUSE or failure to follow the safety rules stated in
this instruction manual may cause serious personal
injury.

ENC007-12

IMPORTANT SAFETY INSTRUCTIONS FOR 
BATTERY CARTRIDGE

1.

Before using battery cartridge, read all instruc-
tions and cautionary markings on (1) battery
charger, (2) battery, and (3) product using bat-
tery.

2.

Do not disassemble battery cartridge.

3.

If operating time has become excessively
shorter, stop operating immediately. It may
result in a risk of overheating, possible burns
and even an explosion.

4.

If electrolyte gets into your eyes, rinse them out
with clear water and seek medical attention right
away. It may result in loss of your eyesight.

5.

Do not short the battery cartridge:

(1)

Do not touch the terminals with any conduc-
tive material.

(2)

Avoid storing battery cartridge in a con-
tainer with other metal objects such as nails,
coins, etc.

(3)

Do not expose battery cartridge to water or
rain.

A battery short can cause a large current flow,
overheating, possible burns and even a break-
down.

6.

Do not store the tool and battery cartridge in
locations where the temperature may reach or
exceed 50°C (122°F).

7.

Do not incinerate the battery cartridge even if it
is severely damaged or is completely worn out.
The battery cartridge can explode in a fire.

8.

Be careful not to drop or strike battery.

9.

Do not use a damaged battery.

10.

The contained lithium-ion batteries are subject
to the Dangerous Goods Legislation require-
ments.

For commercial transports e.g. by third parties, for-
warding agents, special requirement on packaging
and labeling must be observed.
For preparation of the item being shipped, consult-
ing an expert for hazardous material is required.
Please also observe possibly more detailed national
regulations.
Tape or mask off open contacts and pack up the bat-
tery in such a manner that it cannot move around in
the packaging.

11.

Follow your local regulations relating to disposal
of battery.

12.

Use the batteries only with the products speci-
fied by Makita.

 Installing the batteries to non-com-

pliant products may result in a fire, excessive heat,
explosion, or leak of electrolyte.

SAVE THESE INSTRUCTIONS.

CAUTION:

Only use genuine Makita batteries.

 Use of non-genu-

ine Makita batteries, or batteries that have been altered,
may result in the battery bursting causing fires, personal
injury and damage. It will also void the Makita warranty
for the Makita tool and charger.

Tips for maintaining maximum battery life

1.

Charge the battery cartridge before completely
discharged. Always stop tool operation and
charge the battery cartridge when you notice
less tool power.

2.

Never recharge a fully charged battery cartridge.
Overcharging shortens the battery service life.

3.

Charge the battery cartridge with room tempera-
ture at 10°C – 40°C (50°F – 104°F). Let a hot battery
cartridge cool down before charging it.

4.

Charge the battery cartridge if you do not use it
for a long period (more than six months).

FUNCTIONAL DESCRIPTION

CAUTION: 

• Always be sure that the tool is switched off and the bat-

tery cartridge is removed before adjusting or checking
function on the tool.

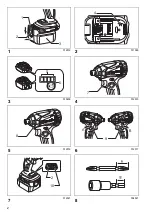
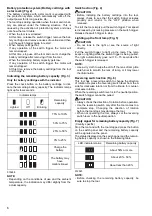
Installing or removing battery cartridge (Fig. 1)

• Always switch off the tool before installing or removing

of the battery cartridge.

• To remove the battery cartridge, slide it from the tool

while sliding the button on the front of the cartridge. 

• To install the battery cartridge, align the tongue on the

battery cartridge with the groove in the housing and slip
it into place. Always insert it all the way until it locks in
place with a little click. If you can see the red indicator
on the upper side of the button, it is not locked com-
pletely. Install it fully until the red indicator cannot be
seen. If not, it may accidentally fall out of the tool, caus-
ing injury to you or someone around you.

Do not use force when installing the battery cartridge. If
the cartridge does not slide in easily, it is not being
inserted correctly.

Содержание DTD134RTJ

Страница 1: ...schrauber Betriebsanleitung I Avvitatore ad impulso a batteria Istruzioni per l uso NL Accu slagschroevendraaier Gebruiksaanwijzing E Atornillador de Impacto Inal mbrico Manual de instrucciones P Para...

Страница 2: ...2 1 2 3 4 5 6 7 8 2 10 A B 9 8 7 4 1 2 3 012012 015659 012016 012021 011389 012015 012017 004521 6 5...

Страница 3: ...0 M14 M12 M10 M8 M14 M12 M10 M8 16 N m 17 19 S 18 kgf cm 1224 1020 816 612 408 204 120 1224 100 1020 80 816 60 612 40 408 20 204 0 1 0 2 0 3 0 M12 M10 M8 M12 M10 M8 N m 17 19 S 18 kgf cm 20 14 15 13...

Страница 4: ...nd specifications provided with this power tool Failure to follow all instructions listed below may result in electric shock fire and or serious injury Save all warnings and instructions for future re...

Страница 5: ...ation of the item being shipped consult ing an expert for hazardous material is required Please also observe possibly more detailed national regulations Tape or mask off open contacts and pack up the...

Страница 6: ...d is increased by increasing pressure on the switch trigger Release the switch trigger to stop Lighting up the front lamp Fig 5 CAUTION Do not look in the light or see the source of light directly Pul...

Страница 7: ...crew or the point of the driver bit may be overstressed stripped damaged etc Before start ing your job always perform a test operation to deter mine the proper fastening time for your screw If you use...

Страница 8: ...t is running idle in addition to the trigger time ENG900 1 Vibration The vibration total value tri axial vector sum determined according to EN62841 2 2 Model DTD134 Work mode impact tightening of fast...

Страница 9: ...erie et chargeur peut provoquer des blessures et ou un incendie ENE033 1 Utilisations L outil est con u pour le vissage dans le bois le m tal et le plastique GEA010 2 Consignes de s curit g n rales po...

Страница 10: ...es de monnaie etc 3 N exposez pas la batterie l eau ou la pluie Un court circuit de la batterie peut provoquer une intensit de courant lev e une surchauffe parfois des br lures et m me une panne 6 Ne...

Страница 11: ...batterie qu apr s l avoir retir e de l outil Lorsque la charge restante de la batterie est basse Le moteur ne d marrera pas m me si vous activez la g chette Il faut alors retirer la batterie de l out...

Страница 12: ...est quip d un crochet pratique qui permet de l accrocher temporairement Ce crochet s installe d un c t comme de l autre de l outil Pour installer le crochet ins rez le dans une des rainu res situ es d...

Страница 13: ...veau de puissance sonore LWA 104 dB A Incertitude K 3 dB A ENG907 1 NOTE La ou les valeurs d mission de bruit d clar es ont t mesur es conform ment la m thode de test stan dard et peuvent tre utilis e...

Страница 14: ...eger te besteht Verletzungs und oder Brandgefahr ENE033 1 Vorgesehene Verwendung Die Maschine ist f r das Eindrehen von Schrauben in Holz Metall und Kunststoff vorgesehen GEA010 2 Allgemeine Sicherhei...

Страница 15: ...nen Sie Ihre Sehkraft verlieren 5 Der Akku darf nicht kurzgeschlossen werden 1 Die Kontakte d rfen nicht mit leitf higem Material ber hrt werden 2 Lagern Sie den Akku nicht in einem Beh lter zusammen...

Страница 16: ...der Motor abgeschaltet Unterbrechen Sie in diesem Fall den Betrieb der Maschine um sie abk hlen zu lassen oder laden Sie den Akku nachdem Sie ihn von der Maschine abge nommen haben Wenn die Akku Rest...

Страница 17: ...hwierig ist zie hen Sie die Werkzeugaufnahme zur ck und f hren Sie dann den Einsatz bis zum Anschlag in die Werkzeug aufnahme ein Vergewissern Sie sich nach dem Einf hren des Einsat zes dass er einwan...

Страница 18: ...en bez glich dieser Zube h rteile ben tigen wenden Sie sich bitte an Ihre Makita Kundendienststelle Schraubendrehereins tze Haken Plastikkoffer Verschiedene Original Makita Akkus und Ladeger te Akkusc...

Страница 19: ...en abwei chen Identifizieren Sie Sicherheitsma nahmen zum Schutz des Benutzers anhand einer Sch tzung des Gef hrdungsgrads unter den tats chlichen Benut zungsbedingungen unter Ber cksichtigung aller P...

Страница 20: ...ce batterie e caricatori diversi potrebbe causare lesioni personali e o incendi ENE033 1 Utilizzo previsto Questo utensile serve ad avvitare le viti nel legno metallo e plastica GEA010 2 Avvertenze ge...

Страница 21: ...ltare nella perdita della vista 5 Non cortocircuitare la cartuccia della batteria 1 Non toccare i terminali con alcun materiale conduttivo 2 Evitare di conservare la cartuccia della batteria in un con...

Страница 22: ...oi di nuovo il grilletto dell interruttore per riavviare l utensile Quando la batteria diventa calda Anche se si aziona il grilletto dell interruttore il motore non parte In questo caso smettere di us...

Страница 23: ...manicotto quando si installa la punta Se la punta non inserita completamente nel mani cotto questo non torna sulla sua posizione originale e la punta non rimane fissata In tal caso provare a inse rire...

Страница 24: ...ENG905 1 Rumore Il tipico livello di rumore pesato A determinato secondo EN62841 2 2 Modello DTD134 Livello pressione sonora LpA 95 dB A Livello potenza sonora LWA 103 dB A Incertezza K 3 dB A Modell...

Страница 25: ...lle condizioni effettive di utilizzo tenendo conto di tutte le parti del ciclo operativo ad esempio del numero di spegnimenti dell utensile e di quando giri a vuoto oltre al tempo di attivazione DICHI...

Страница 26: ...ader gebruikt kan dat leiden tot letsel en of brand ENE033 1 Doeleinden van gebruik Dit gereedschap is bedoeld voor het indraaien van schroeven in hout metaal en kunststof GEA010 2 Algemene veiligheid...

Страница 27: ...ektrolyt in de ogen kan blindheid veroorzaken 5 Voorkom kortsluiting van de accu 1 Raak de accuklemmen nooit aan met een geleidend materiaal 2 Bewaar de accu niet in een bak waarin andere metalen voor...

Страница 28: ...ebruik van het gereedschap en laat u de accu afkoelen of verwijdert u de accu om die opnieuw op te laden Wanneer de resterende accuspanning te gering is Ongeacht de stand of de beweging van de treksch...

Страница 29: ...t uit de bus komt mag u de bit niet gebruiken Haak Fig 11 De haak is handig om het gereedschap tijdelijk op te hangen De haak kan aan iedere zijkant van het gereed schap worden bevestigd Om de haak te...

Страница 30: ...niveau LWA 103 dB A Onnauwkeurigheid K 3 dB A Model DTD146 Geluidsdrukniveau LpA 96 dB A Geluidsvermogenniveau LWA 104 dB A Onnauwkeurigheid K 3 dB A ENG907 1 OPMERKING De opgegeven geluidsemissiewaar...

Страница 31: ...er praktijkomstandigheden rekening houdend met alle fasen van de bedrijfscyclus zoals de tijds duur gedurende welke het gereedschap is uitge schakeld en stationair draait naast de ingeschakelde tijdsd...

Страница 32: ...tilizaci n de cualquier otro cartucho de bater a y cargador puede ocasionar heridas y o un incendio ENE033 1 Uso previsto La herramienta ha sido dise ada para atornillar en madera metal y pl stico GEA...

Страница 33: ...s con ning n material conductor 2 Evite guardar el cartucho de bater a en un caj n junto con otros objetos met licos como clavos monedas etc 3 No exponga el cartucho de bater a al agua ni a la lluvia...

Страница 34: ...rruptor otra vez para reanudar Cuando las celdas de la bater a se calientan Si realiza cualquier operaci n del gatillo interruptor el motor permanecer detenido En este momento deje de utilizar la herr...

Страница 35: ...la punta Fig 10 Para desmontar la punta tire del manguito y saque la punta NOTA Excepto Europa para los dem s pa ses no es necesa rio tirar del manguito al instalar la punta Si la punta no est sufici...

Страница 36: ...mienta Makita especificada en este manual El uso de cualquier otro accesorio o adi tamento puede suponer un riesgo de lesiones persona les Utilice el accesorio o aditamento exclusivamente para su uso...

Страница 37: ...o los valores de emisi n declarado dependiendo de las formas en las que la herramienta sea utilizada especialmente qu tipo de pieza de trabajo se pro cesa Aseg rese de identificar medidas de segurida...

Страница 38: ...lquer outro cartucho de bateria e carregador pode provocar ferimentos e ou inc ndio ENE033 1 Utiliza o a que se destina A ferramenta foi concebida para aparafusamento em madeira metal e pl stico GEA01...

Страница 39: ...om qualquer material condutor 2 Evite guardar a bateria juntamente com outros objetos met licos tais como pregos moedas etc 3 N o exponha a bateria gua ou chuva Um curto circuito pode ocasionar um eno...

Страница 40: ...fazer qualquer opera o atrav s do gatilho do interruptor o motor n o funciona Neste momento pare de usar a ferramenta e aguarde at arrefecer ou recarregue a bateria depois de retir la da ferramenta Se...

Страница 41: ...etirar a broca puxe a manga e puxe a broca para fora NOTA Exceto nos pa ses Europeus n o necess rio puxar a manga ao instalar a broca Se a broca n o estiver colocada suficientemente funda na manga a m...

Страница 42: ...para as pessoas Utilize apenas acess rios ou pe as para os fins indicados Se precisar de ajuda para obter mais informa es relati vos a estes acess rios entre em contacto com o centro de assist ncia M...

Страница 43: ...ntificar as medidas de segu ran a para prote o do operador que sejam basea das em uma estimativa de exposi o em condi es reais de utiliza o considerando todas as partes do ciclo de opera o tal como qu...

Страница 44: ...at overholde alle nedenst ende instruktioner kan medf re elektrisk st d brand og eller alvorlig personskade Gem alle advarsler og instruktioner til fremtidig reference Ordet el v rkt j i advarslerne h...

Страница 45: ...r rende farligt gods Ved kommerciel transport f eks af tredjeparts trans portselskaber skal s rlige krav til forpakning og m rkning overholdes Ved forberedelse af udstyret til forsendelse skal du kont...

Страница 46: ...kes der blot p afbryderknap pen Maskinens hastighed ges ved at ge trykket p afbryderknappen Slip afbryderknappen for at stoppe Foran lampens lys Fig 5 FORSIGTIG Kig aldrig direkte p lyskilden Lad ikke...

Страница 47: ...ssende til hovedet p den skrue eller bolt som De nsker at anvende Ved fastsp nding af M8 eller mindre skruer skal tryk ket p afbryderknappen reguleres omhyggeligt s le des at skruen ikke blive beskadi...

Страница 48: ...e sikkerhedsforskrifter til beskyttelse af operat ren som er baseret p en vurdering af eksponering under de faktiske brugs forhold med hensyntagen til alle dele i brugscyk lussen f eks de gange hvor m...

Страница 49: ...A010 2 DTD134 DTD146 4 8 5 14 5 12 1 0 2 400 0 2 300 0 3 200 138 D C 14 4 V D C 18 V 1 2 1 4 1 3 1 6 D C 14 4 V BL1415N BL1430 BL1430B BL1440 BL1450 BL1460B D C 18 V BL1815N BL1820 BL1820B BL1830 BL18...

Страница 50: ...50 GEB137 1 1 2 3 4 5 6 7 8 ENC007 12 1 1 2 3 2 3 4 5 1 2 3 6 50 C 7 8 9 10 11 12 Makita Makita Makita Makita Makita...

Страница 51: ...51 1 2 3 10 C 40 C 4 A 1 2 3 015658 4 OFF 75 100 50 75 25 50 0 25...

Страница 52: ...52 5 10 15 6 7 012023 8 006348 011405 1 9 2 10 11 LED 50 20 50 20 A 12 mm B 9 mm 1 A 17 mm B 14 mm 1 A 12 mm B 9 mm 2...

Страница 53: ...53 12 13 14 8 15 1 2 3 4 5 Makita Makita Makita Makita Makita ENG905 1 EN62841 2 2 DTD134 LpA 95 dB A LWA 103 dB A 3 dB A DTD146 LpA 96 dB A LWA 104 dB A 3 dB A ENG907 1...

Страница 54: ...54 ENG900 1 EN62841 2 2 DTD134 ah 12 0 m s2 1 5 m s2 DTD146 ah 15 5 m s2 2 0 m s2 ENG901 2 A...

Страница 55: ...55...

Страница 56: ...Makita Europe N V Jan Baptist Vinkstraat 2 3070 Kortenberg Belgium Makita Corporation 3 11 8 Sumiyoshi cho Anjo Aichi 446 8502 Japan IDE 885243H990...

Отзывы: