background image

FUNCTIONAL DESCRIPTION 


CAUTION: 

• 

Always be sure that the tool is switched off and the 
battery cartridge is removed before adjusting or 
checking function on the tool. 

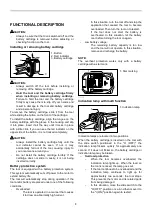
Installing or removing battery cartridge 

1

2

3


013993 

CAUTION: 

• 

Always switch off the tool before installing or 
removing of the battery cartridge. 

• 

Hold the tool and the battery cartridge firmly 
when installing or removing battery cartridge.


Failure to hold the tool and the battery cartridge 
firmly may cause them to slip off your hands and 
result in damage to the tool and battery cartridge 
and a personal injury. 

To remove the battery cartridge, slide it from the tool 
while sliding the button on the front of the cartridge. 
To install the battery cartridge, align the tongue on the 
battery cartridge with the groove in the housing and slip 
it into place. Insert it all the way until it locks in place 
with a little click. If you can see the red indicator on the 
upper side of the button, it is not locked completely. 


CAUTION: 

• 

Always install the battery cartridge fully until the 
red indicator cannot be seen. If not, it may 
accidentally fall out of the tool, causing injury to 
you or someone around you. 

• 

Do not install the battery cartridge forcibly. If the 
cartridge does not slide in easily, it is not being 
inserted correctly. 

Battery protection system 

The tool is equipped with a battery protection system. 
This system automatically cuts off power to the motor to 
extend battery life. 
The tool will automatically stop during operation if the 
tool and/or battery are placed under one of the following 
conditions: 

• 

Overloaded: 

The tool is operated in a manner that causes 
it to draw an abnormally high current. 

In this situation, turn the tool off and stop the 
application that caused the tool to become 
overloaded. Then turn the tool on to restart. 
If the tool does not start, the battery is 
overheated. In this situation, let the battery 
cool before turning the tool on again. 

• 

Low battery voltage: 

The remaining battery capacity is too low 
and the tool will not operate. In this situation, 
remove and recharge the battery. 


NOTE: 

The overheat protection works only with a battery 
cartridge with a star mark. 

1


012128 

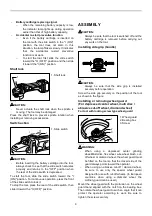
Indication lamp with multi function 

1


007224 

Indication lamps are located in two positions. 
When the battery cartridge is inserted on the tool with 
the slide switch positioned in the "O (OFF)", the 
indication lamp flickers quickly for approximately one 
second. If it does not flicker so, the battery cartridge or 
indication lamp may be broken. 


Overload protection


When the tool becomes overloaded, the 
indication lamp lights up. When the load on 
the tool is reduced, the lamp goes out. 


If the tool continues to be overloaded and the 
indication lamp continues to light up for 
approximately two seconds, the tool stops. 
This prevents the motor and its related parts 
from being damaged. 


In this situation, move the slide switch to the 
"O (OFF)" position once. And then move it to 
the "I (ON)" position again to restart. 


1. Star marking 

1. Button 
2. Red indicator 
3. Battery cartridge

1. Indication lamp 

Содержание DGA452Z

Страница 1: ...1 ENGLISH Original instructions INSTRUCTION MANUAL IMPORTANT Read Before Using Cordless Angle Grinder DGA402 DGA450 DGA452 007214 ...

Страница 2: ...and Accumulators and their implementation in accordance with national laws electric equipment and batteries and battery pack s that have reached the end of their life must be collected separately and returned to an environmentally compatible recycling facility ENE048 1 Intended use The tool is intended for grinding sanding and cutting of metal and stone materials without the use of water ENG905 1 ...

Страница 3: ...re and or serious injury Save all warnings and instructions for future reference The term power tool in the warnings refers to your mains operated corded power tool or battery operated cordless power tool Work area safety 1 Keep work area clean and well lit Cluttered or dark areas invite accidents 2 Do not operate power tools in explosive atmospheres such as in the presence of flammable liquids ga...

Страница 4: ...ment or binding of moving parts breakage of parts and any other condition that may affect the power tool s operation If damaged have the power tool repaired before use Many accidents are caused by poorly maintained power tools 22 Keep cutting tools sharp and clean Properly maintained cutting tools with sharp cutting edges are less likely to bind and are easier to control 23 Use the power tool acce...

Страница 5: ...t hidden wiring Contact with a live wire will also make exposed metal parts of the power tool live and could give the operator an electric shock 11 Never lay the power tool down until the accessory has come to a complete stop The spinning accessory may grab the surface and pull the power tool out of your control 12 Do not run the power tool while carrying it at your side Accidental contact with th...

Страница 6: ...binding or when interrupting a cut for any reason switch off the power tool and hold the power tool motionless until the wheel comes to a complete stop Never attempt to remove the cut off wheel from the cut while the wheel is in motion otherwise kickback may occur Investigate and take corrective action to eliminate the cause of wheel binding d Do not restart the cutting operation in the workpiece ...

Страница 7: ... 1 Before using battery cartridge read all instructions and cautionary markings on 1 battery charger 2 battery and 3 product using battery 2 Do not disassemble battery cartridge 3 If operating time has become excessively shorter stop operating immediately It may result in a risk of overheating possible burns and even an explosion 4 If electrolyte gets into your eyes rinse them out with clear water...

Страница 8: ...otor to extend battery life The tool will automatically stop during operation if the tool and or battery are placed under one of the following conditions Overloaded The tool is operated in a manner that causes it to draw an abnormally high current In this situation turn the tool off and stop the application that caused the tool to become overloaded Then turn the tool on to restart If the tool does...

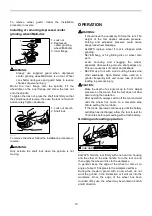
Страница 9: ... tool press the rear of the slide switch then slide it toward the O OFF position ASSEMBLY CAUTION Always be sure that the tool is switched off and the battery cartridge is removed before carrying out any work on the tool Installing side grip handle 007225 CAUTION Always be sure that the side grip is installed securely before operation Screw the side grip securely on the position of the tool as sho...

Страница 10: ...king corners sharp edges etc This can cause loss of control and kickback NEVER use tool with wood cutting blades and other sawblades Such blades when used on a grinder frequently kick and cause loss of control leading to personal injury CAUTION Make the depth of a single cut up to 5 mm Adjust pressure on the tool so that the tool does not slow down during the operation After operation always switc...

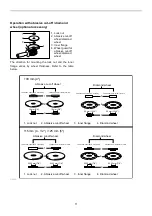
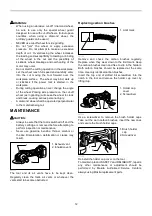
Страница 11: ... wheel Thickness Less than 4 mm 5 32 Thickness 4 mm 5 32 or more Thickness Less than 4 mm 5 32 Thickness 4 mm 5 32 or more Thickness Less than 4 mm 5 32 Thickness 4 mm 5 32 or more 22 23 mm 7 8 22 23 mm 7 8 22 23 mm 7 8 16 mm 5 8 20 mm 13 16 1 2 3 1 4 3 4 3 2 1 100 mm 4 115 mm 4 1 2 125 mm 5 1 2 3 1 4 3 Lock nut Abrasive cut off wheel Inner flange Diamond wheel 4 3 2 1 Lock nut Abrasive cut off wh...

Страница 12: ...CAUTION Always be sure that the tool is switched off and the battery cartridge is removed before attempting to perform inspection or maintenance Never use gasoline benzine thinner alcohol or the like Discoloration deformation or cracks may result 1 2 007222 The tool and its air vents have to be kept clean Regularly clean the tool s air vents or whenever the vents start to become obstructed Replaci...

Страница 13: ...rvice Center Wheel guard Wheel cover for depressed center wheel multi disc Wheel guard Wheel cover for abrasive cut off wheel diamond wheel Depressed center wheels Abrasive cut off wheels Multi discs Diamond wheels Wire cup brushes Wire bevel brush 85 Abrasive discs Inner flange Lock nut for depressed center wheel abrasive cut off wheel multi disc diamond wheel Lock nut for abrasive disc Lock nut ...

Страница 14: ...14 ...

Страница 15: ...15 ...

Страница 16: ...16 www makita com Makita Jan Baptist Vinkstraat 2 3070 Belgium Makita Corporation Anjo Aichi Japan 885268B223 ...

Отзывы: