6 ENGLISH
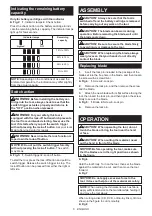
Indicating the remaining battery
capacity
Only for battery cartridges with the indicator
►
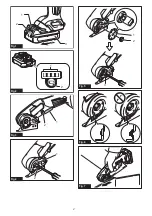
Fig.2:
1.
Indicator lamps
2.
Check button
Press the check button on the battery cartridge to indi
-
cate the remaining battery capacity. The indicator lamps
light up for few seconds.
Indicator lamps
Remaining
capacity
Lighted
Off
75% to 100%
50% to 75%
25% to 50%
0% to 25%
NOTE:
Depending on the conditions of use and the
ambient temperature, the indication may differ slightly
from the actual capacity.
Switch action
WARNING:
Before installing the battery car-
tridge into the tool, always check to see that the
switch trigger actuates properly and returns to
the "OFF" position when released.
WARNING:
For your safety, this tool is
equipped with the lock-off button which prevents
the tool from unintended starting. Never use the
tool if it starts when you pull the switch trigger
without pressing the lock-off button.
Ask your local
Makita Service Center for repairs.
WARNING:
Never disable the lock function or
tape down the lock-off button.
NOTICE:
Do not pull the switch trigger forcibly
without pressing the lock-off button.
The switch
may break.
►
Fig.3:
1.
Switch trigger
2.
Lock-off button
To start the tool, press the lock-off button and pull the
switch trigger. Release the switch trigger to stop. The
lock-off button can be pressed from either the right or
left side.
ASSEMBLY
CAUTION:
Always be sure that the tool is
switched off and the battery cartridge is removed
before carrying out any work on the tool.
CAUTION:
The blade can be warm during
operation. Before removing the blade, wait until
the blade cools down.
CAUTION:
Be sure to secure the blade firmly
to avoid injury or damage to the tool.
CAUTION:
When replacing the blade, always
wear gloves so that your hands do not directly
contact the blade.
Replacing blade
1.
Insert the lock pin included in the package of the
blade set into the free hole in the blade, and then loosen
the screw with a screwdriver.
►
Fig.4:
1.
Screw
2.
Lock pin
2.
Remove the lock pin, and then remove the screw
and the blade.
3.
Attach the new blade with its flat surface facing the
tool, then insert the lock pin, and then tighten the screw
firmly to secure the blade.
►
Fig.5:
1.
Blade
2.
Screw
3.
Lock pin
4.
Remove the lock pin.
OPERATION
CAUTION:
When operating the tool, do not
touch the blade or bring the tool near the hand
or face.
CAUTION:
When cutting the material, never
put the hand in front of the blade.
NOTICE:
Before operating the tool, make sure
that the blades are in the right position as shown
in the figure.
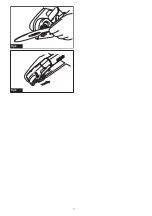
►
Fig.6
Hold the tool firmly. Turn on the tool, then set the blade
against the material to be cut, and then move the tool
forward.
►
Fig.7
NOTICE:
Do not apply excessive force to the
tool. It does not help to cut the material smoothly.
NOTE:
When cutting the thin material such as fabric,
apply sufficient tension to the material while holding it
and move the tool slowly.
When cutting a disc (CD, DVD, or Blu-ray Disc), tilt it as
shown in the figure to cut it smoothly.
►
Fig.8
Содержание CP100D
Страница 2: ...1 2 3 Fig 1 1 2 Fig 2 2 1 Fig 3 1 2 Fig 4 1 2 3 Fig 5 Fig 6 Fig 7 2 ...
Страница 3: ...Fig 8 Fig 9 3 ...


