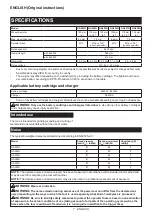
16 ENGLISH
Operation with abrasive cut-off /
diamond wheel
Optional accessory
WARNING:
Do not "jam" the wheel or apply
excessive pressure. Do not attempt to make an
excessive depth of cut.
Overstressing the wheel
increases the loading and susceptibility to twisting
or binding of the wheel in the cut and the possibility
of kickback, wheel breakage and overheating of the
motor may occur.
WARNING:
Do not start the cutting operation
in the workpiece. Let the wheel reach full speed
and carefully enter into the cut moving the tool
forward over the workpiece surface.
The wheel
may bind, walk up or kickback if the power tool is
started in the workpiece.
WARNING:
During cutting operations, never
change the angle of the wheel.
Placing side pres
-
sure on the cut-off wheel (as in grinding) will cause
the wheel to crack and break, causing serious per
-
sonal injury.
WARNING:
A diamond wheel shall be oper
-
ated perpendicular to the material being cut.
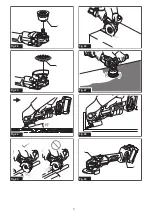
Usage example: operation with abrasive cut-off
wheel
►
Fig.25
Usage example: operation with diamond wheel
►
Fig.26
Operation with wire cup brush
Optional accessory
CAUTION:
Check operation of brush by run
-
ning tool with no load, insuring that no one is in
front of or in line with brush.
NOTICE:
Avoid applying too much pressure
which causes over bending of wires when using
the wire cup brush.
It may lead to premature
breakage.
Usage example: operation with wire cup brush
►
Fig.27
Operation with wire wheel brush
Optional accessory
CAUTION:
Check operation of wire wheel
brush by running tool with no load, insuring that
no one is in front of or in line with the wire wheel
brush.
NOTICE:
Avoid applying too much pressure
which causes over bending of wires when
using wire wheel brush.
It may lead to premature
breakage.
Usage example: operation with wire wheel brush
►
Fig.28
MAINTENANCE
CAUTION:
Always be sure that the tool is
switched off and the battery cartridge is removed
before attempting to perform inspection or
maintenance.
NOTICE:
Never use gasoline, benzine, thinner,
alcohol or the like. Discoloration, deformation or
cracks may result.
To maintain product SAFETY and RELIABILITY, repairs,
any other maintenance or adjustment should be per
-
formed by Makita Authorized Service Centers, always
using Makita replacement parts.
Air vent cleaning
The tool and its air vents have to be kept clean.
Regularly clean the tool's air vents or whenever the
vents start to become obstructed.
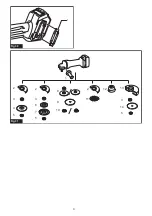
►
Fig.29:
1.
Exhaust vent
2.
Inhalation vent
Remove the dust cover from inhalation vent and clean it
for smooth air circulation.
►
Fig.30:
1.
Dust cover
NOTICE:
Clean out the dust cover when it is
clogged with dust or foreign matters.
Continuing
operation with a clogged dust cover may damage the
tool.
Содержание 0088381894937
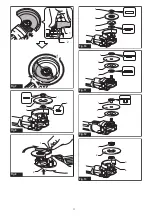
Страница 2: ...2 3 1 Fig 1 1 2 Fig 2 1 Fig 3 1 Fig 4 Fig 5 1 2 3 Fig 6 2 ...
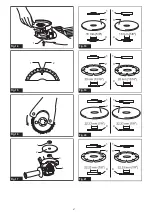
Страница 3: ...2 1 Fig 7 2 3 4 1 Fig 8 1 2 Fig 9 1 2 3 4 Fig 10 1 2 3 4 Fig 11 1 2 3 Fig 12 1 2 4 3 Fig 13 3 ...
Страница 5: ...1 Fig 22 1 Fig 23 Fig 24 Fig 25 Fig 26 Fig 27 Fig 28 1 2 Fig 29 5 ...
Страница 6: ...1 Fig 30 1 2 5 2 2 11 12 4 3 5 6 7 8 9 10 13 3 14 5 3 Fig 31 6 ...
Страница 99: ...99 ...


