background image

37

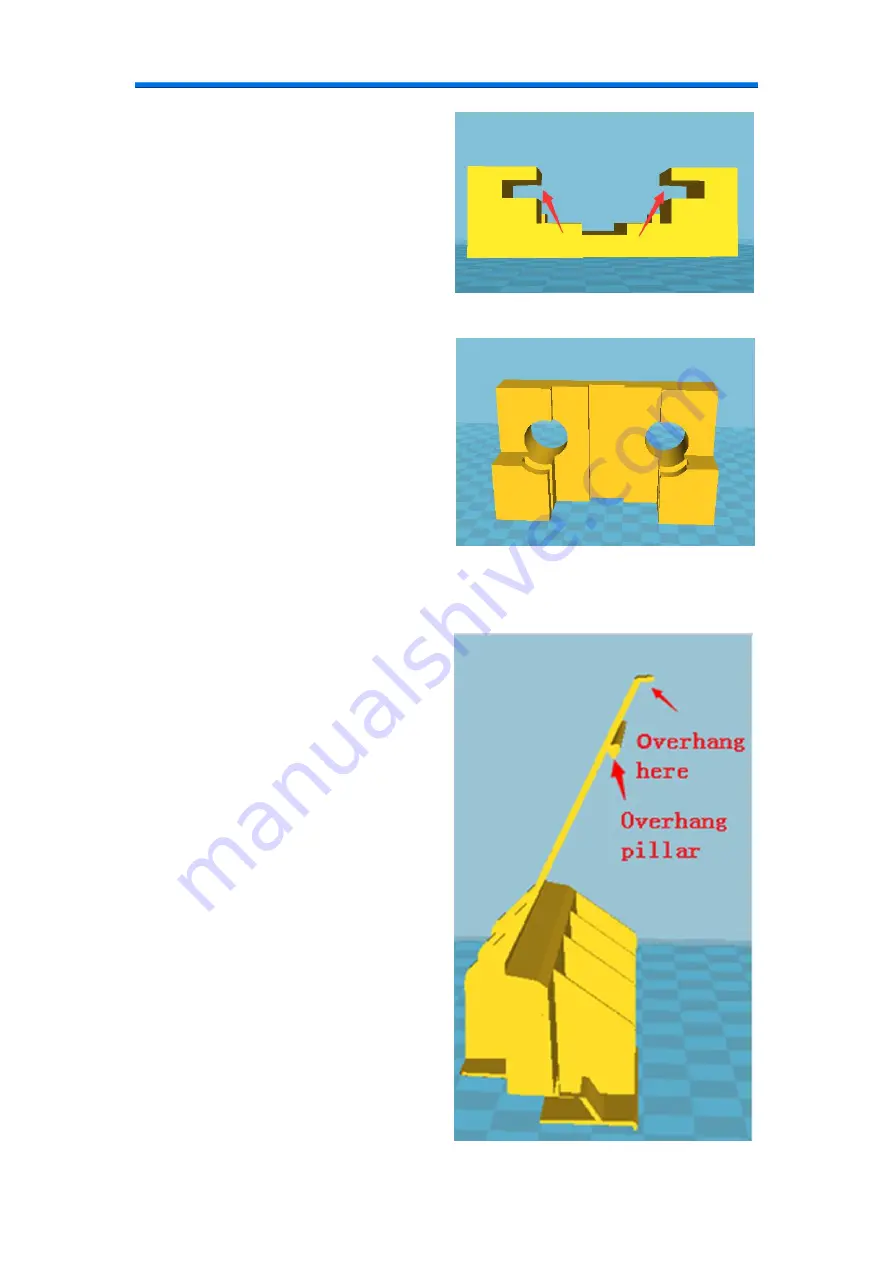
There's also an overhang in this
direction.

So finally decided to print in this
direction.

二.

Avoid overhang in design.

Overhang appears in this model and
cannot be avoided by changing
location. So divide overhanging incline
and pillar from main part, print them
separately and stick them together with
glue in the end.

Содержание K5 Plus

Страница 1: ...1 ...

Страница 2: ...to zero 14 4 1 2 Unlock stepper motor 14 4 1 3 Load filament 15 4 1 4 Unload filament 15 4 1 5 XYZ move axis 16 4 1 6 Preheat 16 4 1 7 Cool 17 4 2 Print 17 4 3 Machine setting 18 4 3 1 Key sound 18 4 2 2 Alarm sound 18 4 3 3 Touch calibration 19 4 3 4 Z distance measurement 19 4 4 Machine status query 19 4 5 Other functions 20 4 5 1 Basic functions 20 4 5 2 Midway refueling 20 4 5 3 Temperature pr...

Страница 3: ...ed setup 28 5 2 5 CURA print interface 29 5 3 View the model 30 Chapter 6 Printing exercises 32 Chapter 7 Printing skills 35 7 1 Flat bottom 36 7 2 Avoid overhang 36 7 3 Assemble matching graphic tolerances 38 7 4 Big size model print 38 Chapter 8 Printing picture relief 38 Chapter 9 Exports STL format files 40 9 1 Pro E exports STL files 41 9 2 UG export STL file 42 9 3 Solidworks export STL file...

Страница 4: ...4 Chapter 1 Learn about your 3D printer 1 1 3D printer introduction ...

Страница 5: ...5 ...

Страница 6: ...aterials during the disassembled process 4 In daily use it is necessary to regularly clean and lubricate the optical axis of the cross slide table of the 3D printer and be careful not to drip onto the casing or belt when adding lubricating oil 5 Reading User guide at the same time with the actual operation of the machine will be more conducive to your operation 6 In the printing process encountere...

Страница 7: ... packing remove the tape open the front door and remove the foam Take out the accessory box etc Take out the power cord from the accessory box connect the power cord is power on O is power off Install filament racks on the back of the machine with an open end stuck in the hole ...

Страница 8: ...8 Install WIFI antenna on the side of the machine Rotate clockwise to fix the antenna Install white feeding pipe separate the two ends insert into hole ...

Страница 9: ...to the printing platform 3 1 Coarse tuning Platform leveling filament must be unloaded When the platform is down confirm that there is no debris inside the machine Remove the swift change nozzle replace the leveling module 1 2 ...

Страница 10: ...10 3 4 Tighten the four nuts counterclockwise Twist the nut according to screen indicated ...

Страница 11: ...11 Turn off the power Replace the swift change nozzle 1 2 3 ...

Страница 12: ...e distance between the platform and the nozzle is too large and the filament is thrown down from the nozzle instead of sticking tightly Turn the nut a little clockwise to make the platform go up until the phenomenon disappears and a tight line appears If the filament is found to be too thin or incoherent it means that the distance between the nozzle and the platform is too small resulting in too s...

Страница 13: ...s appropriate In most cases the printing failure is caused by the platform not being adjusted properly Therefore please debug repeatedly as required to ensure that the platform height has been adjusted to a better level And when printing the first layer it s best to watch the machine print and make sure the machine prints properly before leaving ...

Страница 14: ...ro The machine moves to zero automatically and the XYZ coordinate is 0 Click Prepare to enter the preparatory operation interface select Return to zero and wait for the machine to return to zero automatically 4 1 2 Unlock stepper motor Remove the self locking state of the stepper motor Only after unlocking the stepper motor can the cross slide be moved manually Click Prepare to enter the preparato...

Страница 15: ...eated to 230 C the filament feeder will evenly and smoothly squeeze the filament out of the nozzle loading filament automatically finish click exit it will stop 4 1 4 Unload filament Unload filament is an operation often used in the process Select Prepare and click Unload filament nozzle heating when replacing filaments we usually choose to unload the filament first Nozzle is heated to 230 C the f...

Страница 16: ... to print the nozzle and the hotbed can be heated together by selecting preheating to reach the selected temperature which can reduce the preparation time of temperature rise before printing There are two forms of preheating preheating PLA and preheating ABS Selecting preheat PLA it can be found that the screen goes back to the main interface the temperature setting value becomes 180 the hot bed s...

Страница 17: ...ting Select Cool You can see that the interface is back to the main interface and that the temperature of the nozzle and the hot bed is set to zero 4 2 Print Before printing the preparatory work that needs to be done well is to adjust the platform For specific methods refer to chapter 2 After confirming that the platform is set up select Print Then select the Gcode file you want to print ...

Страница 18: ...alibrate the machine key sound settings and alarm sound settings as well as the Z distance measurement This function is required if there is a power failure 4 3 1 Key sound Click Key sound to cancel the key sound and click again to resume 4 3 2 Alarm sound Click Alarm sound to cancel the alarm sound and click again to restore it is not recommended to cancel it ...

Страница 19: ...ether the calibration succeeded or failed If it fails it will need to be recalibrated once again 4 3 4 Z distance measurement During use the maximum distance of Z may change slightly Select Z distance measurement to re measure the distance of Z 4 4 Machine status query Click Status on the main interface to view the version information of the machine When there is a problem in the use of the machin...

Страница 20: ...nting and the machine will print according to the original process Stop printing If you find that the printing failed or for some other reasons the model is no longer printed you can click Stop printing After the printing is stopped the printing is over and cannot be resumed 4 5 2 Midway refueling When the machine is printing a large model it often encounters that the filament are not enough to co...

Страница 21: ...stuck to the gear of the wire feeder It will continue printing after loading 4 5 3 Temperature printing speed and nozzle fan adjustment The machine can be set again if it finds that the temperature set in Cura slice software is unsuitable for the current printing or forgot to turn off the nozzle fan when printing ABS before printing In the main interface or the printed interface click the icon of ...

Страница 22: ...ill display the adjustment interface of the hot bed temperature and fan speed The fan speed on means to open the fan and off means to turn off the fan 4 5 4 WiFi connection and video monitoring Refer to the machine switch code open the WIFI of the mobile phone to search for the wireless name and enter the password and then you can connect and operate the 3D printer Open the WIFI function of the mo...

Страница 23: ...he last 8 digit password of WIFI name Open the mobile browser and enter the url 10 10 10 10 to enter Enter the interface can observe the printing process through video or select the command to operate the printer ...

Страница 24: ...structions note that if you need to open OBJ and AMF files when using CURA you need to check the corresponding component when installed As shown below Select by printing requirement and click install for further installation 1 Install Arduino Drivers 2 Open STL files with Cura 3 Open OBJ files with Cura 4 Open AMF files with Cura It needs to install software driver if the menu in the right image p...

Страница 25: ...ext will continue to install the slicing software After the green progress bar is complete click the option Next Finally click Finish to complete the slicing installation After installation the software will automatically open and menu in the right image will appear ...

Страница 26: ...ns for the parameters The printed parameters can be set according to the displayed information as a reference 5 2 3 Basic setup 1 Layer thickness The thickness of each layer filament supports 0 05 0 3 and it is recommended to take value between 0 1 0 2 Effect The smaller the layer thickness the finer the surface the longer the printing time 2 Wall thickness The outer wall thickness of the model is...

Страница 27: ...t tight and the appearance of an edge up 9 Support type Because there will be overhang during printing the filament might drop for gravity reason Therefore a support is needed but not for all None No support Touching buildplate External support Only add support for the overhang part do not add internal support Everywhere Add to every part of the model as long as it is overhang including inside of ...

Страница 28: ...t will be better 5 Double headed overlap Double headed printers need to be set for printing and repeats the amount of squeezing when setting the double headed printing Effect Set a certain amount of repetitive extrusion can make two colors stick tighter 6 Movement speed The speed of machine movement Effect The faster the movement speed the shorter the printing time 7 Underlying print speed The spe...

Страница 29: ...eed up the cooling Effect It is used for accelerated cooling during printing and the molding effect is better ABS is used with caution and is easily cracked 5 2 5 CURA print interface Load model Save model Save to SD card USB network print Rotate Rotate the model Automatically lay flat model Reset model Click the rotation icon and three different color circles centered on the center of the model w...

Страница 30: ...to change the size of the model and the size of one of the directions all other dimensions will be changed according to the scale Change the size of model X in the figure from 156 129 to 100 and Scale will show the size changed the original 0 64 times the Size of Y and Z dimensions will also automatically change to the corresponding values If you only want to scale one direction separately you can...

Страница 31: ...irection 5 3 View model See if the model size can be printed The size or position of the model exceeds the scope of the machine s printing so the model will appear gray as shown in the figure Modify the model size or move the model location as required until the model is all displayed in yellow View model overhang Overhang usually exists in print model you can see in Chapter 7 and the following wa...

Страница 32: ...on of model view Select model click right mouse button and you can make the following operations to the model Center move the model to the center of the printing platform Delete objects Delete unnecessary models Multiplied object Multiply model quantity View the model from various angles Click and hold right mouse button and move mouse Move model Click and hold left mouse button and move mouse Zoo...

Страница 33: ...lete one printing we need the following procedures STL file gcode file 3D printer The specific operation is as follows Open Cura click the icon or select Open model or gcode in the File column choose the STL file which you want to print click and open it which is displayed in the following image Select the 3D printer of the corresponding model in the Equipment column ...

Страница 34: ...ng after the compilation completed Note the information provided by the software can be used to check whether the filament are sufficient and the platform is well adjusted Click the icon to store the Gcode file directly into the SD card If you want to save the Gcode file somewhere else or if you need to rename the Gcode file select Save GCode in the File and save it to the appropriate file Then in...

Страница 35: ... file and print Wait for the model to start printing and then the model will be printed Note the model will adhere to the platform after printing and the bottom can be slowly removed with a shovel If it s too tight you can heat the platform Take out ...

Страница 36: ...ozzle during printing are fluid they will droop under the influence of gravity if there is any overhang in the printed image the filament will drop down therefore we need to use software to form a support when print and remove it after print is done It is same as building a house because the concrete is fluid which will drop down so we need stake it off and remove the wooden stakes after the concr...

Страница 37: ...decided to print in this direction 二 Avoid overhang in design Overhang appears in this model and cannot be avoided by changing location So divide overhanging incline and pillar from main part print them separately and stick them together with glue in the end ...

Страница 38: ...well as the underlying swollen edge printing the tolerances need to be enlarged a little general tolerance is set to 0 4 mm depending on the actual graphics settings 7 4 Big size model print If the print volume is relatively big PLA filament are needed the feature of ABS filament decide that it is not suitable for big volume graphic it will easily split and out of shape So PLA is recommended for p...

Страница 39: ...u do not need to replace the transparent background you can directly save the picture format as BMP JPG JPEG PNG Open the model in cura and select the image you want to print After selecting to open the picture the corresponding parameters will be set in the interface as shown in the figure below Darker is higher Lighter is higher No smoothing Light smoothing Heavy smoothing Appropriately reducing...

Страница 40: ...40 After setting the parameters click OK and the model file as shown in the figure will appear the effect will be better if the picture is pressed upright After generating gcode it can be printed ...

Страница 41: ...Chapter 9 Exports STL format files 9 1 Pro E exports STL files Select the File column and click Save Copy in Save As Check the format of stl in the Type column of the saved file name the file and click OK ...

Страница 42: ... select Binary as the format of the parameter and enter the Chord height and Angle control input values and then confirm that the export is completed 9 2 UG export STL file Select the column Export STL format ...

Страница 43: ...43 Enter 0 for Triangle Tolerance and Adjacent Tolerance and click OK Name the component and click OK Click OK Select the model file you want to convert and click OK ...

Страница 44: ... the selection box that pops up after that select OK until the export of the file is completed 9 3 Solidworks export STL files 1 Click on the File column and select Save As 2 Select STL stl in the Save as type column ...

Страница 45: ...tton at the bottom left of the interface 4 As the options shown in the figure above the output is Binary adjust the Error and Tolerance parameters to the far right and then click OK 5 Then click save to complete the format conversion ...

Страница 46: ...n improve the viscosity by affixing high temperature adhesive tape 4 The platform cooling fan is turned on too early you can unplug the fan s interface remember not to plug the the motor cooling fan interface 3 Abnormal filament production 1 The temperature has not reached the best melting point of filaments and the temperature can be adjusted properly Generally the temperature is not high enough ...

Отзывы: