DOLBY ATMOS is only available in
„HDMI
IN‟
and
„HDMI
OUT‟
(ARC) modes. For the details of the
If you never see this scrolling message you will need to follow the guidance below to achieve Dolby
Volume Control
To adjust the volume of the soundbar,
press either the „Volume Up‟ or Volume Down‟ buttons on the remote control
(Remote Control Ref.3/Ref.5)
. Alternatively, press and hold the
„Volume
Up‟
or Volume
Down‟
buttons on the top of the soundbar
(Front and Top View Ref.3/Ref.4).
Dynamic EQ
To adjust the sound effect of the soundbar, press either the
„MUSIC‟
(Remote Control Ref.6)
„MOVIE‟
(Remote Control Ref. 12)
„NEWS‟
(Remote Control Ref.13)
„3D‟ buttons
(Remote
Control Ref.16)
on the remote control.
Dolby Atmos
When the Sierra receives a Dolby
Atmos signal, the front display will scroll “Dolby Atmos/Dolby Surround”. This
scrolling display is only temporary and will last for 3 seconds. This will
happen at the start of the film or the studio intro.
To play Atmos on the Sierra Plus, the player or streaming product needs to be Atmos capable. To use Dolby Atmos in HDMI 1 /HDMI 2 / HDMI ARC mode, your TV
has to support Dolby Atmos.
The UHD (Ultra-High-Definition)/Blu-ray player or TV must have the digital output settings set to Bitstream, often
labelled with references to „Cinema Surround‟ or „Dolby‟. “The
UHD/Blue-Ray disc must be Dolby Atmos-
enabled”.
The TV may not be able to pass through the Atmos stream to the soundbar even though it is capable of processing Atmos itself.
A
workaround for this is to suggest a direct connection from the player to the soundbar. For example, if
your TV or DVD player has 2 x HDMI outputs. 1 is labelled “Audio/Video”. You
can connect this to the TV for the picture. The second connection is labelled
“Audio
only”.
This can be connected directly to the Sierra Plus. If the player output is set to bitstream, then
the Sierra Plus will output Atmos and display Atmos when it first sees the stream.
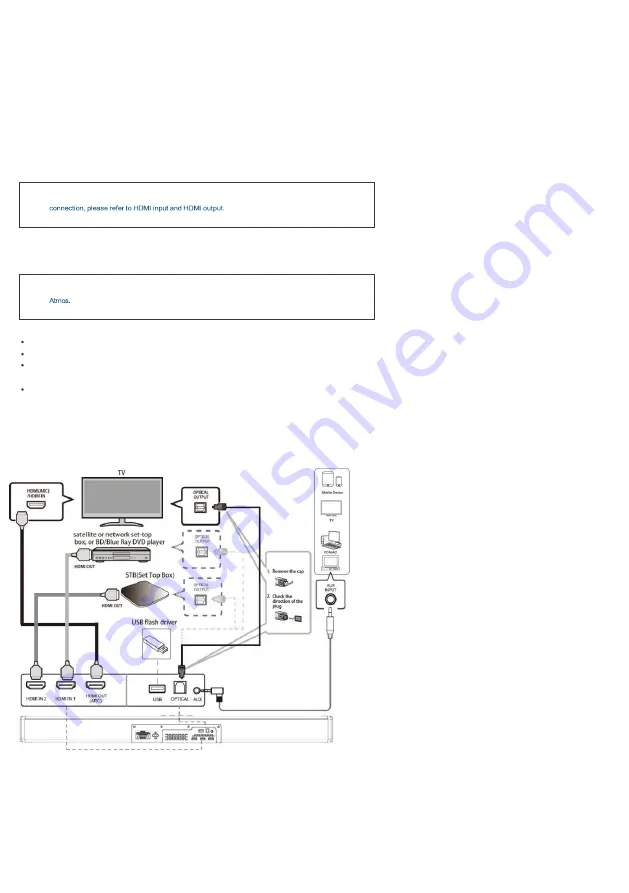
Connections
(https://www.majority.co.uk/wp-content/uploads/2021/06/Sierra-Connections.jpg)


