background image

2

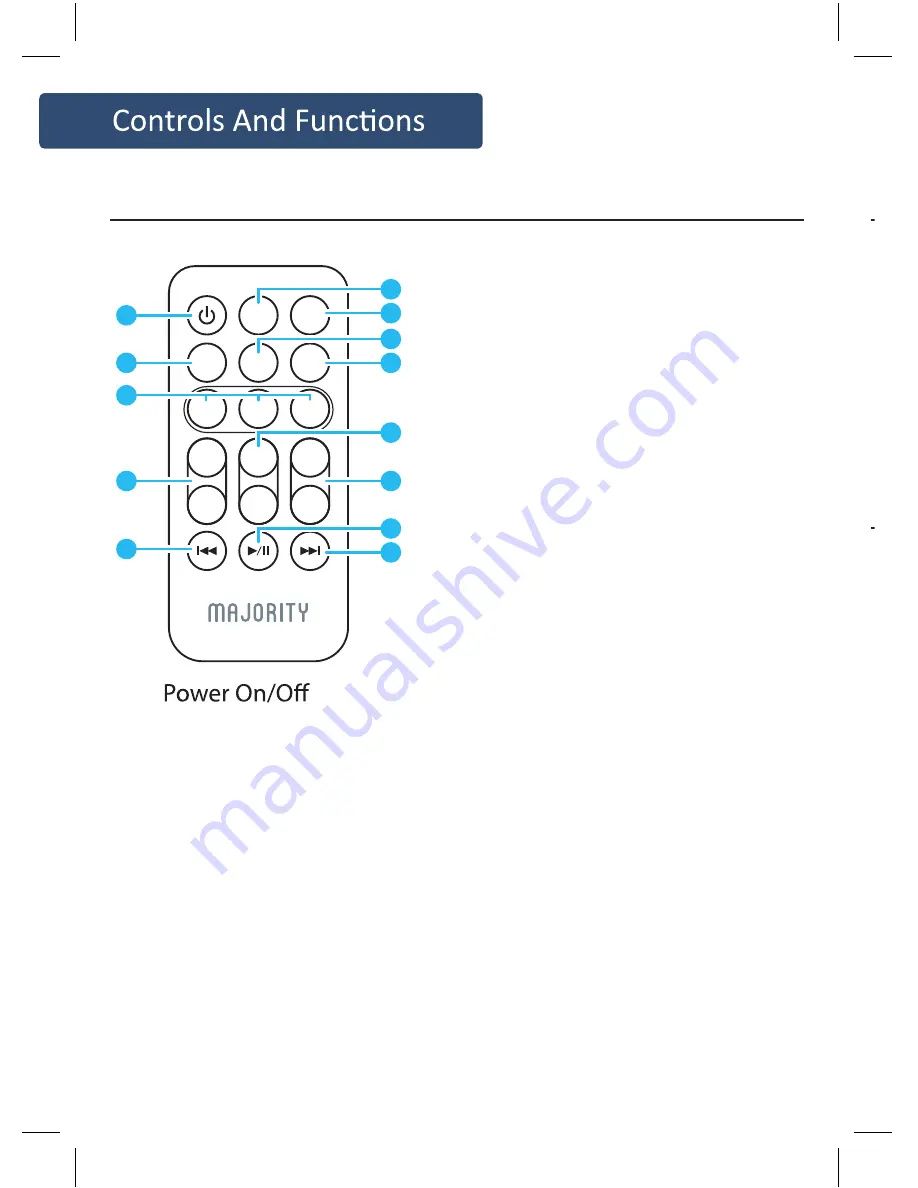
13. 

Switch the unit between on and 
Standby mode

14.  BT button

Bluetooth input buttons

15.  Music/Movie/Dialog 

buttons

Press the button to select a 
desired music mode: Music, 
Movie, Voice

16.  /Treble- buttons

(It must be in mode of Music)

17.  Back button

Skip backwards to the 
beginning of the track or to 
the previous track in Bluetooth 
mode

18.  OPTICAL button

Optical in button

19.  PAIR/MUTE button

One touch to silence the unit or 
restore the sound
Press and hold 2 seconds to 
select PAIR mode

20.  LINE button

Line In for 3.5mm input

21.  AUX button

AUX for RCA L/R input

22.  BASS+/BASS- buttons

(It must be in mode of Music)

23.  VOL +/- buttons

Adjust the volume

24.  Play/Stop button

Play/pause/resume playback in 
Bluetooth mode

25.  Skip button

Skip forwards to the next track 
in Bluetooth mode

The remote control sensor at the front of the soundbar is 
sensitive to the remote control’s commands up to a maximum of 
6 metres away and within a maximum arc of 40 degrees.

Please note that the operating distance may vary depending on 
the brightness of the room.

Remove the battery compartment located on the back of the 

remote control.

The unit comes standard with a battery 

installed. To avoid discharging it, it is locked 

with a plastic tape. Remove the tape to 

activate the battery.

If you have to change, insert a CR2025 3V 

battery, observing the correct polarity.

Replace the battery compartment.

STANDBY

LINE

OPTICAL

BT

MUSIC

BASS+

VOLUME-

BASS-

TREBLE-

MOVIE

VOICE

AUX

PAIR/

MUTE

13

14

15

16

17

21

20

19

18

22

23

25

24

Remote Control

Using the Remote Control

Remote Control Battery Replacement

Skip backwards to the 
beginning of the track or to 
the previous track in Bluetooth 
mode

18.  OPTICAL button

Optical in button

19.  PAIR/MUTE button

One touch to silence the unit or 
restore the sound
Press and hold 2 seconds to 
select PAIR mode

20.  LINE button

Line In for 3.5mm input

21.  AUX button

AUX for RCA L/R input

22.  BASS+/BASS- buttons

(It must be in mode of Music)

23.  VOL +/- buttons

Adjust the volume

24.  Play/Stop button

Play/pause/resume playback in 
Bluetooth mode

25.  Skip button

Skip forwards to the next track 
in Bluetooth mode

Remote Control

Содержание SCAFELL PIKE SKP-BAR-BLK

Страница 1: ...SKP BAR BLK SCAFELL PIKE Audio Soundbar Wired Subwoofer Instructions Guide...

Страница 2: ...g the Subwoofer with the Soundbar 13 10 11 12 14 15 16 16 17 Contents Fron Watch video tutorials and register your product for a FREE 3 year warranty at www majorityradios co uk YEAR WARRANTY Warranty...

Страница 3: ...View LED Indicator Light 1 Speaker Drivers 2 Remote Control Sensor 3 LED Indicator Light Side View Buttons 4 5 Select a mode Bluetooth AUX in LINE in or OPTICAL in 6 Volume increase 7 Volume decrease...

Страница 4: ...lay pause resume playback in Bluetooth mode 25 Skip button Skip forwards to the next track in Bluetooth mode The sens 6 me Plea the b Rem remo The insta with activ If yo batt Repl STANDBY LINE OPTICAL...

Страница 5: ...partment ng the Remote Control mote Control Battery Replacement 3 oth it or k in ack The remote control sensor at the front of the soundbar is sensitive to the remote control s commands up to a maximu...

Страница 6: ...E VOICE AUX PAIR MUTE 1 Majority Scafell Pike Soundbar 2 Remote Control 3 Adapter 4 3 5mm to 3 5mm Audio cable 5 RCA Stereo Audio Cable 6 Subwoofer 7 WallPlugs 8 Screws 9 Instructions Guide Majority S...

Страница 7: ...e follow the guidance of the manual to set up your new purchase and begin enjoying its features If you require further assistance with your new soundbar please contact our support team on the Majority...

Страница 8: ...heck the wall type before drilling and mounting Tools fixings required 1 Drill fitted with masonry drill bit 3 Pencil 5 Spirit level 2 Screwdriver 4 Ruler Place the soundbar in the desired position an...

Страница 9: ...ll use a masonry drill bit drill holes to a depth of approximately 30mm and insert the wall plugs Insert the screws into the wall plugs and drive home the screws until the heads stand proud of the wal...

Страница 10: ...8 Mode Indicator Lights State Indicator Lights Red Optical mode Yellow AUX mode White Line in mode Green Bluetooth ready Flashing blue Bluetooth connected Blue Use RCA unit Then sour Turn Fixi...

Страница 11: ...Sockets of the unit Then press the AUX button on the remote control or press the source button on the unit to choose the AUX function Turn on your television set to use the Majority Scafell Pike LINE...

Страница 12: ...SW OUT DC 18V OPTI CAL Rear vi ew of the unit OPTICALcable Using the Optical Input Plug Line to th Plug head Pres on th Pres in bu indic Aud thro Usin You will need An audio source with an Optical Au...

Страница 13: ...K Connection Line In 11 tal on ctly D re Plug one end of a 3 5mm audio input cable included into the Line in on the unit Before use disconnect any cables connected to the Stereo RCA Inputs Plug the ot...

Страница 14: ...12...

Страница 15: ...it or STANDBY button on the remote control to switch on the unit 2 User the RCA audio cable from the subwoofer to connect to the SW OUT jack subwoofer out on the soundbar 3 When audio is played throug...

Страница 16: ...paired unless unpaired manually by the user or until it is erased due to a reset of the device If the soundbar is Bluetooth connected to a device you can press the MUTE PAIR button for 3 seconds to e...

Страница 17: ...er you have pressed PAIR button before pairing Check whether external device requires password 0000 to start with Function disturbance If a particular mode is causing problems please try an alternativ...

Страница 18: ...16...

Страница 19: ...17...

Страница 20: ...www majorityradios co uk...

Отзывы: