Majestic 33BDVT Скачать руководство пользователя страница 32

33/36/39/43 BDVT 

-32- 

10002555/0

Vermont Castings, Majestic Products.

O

PTIONAL

 A

CCESSORIES

 A

VAILABLE

F

AN

 K

ITS

FK24 Fan Assembly

This auxiliary fan system increases the efciency of the circu-

lation of the heating air.
The FK24 fan kit allows variable speed control of the circula-

tion fan and also incorporates a heat sensor in the circuit.
Specications
115 Volt / 60 Hz / 56 Watts

Maintenance

The fan itself does not require regular maintenance, however 

periodic cleaning of the fan and the surrounding area is 

required.
Check the area under the control door (lower louvre assembly) 

and in front of the fan and wipe or vacuum this area at least 

once a month during the operating season.

Installation

The fan assembly and other components are supplied fully 

wired eliminating the need for a licensed electrician to carry 

out the installation
If hard wiring the fan in using Method B (following) we 

strongly recommend the use of a licensed electrician.
1  Open the lower Louvre assembly.  Maneuver the fan & 

bracket assembly around the gas valve and lines to locate 

the unit onto the screw studs on the back of the replace

2  Install the thermal sensor under the bottom of the rebox, 

locating it over the two 10 mm studs and secure it with 

nuts.

3  Locate the fan speed control unit.  This can be tted 

behind the lower louvre assembly as in Fig. 54 or located 

remotely in a conveniently located wall mounted electrical 

box.  Remote location of the speed control will require 

suitable extension of the component wiring.

4  The power supply may be connected in 2 ways:
 

Method A


Route the 6' lead tted to the unit to a conveniently 

located wall socket.


Method B


The EB1 receptacle box (Pt. # ZA1200) may be hard 

wired into the house supply.  The fan lead is then plugged 

into the EB1 box.

FK12

This auxiliary fan system increases the efciency of the circu-

lation of the heating air.
The FK12 Fan Assembly is a xed speed fan system and does 

not allow for variable speed control.  It does not use the speed 

control unit or the heat sensor used in the FK24 Kit.
Specications
115 Volts / 60 Hz / 56 Watts.

Maintenance

The fan itself does not require regular maintenance, however 

periodic cleaning of the fan and the surrounding area is 

required.
Check the area under the control door (lower louvre assembly) 

and in front of the fan and wipe or vacuum this area at least 

once a month during the operating season.

Installation

The fan assembly is supplied fully wired eliminating the need 

for a licensed electrician to carry out the installation
1.  Open the lower Louvre assembly.  Maneuver the fan & 

bracket assembly around the gas valve and lines to locate 

the unit against the back wall of the appliance, resting on 

the base.

2.  With the protective cover removed from the self-adhesive  

‘Velcro’ strips apply mild pressure to the fan & bracket 

unit to secure the strips to the metal panels.  No further 

securing is required.

3.  Power to the fan can be supplied by plugging the supplied 

lead into a conveniently located wall socket or by using a 

hard-wired EB1 connector box.
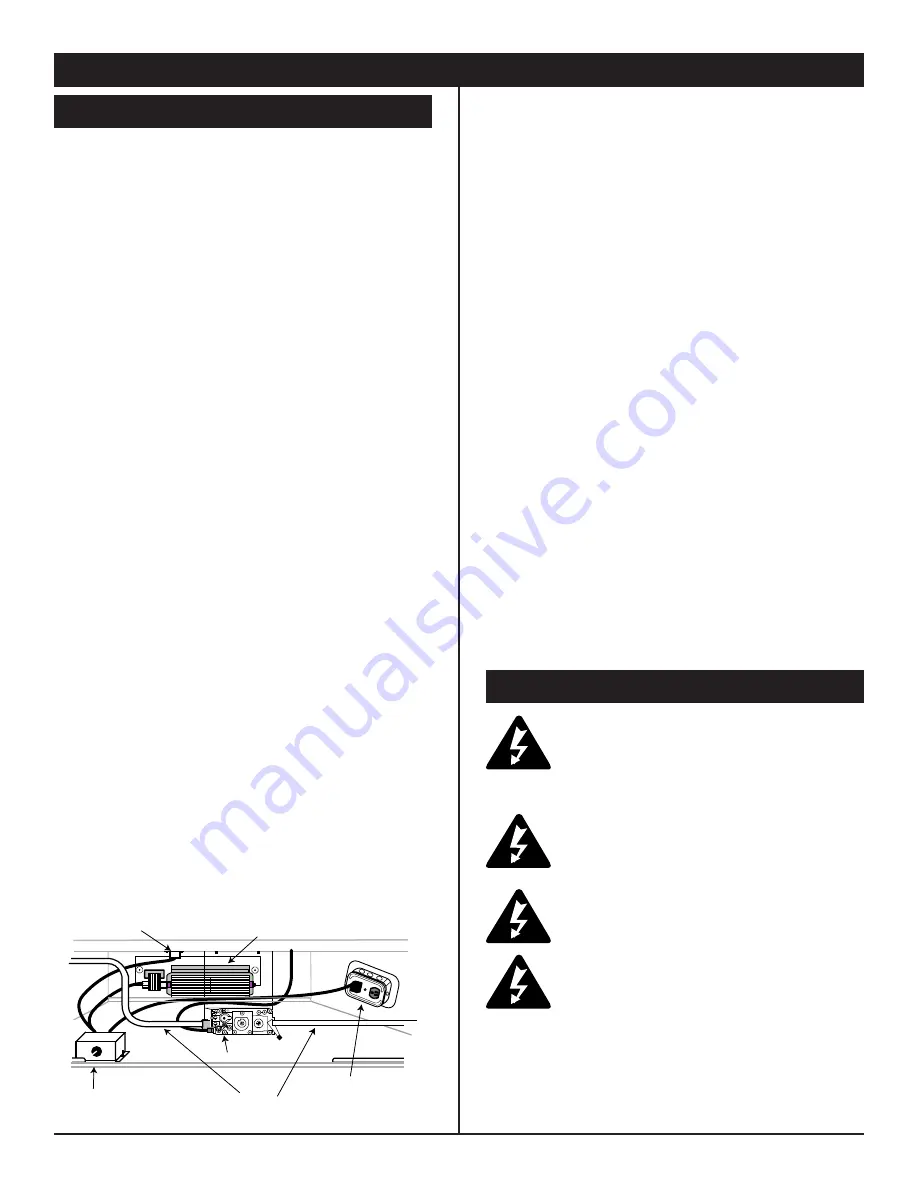
FAN SPEED SWITCH

VALVE

GAS

LINES

ELECTRICAL

BOX

FAN

THERMAL SENSOR

W

IRING

 I

NSTRUCTIONS

The replace, when installed, must be electri-

cally connected and grounded in accordance 

with local codes or, in the absence of local 

codes, with the current CSA C22.1 Canadian 

Electric Code.

For U.S.A. installations follow the local codes 

and the national electrical code ANSI/NFPA No 

70.

Should this fan require servicing or repair the 

power supply must be disconnected.  For rewir-

ing of any replacement parts see Fig. 55

Any electrical re-wiring of this fan must be done 

by a licensed electrician.

Method A 

(Not using EB1, Fig. 55)

1.  Connect the ground wire of the power supply line to the 

ground stud located on the base of the rebox.

2.  Connect the black wire of the supply line to either termi-

nal of the speed control unit.

Fig. 54

Содержание 33BDVT

Страница 1: ...ediately call yourgas supplier from your neighbours phone Follow the gas suppliers instructions If you cannot reach your gas supplier call the re department WARNING IF THE INFORMATION IN THIS MANUAL I...

Страница 2: ...lation 7 Remote Switch Installation 7 Electronic Gas Valve wiring instructions 8 EB 1 electrical Box Connection 8 Converting the Appliance Between Gas Types 9 Venting Installation Instructions General...

Страница 3: ...ace 9 Under no circumstances should any solid fuels wood coal paper or cardboard etc be used in this replace 10 The ow of combustion and ventilation air must not be obstructed in any way 11 When the r...

Страница 4: ...25 946 mm 37 25 1016 mm 40 H 152 mm 6 181 mm 7 13 190 mm 7 5 178 mm 7 I 149 mm 5 87 171 mm 6 75 159 mm 6 25 140 mm 5 5 J 200 mm 7 87 254 mm 10 213 mm 8 38 210 mm 8 25 K 297 mm 11 343 mm 13 5 318 mm 12...

Страница 5: ...ss A 10 254 mm 10 254 mm B 8 203 mm 8 203 mm C 6 152 mm 6 152 mm D 4 101 mm 4 101 mm E 2 51 mm 2 51 mm HEARTH A Hearth is not mandatory but it is recommended for aesthetic purpose We recommend a non c...

Страница 6: ...IONS Max Min Input Input Model Fuel Gas Control BTU h BTU h 33BDVTRN Nat Millivolt 15 000 10 500 33BDVTRP Prop Millivolt 15 000 11 250 33BDVTEN Nat 24V Hi Lo 15 000 10 500 33BDVTEP Prop 24V Hi Lo 15 0...

Страница 7: ...est point therefore it is not necessary to provide a 1 8 test point up stream of the control When using copper or ex connectors use only approved t tings Always provide a union when using black iron p...

Страница 8: ...er line to the chrome screw of the socket assembly 7 Connect the ground wire of the supply line to the green screw of the socket assembly 8 Re t the socket assembly back into the electrical box and re...

Страница 9: ...th the new ori ce supplied in the kit Re t the pilot hood assembly Do not over tighten the pilot hood The hood must return to its original alignment Take care not to damage the thermocouple thermopile...

Страница 10: ...king for leaks with a soap solution replace the front glass Fire up the unit check for ame impingement on the logs adjusting them if necessary Check the manifold and supply pressures against the appli...

Страница 11: ...ply inlet to building or the combustion air inlet to any other replace 12 inches 305mm minimum K clearance to a mechanical air supply inlet 72 inches 1828mm minimum L clearance above paved side walk o...

Страница 12: ...le 2 50mm A Balcony with no side wall G Combustible Non Combustible 12 305mm G Balcony with perpendicular side wall H 24 610mm J 20 508mm H J B Recessed Location C Maximum depth of 48 1219mm for reces...

Страница 13: ...efore joining elbows and pipes apply a bead of high tempera ture sealant to the crimped end of the elbow or pipe Join the pipes using a 2 50 mm overlap and secure the joints with three sheet metal scr...

Страница 14: ...t 2 3 m PIPE STRAPS EVERY 3 ft 914mm PIPE STRAPS EVERY 3 ft 914mm If a 90 elbow is tted directly onto the replace ange the maximum horizontal vent run before the termination or a vertical rise is 36 9...

Страница 15: ...h to restop with 8 sheet metal screws supplied Install restop assembly Fig 25 Zero clearance sleeve is only required for combustible walls 8 SCREWS 2 ADJUSTABLE ZERO CLEARANCE SLEEVE ADJUSTABLE ZERO C...

Страница 16: ...elled and properly positioned BELOW GRADE INSTALLATIONS When it is not possible to meet the required vent terminal clearances of 12 305mm above grade level a snorkel vent kit is recommended It allows...

Страница 17: ...ill be necessary to extend the vent pipes out as far as the protruding wall face Fig 31 FOUNDATION RECESS SNORKEL SCREWS WALL SCREWS SHEET METAL Watertight seal around the vent pipe VERTICAL THROUGH T...

Страница 18: ...ation Fitting The Restrictor Plate 1 Remove the window glass frame assembly 2 Locate the rebox baf e assembly in the top rear area of the rebox Fig 34 3 Remove the four 4 nuts along the front edge and...

Страница 19: ...ort Fig 38 and roof ashing making sure upper ange of ashing is below the shingles Fig 39 8 Install appropriate pipe sections until the venting is above the ashing See Fig 39 Typical ceiling support ap...

Страница 20: ...th lemon oil Do not use water or household cleaners on any brass components LOUVRE REMOVAL The top louvre panel is removed by lifting the panel vertically and pulling it away from the appliance Fig 41...

Страница 21: ...housing and place the log in position 6 Place the left top log in position by aligning the hole on the underside of the log with the lug on the top face of the rear log The front end of the log rests...

Страница 22: ...rn clockwise to increase flame height Honeywell Valve Turn counterclockwise to increase flame height Turn clockwise to decrease flame height SIT 820 Valve FLAME CHARACTERISTICS It is important to peri...

Страница 23: ...smell gas go to the next step 7 Remove glass door before lighting pilot See Glass Frame Removal in manual 8 Visibly locate pilot by the main burner 9 Turn knob on gas control counter clockwise to PIL...

Страница 24: ...uali ed service technician to inspect the appliance and to replace any part of the control system and any gas control which has been under water FOR YOUR SAFETY READ THE FOLLOWING WARNINGS BEFORE LIGH...

Страница 25: ...325mV ADJUST PILOT FLAME HEIGHT ALL WIRING CONNECTIONS REPLACE THERMOPILE THERMOCOUPLE NEEDS A MINIMUM OF 14mV DEFECTIVE VALVE TURN TO PILOT METER SHOULD READ GREATER THAN 100 mV IF NOT REPLACE PILOT...

Страница 26: ...pter block not supplied must be used to conduct this test 3 Pilot burning no gas to A Wall switch or wires defective Check wall switch and wires for proper connections main burner Jumper wire across t...

Страница 27: ...MPLETE LED OFF 5 Sec Inter Trial Delay LOCKOUT LED STEADY FLASH Reset by interrupting On Off switch or Power for 10 seconds LOCKOUT LED 2 FLASHES Reset by interrupting On Off switch or Power for 10 se...

Страница 28: ...VALVES ARE OPEN SUPPLY TUBING AND PRESSURES ARE GOOD AND PILOT BURNER ORIFICE IS NOT BLOCKED CHECK ELECTRICAL CONNECTIONS BETWEEN MODULE AND PILOT OPERATOR ON GAS CONTROL CHECK FOR 24VAC ACROSS PV MVP...

Страница 29: ...y SIT EP 10000671 10000671 10000671 5a Pilot assembly SIT Top Convertible RN 10002264 5b Pilot assembly SIT Top convertible RP 10002265 6a Pilot assembly SIT Top convertible EN 10002387 6b Pilot assem...

Страница 30: ...ion 51865 51865 51865 51865 Fan temperature sensor FK24 option 51704 51704 51704 51704 Fan speed control FK24 option 51738 51738 51738 51738 Knob fan speed control FK24 option 51882 51882 51882 51882...

Страница 31: ...ICTORIAL L O H I PILOT ADJ P I L O T ON OFF HI LO 33BDVT 36BDVT 39BDVT 43BDVT 1a 1b 1c 1d 1e 1a 1b 1c 1d 1e 1a 1b 1c 1d 1e 1a 1b 1c 1d 1e 2a b 22 21 17a b 18a b 16a b 15 20 14 24 28 19 11 9 13 10 8 11...

Страница 32: ...he circu lation of the heating air The FK12 Fan Assembly is a xed speed fan system and does not allow for variable speed control It does not use the speed control unit or the heat sensor used in the F...

Страница 33: ...e the rear refractory panel in place Locate the lower edge of the panel in the ledge formed by the top of the rear log support bracket 7 Slide the side refractory panels into place to hold the rear pa...

Страница 34: ...with the kit 5 Place the 2 pieces of ceramic refractory along the base of the bay window Fig 59 6 Hang the Bay Window Assembly over the existing front frame glass assembly 7 Re install the upper louv...

Отзывы: