background image

1-800-892-3986

IS9555

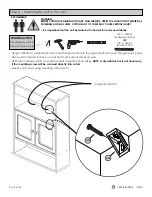
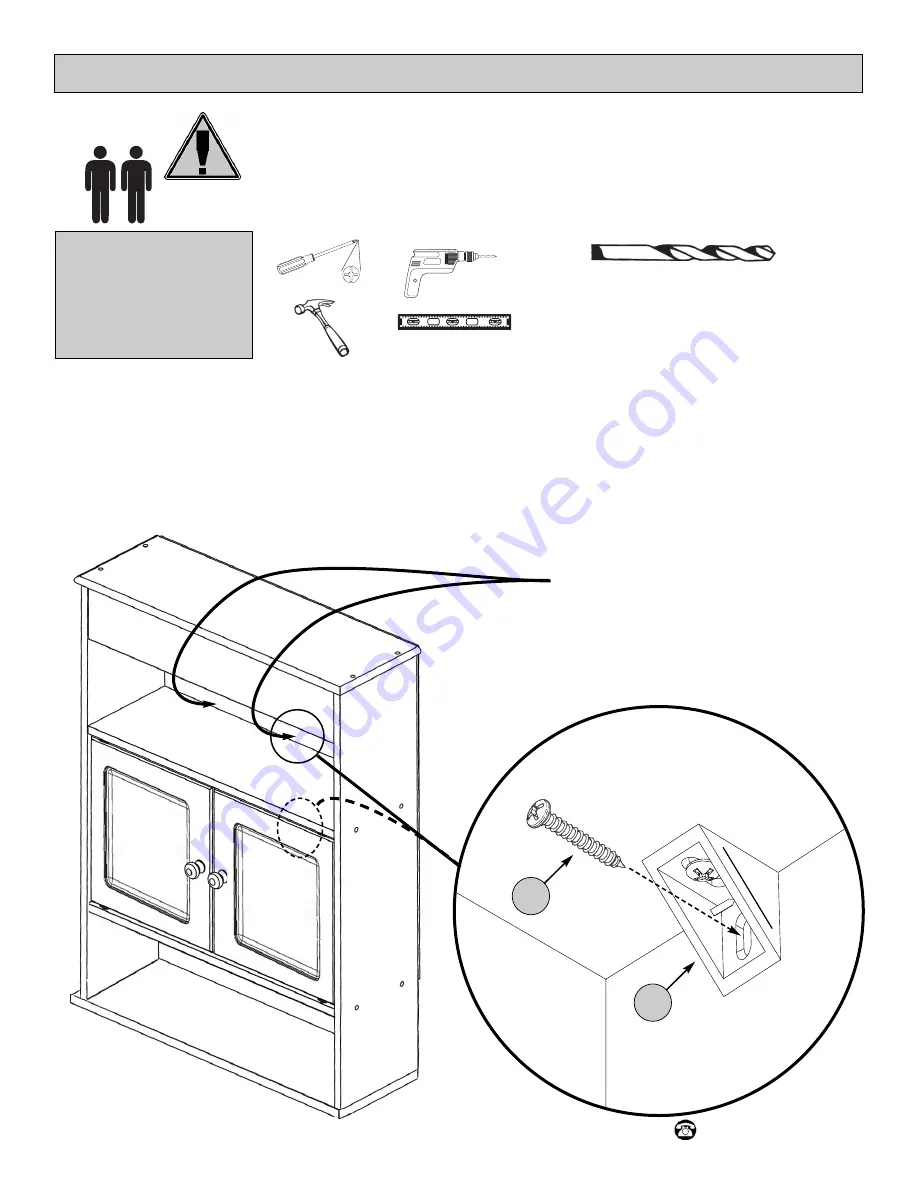
Paso 11: montaje de la unidad en la pared.

Étape 11-montage de l’unité au mur.

ADVERTENCIA: 
ANTES DE CORTAR O TALADRAR EN
CUALQUIER SUPERFICIE DE PARED, VERIFIQUE
LA UBICACIÓN DE LOS CONDUCTOS
ELÉCTRICOS Y LAS TUBERÍAS DE AGUA Y GAS.
AL CORTAR CUALQUIERA DE ESTAS, SE
PODRÍAN OCASIONAR LESIONES GRAVES.

AVERTISSEMENT :
AVANT DE COUPER OU PERCER TOUTE SURFACE
MURALE, VÉRIFIEZ L’EMPLACEMENT DES
CANALISATIONS ÉLECTRIQUES, SANITAIRES ET
DE GAZ. DES BLESSURES GRAVES POURRAIENT
SURVENIR SI L’UNE DE CES CANALISATIONS
ÉTAIT SECTIONNÉE.

Broca de 1/4 pulgadas para anclaje de pared

Un foret de 1/4 pouces (6,35 mm) pour les ancrages

pour cloison sèche 

broca de 1/8 pulgadas para montante directo

un foret de 1/8 pouces (3,175 mm) pour le goujon direct.

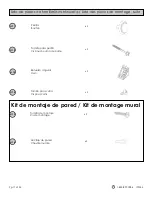
Tornillo de montaje (H15)

Vis de montage (H15)

Anclaje para drywall (H16)

Ancrages pour cloisons 

sèche (H16)

Kit de montaje de pared

Kit de montage mural

Refuerzo angular (H13)
Coin (H13)

H 15

H 13

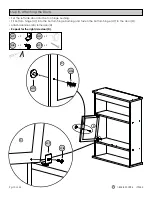
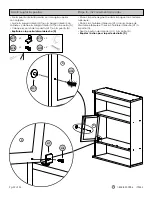
• Utilizando un martillo y una broca pequeña, haga un orificio
a través del bloque de ángulo (H13) y del panel posterior. 
• Coloque la unidad en la posición deseada sobre la pared y
marque la ubicación de los orificios. 
• Taladre los orificios en los puntos marcados en la pared e
inserte los anclajes para drywall (H16). 

NOTA: si el tornillo de

montaje se coloca directamente al montante, el anclaje para
drywall no es necesario.

• Monte la unidad en la pared utilizando los tornillos de 
montaje (H15).

• À l'aide d’une perceuse et d’un petit foret, percez un trou
dans le trou du bloc à angle (H13) et à travers le panneau arrière.
• Placez l’appareil à l’emplacement souhaité sur le mur et
marquez l’emplacement des trous sur le mur.
• Percez des trous aux endroits marqués sur le mur et insérez les
ancrages pour cloisons sèches (H16). 

REMARQUE : Un ancrage

pour cloison sèche n’est pas nécessaire si la vis de montage
sera vissée directement dans un goujon.

• Fixez l’appareil au mur à l’aide de vis de montage (H15).

RECOMIENDA 

RECOMMANDÉ 

Pg 24 of 24

Содержание 9554CHWM Espresso

Страница 1: ...03 2019 Assembly Instructions Model 9554CHWM Espresso For Spanish and French instructions start on page 13 Para instrucciones en espa ol y franc s comience en la p gina 13 Pour les instructions espagn...

Страница 2: ...M 5 00PM EST Monday through Friday Cleaning Note Cleaning with a dry cloth may be sufficient but for other stains or marks wipe gently with a damp cloth DO NOT use strong detergents or abrasive cleane...

Страница 3: ...Pg 3 of 24 1 800 892 3986 IS9555 A Top and Bottom Shelf 2 B Fixed Shelf 2 C Top Side Panel C R right and C L left 2 List of Parts D Door 2 E Back Panel 1 F Trim Piece 1 A A B B C R E F D D C L...

Страница 4: ...55 Large Screw Hinge Screw Magnet Hinge Bushing Magnet Screw Hinge Allen Wrench for use with Large Screws H2 x 1 x 16 x 4 x 4 x 4 x 1 x 2 Nail x 40 H 10 H 1 H 2 H 3 H 6 H 7 H 8 H 9 List of Hardware Do...

Страница 5: ...00 892 3986 IS9555 Pg 5 of 24 Knob Screw Knob x 2 x 2 H 11 H 12 List of Hardware continued Drywall Anchors Mounting Screws x 2 x 2 Angle Block Angle Block Screw x 2 x 2 H 13 H 14 H 15 H 16 Wall Mount...

Страница 6: ...Installing the Magnet 1 800 892 3986 IS9555 B B x 1 x 2 H 10 H 9 C L Step 2 Attaching the Right Side Panel unfinished edge unfinished edge unfinished edge unfinished edge B B F H 9 H 10 H 2 H 2 H 4 x...

Страница 7: ...800 892 3986 IS9555 Step 3 Attaching the Left Side Panel finished edge A Step 4 Attaching the Top and Bottom Shelves x 8 H 1 H 2 finished edge C R B B F A unfinished edge H 2 H 2 H 4 x 2 H 1 H 4 x 4...

Страница 8: ...wn on floor with the unfinished edges facing up Fasten back panel E to back of unit Helpful Hint With the seam side of back panel facing up align the back panel properly fasten a nail in each of the c...

Страница 9: ...Pg 9 of 24 1 800 892 3986 IS9555 Step 7 Installing TOP Hinges Incorrect Correct H 7 H 8 x 2 x 2 D D D H 8 H 7 H 8 H 7 pre attached magnet strikes D H 8 H 7...

Страница 10: ...8 x 2 x 2 H 11 H 12 x 2 x 2 Set the left side door into the top hinge bushing Fit bottom hinge H7 into the bottom hinge bushing and fasten the bottom hinge H7 to the door D Attach door knob H11 to th...

Страница 11: ...p 9 Attaching Screw Caps H 5 x 16 H 5 Step 10 Installing the Angle Blocks to the Top Panel A x 2 x 2 H 13 H 14 NOTE If needed the angle blocks H13 can be fastened to the fixed shelf B to allow more ac...

Страница 12: ...bit for drywall anchor OR 1 8 in drill bit for direct stud Using a drill and a small drill bit drill a hole through the hole in the angle block H13 and through back panel Place unit in desired locati...

Страница 13: ...Pg 13 of 24 1 800 892 3986 IS9555 Instrucciones de Ensamblado Instructions de montage Modelo Mod le 9554CHWM Espresso espresso...

Страница 14: ...sivas Ellas pueden da ar la superficie de este producto Conseil d entretien Le nettoyage avec un chiffon sec peut tre suffisant mais en cas de taches rebelles ou de marques utilisez un chiffon humide...

Страница 15: ...2 B Repisa fija Tablette fixe 2 C Panel lateral superior C R derecho y C L izquierdo Panneau lat ral sup rieur C R droite et C L gauche 2 Lista de Partes Liste des pi ces D Puerta Porte 2 E Panel pos...

Страница 16: ...es Tornillo para im n Vis pour aimant Bisagra Charni re Llave Allen hexagonal para ser usada con los tornillos grandes H2 Cl hexagonale pour les vis longues H2 x 1 x 16 x 4 x 4 x 4 x 1 x 2 Clavo Clou...

Страница 17: ...2 x 2 H 11 H 12 Lista de piezas de torniller a continuada Liste des pi ces de montage suite Anclaje de pared Cheville murale Tornillo de montaje Vis de montage x 2 x 2 Refuerzo angular Coin Tornillo...

Страница 18: ...l derecho tape 2 Fixation du panneau lat ral droit Borde Sin Acabado Bord non fini Borde Sin Acabado Bord non fini Borde Sin Acabado Bord non fini Borde Sin Acabado Bord non fini B B F H 9 H 10 H 2 H...

Страница 19: ...Fixation du panneau lat ral gauche Borde Acabado Bord fini A Paso 4 Sujetar la repisa superior e inferior tape 4 Fixation des tag res sup rieures et inf rieures x 8 H 1 H 2 Borde Acabado Bord fini B...

Страница 20: ...ba alinee el panel posterior adecuadamente y coloque un clavo en cada una de sus esquinas Posez l appareil face vers le bas sur le sol avec les bords non finis vers le haut Fixer le panneau arri re E...

Страница 21: ...7 Instalar las bisagras SUPERIORES tape 7 Installation des charni res SUP RIEURES Incorrecto Incorrect Correcto Correct H 7 H 8 x 2 x 2 D D D H 8 H 7 H 8 H 7 sujetar los imanes para cerrar puertas aim...

Страница 22: ...or con cojinete y coloque la bisagra inferior H7 en la puerta D Coloque el pomo de la puerta H11 en la puerta D Rep talo en la puerta lateral derecha D Placez la porte de gauche dans la bague de charn...

Страница 23: ...erior tape 10 Installation des blocs angle sur le panneau sup rieur A x 2 x 2 H 13 H 14 NOTA si lo necesita puede colocar los bloques de ngulo H13 a la repisa fija B para permitir m s acceso para comp...

Страница 24: ...ared Kit de montage mural Refuerzo angular H13 Coin H13 H 15 H 13 Utilizando un martillo y una broca peque a haga un orificio a trav s del bloque de ngulo H13 y del panel posterior Coloque la unidad e...

Отзывы: