26
BA082901-en
Pos: 89 / Technische Dokumentation/Alle Geräte/Überschriften/ Überschriften 1.1.1/M/Überschr ift 1.1.1: Manuelles Absenken m it 2,5 k W- oder 5,5 k W-A ggregat im Bedienpult @ 34\mod_ 1383556690377_ 75.docx @ 1848643 @ 2 @ 1
5.10.4
Manual Lowering with 2.5 kW or 5.5 kW Power Unit in the Control Desk
Pos: 90 / Technische Dokumentation/Hebetechnik/DUO/082901 DUO CM/BA/Inhalt: 0829 M an. Absenken - Aggregat Pult CM 1/2 (Text) @ 34\mod_ 1383833737856_ 75.docx @ 1851026 @ @ 1
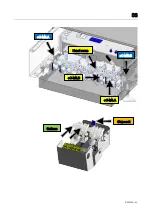
1 Open the cap of seat valve +A-M1 (by turning it anticlockwise), making sure not
to lose the sealing ring.
2 Remove the coil with plug-in connector from the valve and tighten the cap
(without coil) finger-tight. The seat valve is now disabled.
3 Place the sliding shoe underneath the latch on side +A. You may need to use
the hand pump to do this. After several pumping movements, the latch can be
raised by hand.
If you use the hand pump, be aware of offset! Raise the sides one after the
other – the valve on the other side must be closed in each case.
4 Repeat steps 1 to 4 for side +B.
5 Use the key ring to pull up lowering valve +C-M2
slowly. The lift is lowered. Be
aware of offset and hazard zone! To stop the lowering movement, release the
valve.
The height offset should remain < 50 mm – adjust the height of the runways as
necessary. Either use the hand pump to raise the lower side or use bypass valve
+C-M4.A or +C-M4.B to lower the higher side.
6 Lower the lift to the home position, remove the vehicle, rectify errors.
7 Raise the lift without any load.
8 Remove the sliding shoes.
9 Attach the coils with plug-in connectors to both seat valves and tighten the
caps finger-tight (by turning them clockwise). The valves have now been
returned to a functioning state.
Pos: 91 /----- Format-----/MAN UELLER UM BRUCH Seitenumbruch @ 0\m od_1134403577687_ 0.docx @ 1277 @ @ 1


