background image

– 21 –

ES

Español

5

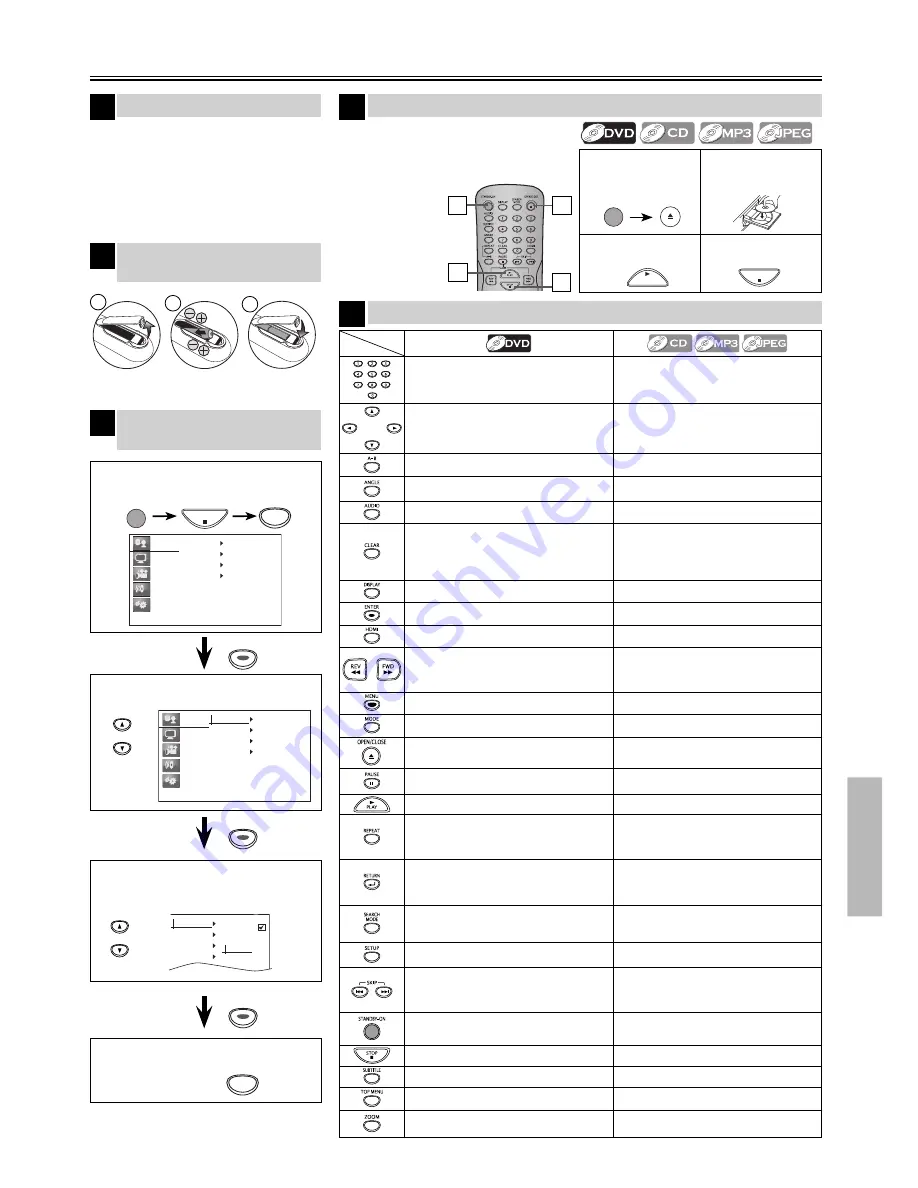
Si su televisor tiene entradas de 
AUDIO / VIDEO vea la sección 
“Connection to a TV” en la página 6 en el 
manual de manejo. En caso contrario, vea 
la sección “Connecting to RF Modulator 
(Not Supplied)” en la página del frente en 
el manual de manejo.

Español

Conexiones

4


Para salir del menú


1

Reproducción

4

4

3

Antes. 

  Encienda el televisor, amplifica-

dor y otros equipos conectados 
a esta unidad. Asegúrese que el 
televisor y el 
sintonizador 
de audio (no 
provisto) están 
en el canal cor-
recto.

Control remoto

1

SETUP

ENTER

ENTER

ENTER

ENTER

ENTER

ENTER

ENTER

ENTER

ENTER


1


Para abrir o cerrar 
la bandeja del 
disco

2


Ponga un disco 
con la etiqueta 
hacia arriba.

3


Para empezar la 

reproducción

4


Para parar la 

reproducción

STOP

STANDBY-ON

OPEN/CLOSE

PLAY

1

1


Confirme que ha seleccionado 
“Language”.

Para cambiar el idioma en la 
pantalla

3

STOP

SETUP

STANDBY-ON

2

1

3

Instalación de las pilas en el 
control remoto

2

Language

Display

Video

Audio

Others

Player Menu

Subtitle 

Audio

Disc Menu 

3


Seleccione el idioma deseado para las 
indicaciones en la pantalla.

Player Menu

Subtitle 

Audio

Disc Menu 

English

Français

Español


2


Seleccione “Player Menu”.

Language

Display

Video

Audio

Others

Player Menu

Subtitle 

Audio

Disc Menu 


•  Para especificar valores en el campo de entrada.
•  Para seleccionar directamente el capítulo o 

título.

•  Para especificar valores en el campo de entrada.
•  Para seleccionar directamente la canción. (CD)
•  Para seleccionar la carpeta / archivo 

directamente.  (MP3 / JPEG)

•  Para mover el cursor y determinar la posición.

•  Para mover el cursor y determinar la posición.
•  Para girar la imagen JPEG. 

•  Para repetir entre su punto A y B seleccionado.

•  Para repetir entre su punto A y B seleccionado. 

(CD / MP3)

•  Para seleccionar los ángulos de la cámara en 

un disco.

------

•  Para seleccionar idiomas de audio en un disco.

•  Para seleccionar “Estéreo”, “L-ch” o “R-ch”. (CD)

•  Para borrar el punto para la repetición A-B

.

•  Para borrar los números mal entrados.

•  Para borrar el punto para la repetición A-B.

(CD / MP3)

•  Para eliminar el Nº de estado en la entrada de 

programa.

•  Para borrar los números mal entrados. 

•  Para mostrar el modo de  disco actual.

•  Para mostrar el modo de  disco actual. 

•  Para seleccionar opciones o valores de 

configuración.

•  Para seleccionar opciones o valores de 

configuración.

•  Para establecer el modo de salida HDMI.

•  Para establecer el modo de salida HDMI.

•  Para buscar en avance/retroceso por un disco.

(×2, ×4, ×8, ×16, ×32)

•  Para empezar la reproducción en avance lento 

durante el modo de pausa.

•  Para buscar en avance/retroceso por un disco.

(×2, ×4, ×8, ×16, ×32)

•  Para llamar el menú en un disco.

------

------

•  Para disponer el orden de reproducción o la 

reproducción aleatoria.

•  Para abrir o cerrar la bandeja del disco.
• Para encender la unidad.

•  Para abrir o cerrar la bandeja del disco.
• Para encender la unidad.

•  Para hacer una pausa en la reproducción.
•  Para avanzar la reproducción un cuadro cada vez.

•  Para hacer una pausa en la reproducción del 

disco.

•  Para iniciar o reanudar la reproducción.

•  Para iniciar o reanudar la reproducción.

•  Para reproducir repetidamente un capítulo o 

título.

•  Para reproducir repetidamente una canción o 

disco. (CD)

•  Para reproducir un archivo, carpeta o disco 

reiteradamente.  (MP3 / JPEG)

•  Para volver al menú o pantalla anteriormente 

visualizado.

•  Para volver al menú o pantalla anteriormente 

visualizado.

•  Cuando aparezca la lista de archivos, presiónelo 

para cambiar a la lista de carpetas. (MP3 / JPEG)

•  Para buscar un capítulo, título o tiempo.

•  Para buscar pistas o archivos.
•  Para buscar el tiempo. (CD / MP3)
•  Para buscar los grupos. (MP3 / JPEG)

•  Para llamar el menú de ajustes de DVD.

•  Para llamar el menú de ajustes de DVD.

•  Para saltar capítulos o titulo.

•  Para saltar pistas o archivos.
•  Cuando aparezca la lista de archivos / 

carpetas, presiónelo para cambiar de una 
página  a  otra.  (MP3 / JPEG)

•  Para encender o para pasar la unidad al modo de 

espera. (Para apagar completamente la unidad, 
debe desconectar el cable de alimentacion de CA.)

•  Para encender o para pasar la unidad al modo de 

espera. (Para apagar completamente la unidad, 
debe desconectar el cable de alimentacion de CA.)

•  Para parar la reproducción. 

•  Para parar la reproducción.

•  Para seleccionar el idioma de subtítulos de un disco.

------

•  Para visualizar el menú de títulos de un disco.

------

•  Para ampliar la imagen de vídeo en DVD.  

(x2, x3, x4, x1/2, x1/3, x1/4)

•  Para ampliar la imagen de vídeo en DVD. (JPEG)

(x2, x3, x4, x1/2, x1/3, x1/4)

Disco

Botón

(Orden alfabético)

Содержание MDV3110

Страница 1: ...ied with the RF modulator rear of TV rear of your RF modulator AUDIO IN TO TV ANT IN L R CHANNEL 4 3 VIDEO IN ANT IN Set channel 3 or 4 rear of this unit RF coaxial cable RF coaxial cable VHF UHF antenna cable TV company or video cable audio cable Connecting to RF Modulator Not Supplied Note RF modulator is not supplied with this unit You need to purchase it at your local store The quality of pict...

Страница 2: ...ned to provide reasonable protection against harmful interference in a residential installation This equipment generates uses and can radiate radio frequency energy and if not installed and used in accordance with the instructions may cause harmful interference to radio communications However there is no guarantee that interference will not occur in a particular installation If this equipment does...

Страница 3: ...he unit Location and Handling Do not install the unit in direct sunlight near strong magnetic fields or in a place subject to dust or strong vibration Avoid a place with drastic temperature changes Install the unit in a horizontal and stable position Do not place anything directly on top or bottom of the unit Depending on your external devices noise or disturbance of the picture and or sound may b...

Страница 4: ... a circular motion Do not use solvents such as benzine thinner commercially available cleaners detergent abrasive cleaning agents or antistatic spray intended for analog records Cleaning the Disc Lens If this unit still does not perform properly although you refer to the relevant sections and to Troubleshooting Guide in this owner s manual the laser optical pickup unit may be dirty Consult your de...

Страница 5: ...operate as described in this manual due to the intentions of the disc s producers 3 Discs recorded in the VR Video Recording format cannot be played back 4 Scratched or stained discs may not be played back 5 Some discs cannot be played back because of incompatible recording conditions characteristics of the recorder or special properties of discs 6 You can play back discs which bear the marks abov...

Страница 6: ...s connected If your TV is compatible with 525 480 progressive scanning and you want to enjoy that high quality picture You must select the connection COMPONENT VIDEO OUT above and progressive scanning mode To set the mode set Progressive to On in Video menu Refer to pages 15 16 for more details When Progressive is On video signals from the unit s VIDEO OUT and S VIDEO OUT jacks will be distorted o...

Страница 7: ... your display device or AV receiver amplifier for more information Note When using HDCP incompatible display device the picture will not be viewed properly The audio signals from the HDMI jack including the sampling frequency the number of channels and bit length may be limited by the device that is connected Among the display device s that support HDMI some do not support audio output for example...

Страница 8: ... a Dolby Digital decoder for Dolby Digital audio output Bitstream Connecting to the other device an MD deck or DAT deck etc without Dolby Digital decoder LPCM Connection Setting digital audio input jack Rear Terminals 1 HDMI OUT jack Use to connect a TV with an HDMI compatible port with an HDMI cable 2 DIGITAL AUDIO OUT COAXIAL jack Connect a digital audio coaxial cable here through the digital au...

Страница 9: ... clear the numbers entered incorrectly To display the current disc mode To display the current disc mode To select items or settings To select items or settings To set the HDMI output mode To set the HDMI output mode To search forward backward through a disc 2 4 8 16 32 To begin slow forward backward playback in the pause mode To search forward backward through a disc 2 4 8 16 32 To call up the me...

Страница 10: ...PAUSE F during playback To continue playback press PLAY B The disc goes forward by one frame each time PAUSE F is pressed in the pause mode To continue playback press PLAY B Note Slow forward reverse speed is different depending on the disc Approximate speed is x1 32 x1 16 x1 8 x1 4 and x1 2 Fast Forward Reverse Search Use FWD g or REV h repeatedly during playback to select the required forward or...

Страница 11: ...back will start automatically Note Some selections may take a while to be recognized Refer to On Screen Display on page 12 for more details If you record data over 20 times it may not be played back correctly For a disc with JPEG files only the file list will appear while in stop mode A maximum of 498 folders or 4000 files may be recognized on one disc Up to 8 hierarchies can be recognized in one ...

Страница 12: ...ack time 00 00 21 00 03 19 Disc time 00 00 25 00 40 15 elapsed time of the current time current repeat mode Off All Track A B elapsed time of current track 1 2 3 remaining time of current track elapsed time of Disc remaining time of Disc Only in stop mode for JPEG playback media tab Audio MP3 Picture JPEG elapsed time of the current file total time of current file while MP3 file list is displayed ...

Страница 13: ...te During random playback you cannot go back to the previous track or file using SKIP G allows you to search tracks or files randomly Note While a program is being played back STOP C works as follows Press STOP C and PLAY B next so that the programmed playback restarts Press STOP C twice and PLAY B next so that playback restarts from the first track in the original order However your programmed pl...

Страница 14: ...e been shot simultaneously from various angles You can change the camera angle if appears on the TV screen If the Angle Icon setting is Off in Display menu will not appear Refer to pages 15 16 1 1 3 Note Some discs will only allow you to change the audio setting from the disc menu Refer to the manual accompanying the discs for details If your language is not shown after pressing AUDIO several time...

Страница 15: ...ers Player Menu Subtitle Audio Disc Menu Language Display Video Audio Others Player Menu Subtitle Audio Disc Menu Language menu Display menu Video menu Audio menu Others menu Language Display Video Audio Others Player Menu Subtitle Audio Disc Menu Language Display Video Audio Others Angle Icon Screen Saver Language Display Video Audio Others TV Aspect Progressive Dual mono Down Sampling DRC Reverb...

Страница 16: ...hanging Progressive setting is not available while HDMI cable is connected Before proceeding Make sure your TV supports the selected item Connect with component video cable NOTE If a blank screen appears wait for 15 seconds for auto recovery Activate Progressive On Select K L Set ENTER Yes No If there is no picture or you do not press any buttons for 15 seconds Progressive will switch to Off and i...

Страница 17: ...r existing 2 channel stereo system Video Audio Others Reverberation Sound Menu Digital Out Off 3D Jazz Rock Pop Classic Dual mono Down Sampling DRC Reverberation Sound Menu Digital Out Select the desired setting Digital Out Default Bitstream Set to Bitstream when the unit is connected to a Dolby Digital decoder Bitstream outputs a Dolby Digital signals LPCM convert the Dolby Digital into LPCM 2 ch...

Страница 18: ...do not wish to initialize press SETUP to exit the menu at step 4 The setting for Paren tal will not be reset Select the desired setting 4 Auto Power Off Default On Set to On to turn this unit off automatically after 30 minutes of no use Language Display Video Audio Others Auto Power Off HDMI Parental Initialize On Off Auto Power Off HDMI Parental Initialize HDMI Resolution Default Auto You can sel...

Страница 19: ...t be played back Clean the disc Ensure the disc is inserted in correct direction Check if the disc is defective by trying another disc Cancel the parental lock or change the control level Insert a correct disc that plays back on this unit Handle a disc with special care so that it does not have fingerprints scratches or dusts on its surface No return to start up screen when disc is removed Reset t...

Страница 20: ...other acts of God THIS WARRANTY DOES NOT COVER PACKING MATERIALS ANY ACCESSORIES EXCEPT REMOTE CONTROL ANY COSMETIC PARTS COMPLETE ASSEMBLY PARTS DEMO OR FLOOR MODELS FUNAI CORP AND ITS REPRESENTATIVES OR AGENTS SHALL IN NO EVENT BE LIABLE FOR ANY GENERAL INDIRECT OR CONSEQUENTIAL DAMAGES ARISING OUT OF OR OCCASIONED BY THE USE OF OR THE INABILITY TO USE THIS PRODUCT THIS WARRANTY IS MADE IN LIEU ...

Страница 21: ... entrados Para mostrar el modo de disco actual Para mostrar el modo de disco actual Para seleccionar opciones o valores de configuración Para seleccionar opciones o valores de configuración Para establecer el modo de salida HDMI Para establecer el modo de salida HDMI Para buscar en avance retroceso por un disco 2 4 8 16 32 Para empezar la reproducción en avance lento durante el modo de pausa Para ...

Страница 22: ... 22 EN Memo ...

Страница 23: ... 23 EN Memo ...

Страница 24: ...E6MY2UD 1VMN29474 Printed in China 1 V M N 2 9 4 7 4 ...

Отзывы: