background image

8

EN

INTRODUCTION

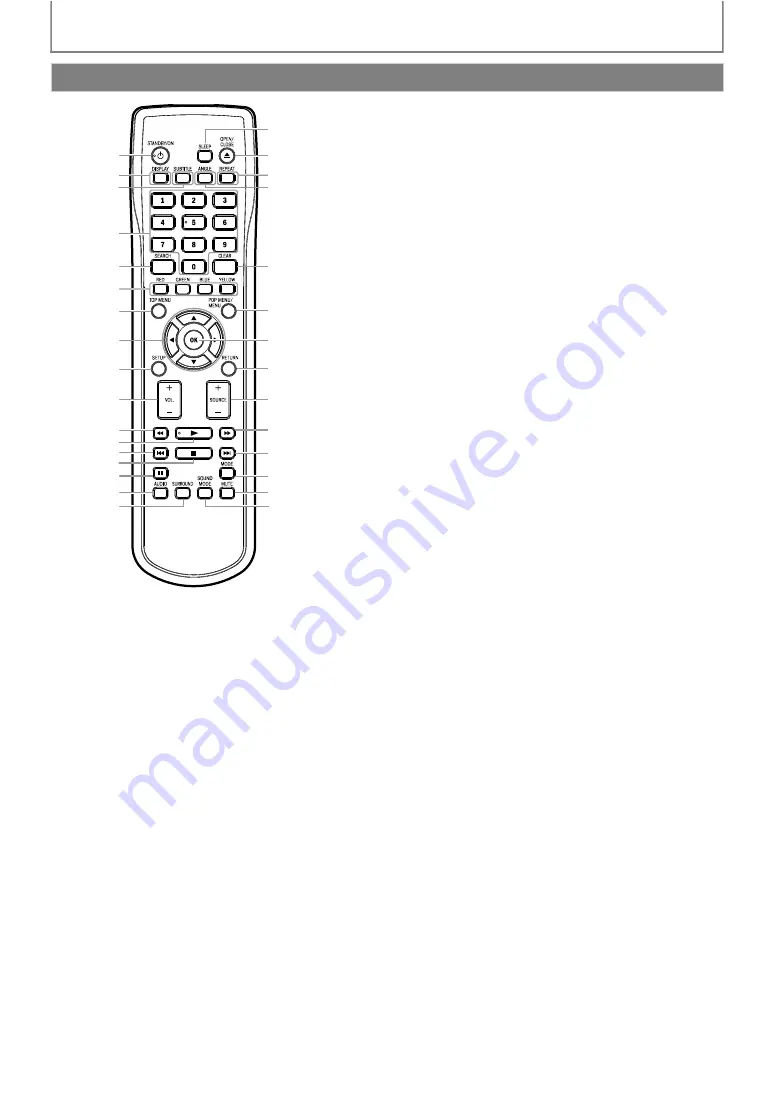
(*) The unit can also be turned on by pressing these buttons.

1. STANDBY/ON 

Q

 button

• Press to turn on the unit, or to turn the unit into the 

standby mode. (To completely turn off the unit, you 
must unplug the AC power cord.)

2. DISPLAY button

• Press to display the on-screen display menu.

3. SUBTITLE button

• Press to display the subtitle menu.

4. Number buttons

• Press to enter the title, chapter, track or file number.
• Press to enter values in the input field.

5. SEARCH button

• Press to display the search menu.

6. RED / GREEN / BLUE / YELLOW button

• Press to select items on some BD menus.
• When file list / thumbnail list is shown, press to 

switch between pages.

7. TOP MENU button

BD:

• Press to display the top menu.

DVD:

• Press to display the title menu.

8.

K

/

L

/

s

/

B

 buttons

DISC:

• Press to select items or settings.

RADIO:

• Press up or down to tune the radio frequency.
• Press left or right to start auto search.

9.

SETUP buttons

• Press to display the setup menu.

10.

VOL. + / –

 button

• Press to adjust the volume.

11.

E

(reverse) button

• During playback, press to fast reverse the playback.

12.

B

(play) button*

• Press to start playback or resume playback.

13.

H

(skip) button

• During playback, press once to return to the 

beginning of the current title, chapter or track.

• During playback, press twice to return to the 

previous title, chapter or track.

• During the JPEG playback, press to return to the 

previous file.

14.

C

(stop) button

• Press to stop playback.

15.

F

(pause) button

• Press to pause playback.
• When playback is in pause mode, press repeatedly 

to forward the playback step by step.

16. AUDIO button

DISC:

• Press to select the audio channel (such as audio 

languages).

RADIO:

• Press to switch between stereo and mono mode.

17. SURROUND button

• Press to select surround mode.

18. SOUND MODE button

• Press to select a sound effect mode.

19. MUTE button

• Press to mute the volume.

20. MODE button

• During BD or DVD playback, press to display the 

setting for the picture adjustment.

• During BD playback, press to turn the picture-in-

picture feature on or off (only applicable to BD-video 
which supports the PIP function).

• During the JPEG playback, press to display menus for 

changing the visual effect for switching the image or 
changing the size of the image.

• In stop mode with BD inserted, press to display a 

menu for setting the BD audio mode.

• In stop mode with audio CD or MP3 / WMA / JPEG 

files inserted, press to display menus for program and 
random playback.

21.

G

(skip) button

• During playback, press to skip to the next title, 

chapter, track or file.

22.

D

(forward) button

• During playback, press to fast forward the playback.
• In pause mode, press to slow forward the playback.

23. SOURCE

 / 

 button

• Press to switch the active source mode;

"Disc / SD", “Aux”, “Coaxial”, “MP3 Line-in” or “FM”.

Remote Control

1

5

7

9

11

13

15
16
17

18

3

14

10

8

30*

27

29

26

24

22

21

20
19

23

25

31

2

6

4

28

12*

Содержание Magnavox MRD410B/F7

Страница 1: ...assistance you may access our online help at http www funai corp com or call 1 800 605 8610 while with your product and Model Serial number Owner s Manual Guide D utilisation Manual del Usuario MRD410...

Страница 2: ...TO QUALIFIED SERVICE PERSONNEL CAUTION RISK OF ELECTRIC SHOCK DO NOT OPEN The exclamation point within an equilateral triangle is intended to alert the user to the presence of important operating and...

Страница 3: ...trong vibration Avoid a place with drastic temperature changes Install the unit in a horizontal and stable position Do not place anything directly on top or bottom of the unit Depending on your extern...

Страница 4: ...o JPEG Files 24 Kodak Picture CD 25 Fast Forward Fast Reverse 26 Slow Forward Playback 26 Step by Step Playback 26 Repeat Playback 26 Program Playback 27 Random Playback 28 Adjusting the Picture 28 PI...

Страница 5: ...zed commercial distribution of this manual or any revision hereto is strictly prohibited Information in this document is subject to change without notice Funai reserves the right to change the content...

Страница 6: ...HDMI High Definition Multimedia Interface cable It is recommended to use a High Speed HDMI Cable for better compatibility The high definition video output signal will be transferred to your HDTV with...

Страница 7: ...to supply power to this unit Unplug this cord from the AC outlet to completely turn off the unit 2 5 1ch Audio Out jacks SPEAKERS 4 Use to connect supplied 5 1ch speakers 3 HDMI OUT jack Use to conne...

Страница 8: ...or track During the JPEG playback press to return to the previous file 14 C stop button Press to stop playback 15 F pause button Press to pause playback When playback is in pause mode press repeatedly...

Страница 9: ...ll off in the operating range of the remote control The maximum operable ranges from the unit are as follows Line of sight approx 23 feet 7 m Either side of the center approx 16 feet 5 m within 30 Abo...

Страница 10: ...o Panel Display in List of Setup Menus on page 40 Playback status icon Mode Playback is in progress Stop mode Pause mode Fast forward mode Tuning radio station in FM mode Fast reverse mode Tuning radi...

Страница 11: ...re more suitable for your room layout that provide the sound experience you enjoy To avoid magnetic interference never position the front speakers too close to your TV The rear speakers are labeled as...

Страница 12: ...Component video cable Your TV Go To No supplied cables are used in this connection Please purchase the necessary cables at your local store Basic VIDEO IN C Video Video cable Your TV Go To Supplied c...

Страница 13: ...th digital content protection system HDCP is copy protection technology that comprises data encryption and authentication of the connected AV device This unit supports HDCP Please read the operating i...

Страница 14: ...g Speakers and Subwoofer SPEAKERS 4 SUB WOOFER FRONT CENTER REAR FRONT HDMI OUT AUDIO IN AUX DIGITAL AUDIO IN COMPONENT VIDEO OUT FM ANT 75 Pr Y Pb VIDEO OUT SPEAKERS 4 SPEAKERS 4 SUB WOOFER SUB WOOFE...

Страница 15: ...UT Coaxial jack on the connected device Connecting Audio from Cable Box Recorder Game Console or TV SPEAKERS 4 SUB WOOFER FRONT CENTER REAR FRONT HDMI OUT AUDIO IN AUX DIGITAL AUDIO IN COMPONENT VIDEO...

Страница 16: ...upplied cables are used in this connection Please purchase the necessary cables at your local store Note To playback the audio from your portable media player refer to Play from Portable Media Player...

Страница 17: ...all the necessary connections press STANDBY ON Q to turn on the unit 2 Turn on your TV 3 Press the button on the TV s remote control that accesses the external input channel It may be labeled SOURCE A...

Страница 18: ...3 BD RE R DVD RW R CD RW R SD Memory Card including SDHC miniSD Card microSD Card Windows Media Audio JPEG Readable cards Playable files data SD Memory Card 8 MB 2 GB MP3 Windows Media Audio JPEG pict...

Страница 19: ...apsed time A Track information remaining time A Disc information elapsed time A Disc information remaining time A Track information elapsed time not available during program random playback off File i...

Страница 20: ...emaining time of the current title Current track file number Total number of track file Elapsed time or remaining time of the current track file except for JPEG files Indication of SD Memory Card play...

Страница 21: ...tep 4 3 Select the type of the file you want to play back in the media filter screen Then press OK to display the file list 4 Use K L to select a desired track folder or file then press OK Use s B to...

Страница 22: ...Media Select 4 Press OK repeatedly to select the desired media 5 Press SETUP to exit Selected media mode is now activated Note Even if you set the media mode to SD Card the setting will be switched to...

Страница 23: ...pplications BD Java In the Disc mode the resume information will be cleared when C stop is pressed while in the Resume On Stop mode the parental level is changed the disc tray is opened In the SD Card...

Страница 24: ...scs Refer to the manual accompanying the disc for details Playing Back an Audio CD or a Disc with MP3 Windows Media Audio JPEG Files 1 Insert an audio CD or a disc with MP3 WMA or JPEG files Media fil...

Страница 25: ...ack in this unit The system can recognize up to 255 folders 999 files for CD 999 folders 9 999 files for BD and DVD The 9th and deeper hierarchies cannot be displayed for CD The 10th and deeper hierar...

Страница 26: ...BD and DVD speed changes in 5 different levels For audio CD MP3 and Windows Media Audio speed changes in 3 different levels For audio CD fast forward fast reverse search between different tracks are...

Страница 27: ...revious page in the programmed list Press YELLOW to go to the next page in the programmed list 0 26 24 CD_DA 0 36 1 14 0 45 0 50 0 53 0 20 0 54 8 9 10 11 12 13 14 1 14 0 50 1 14 0 50 0 53 0 54 0 36 2...

Страница 28: ...o CD or from beginning of the file where C stop was pressed MP3 WMA JPEG To repeat the current track file in the random selection press REPEAT repeatedly until Track appears during playback To repeat...

Страница 29: ...video and DVD video contain scenes which have been shot simultaneously from various angles You can change the camera angle when appears on the TV screen 1 During playback press ANGLE The selected ang...

Страница 30: ...ill start in a few seconds Chapter Search During playback of a title enter the chapter number you want to search using the Number buttons Playback of the chapter will start in a few seconds Track File...

Страница 31: ...O 2 Use K L to select your desired audio stream channel For audio CD you can select following options 3 Press AUDIO to exit Switching Subtitles Primary Subtitle Sets the subtitle for the primary video...

Страница 32: ...to HD Audio Output For some BD secondary audio will be output even when secondary video is off The sound mode cannot be changed during playback of discs not recorded in multiple audio Some discs allow...

Страница 33: ...If you turn up the volume too much the audio may get distorted To enjoy clear sounds please turn down the volume Selecting Surround Mode Note The availability of surround sound modes will depend on t...

Страница 34: ...Set the preset turn off time to 150 minutes To check or change the setting Press SLEEP once to display the remaining time To change the setting press SLEEP repeatedly until your desired preset time i...

Страница 35: ...2 Use RED GREEN BLUE YELLOW to select the desired preset station 3 Press CLEAR The selected station is deleted from the preset station list Radio Operations Presetting Radio Stations Note While auto t...

Страница 36: ...ge Audio Original Chinese Turkish Sets the audio language for BD video or DVD video playback Original Activates the disc s original language Other If you select Other enter 4 digit code for the desire...

Страница 37: ...be selected automatically depending on the connected HDMI device 480p HDMI Deep Color This feature is available only when the display device is connected by an HDMI cable and when it supports Deep Col...

Страница 38: ...output mode You cannot change the video resolution during Blu ray Disc playback To change the resolution stop playback In order to get natural and high quality film reproduction of 24 frame film mater...

Страница 39: ...ker Setup This feature is available only when Audio Output is set to Speakers Refer to page 42 Surround Effects Sets the surround effect of audio when the setting of surround mode is set to Dolby Pro...

Страница 40: ...igital Dolby Digital Plus or Dolby TrueHD audio is played back Off Parental Refer to page 44 for more information Password input field BD Rating Level All Sets the rating level for the BD playback Age...

Страница 41: ...e settings except for Parental to the factory default Yes Format SD Card No Re formats SD card Yes Erase Saved BD ROM Data Player No Re formats local storage Player used for BD Java Yes Erase Saved BD...

Страница 42: ...ing the aspect ratio of the picture 16 9 16 9 Wide To enjoy 16 9 picture on 16 9 monitor Select this setting when you want to enjoy 16 9 picture on the 16 9 TV 4 3 16 9 Squeeze To enjoy 4 3 picture on...

Страница 43: ...PCM or Mute Multi LPCM or Mute DTS HD DTS HD or DTS or Multi LPCM 3 or Mute DTS or Multi LPCM 3 or Mute Multi LPCM 3 or Mute Multi LPCM 3 or Mute LPCM Multi LPCM or Mute Multi LPCM or Mute Multi LPCM...

Страница 44: ...wer of the TV first and then turns off the power of this unit When the connected fun Link HDMI CEC compatible display device is turned off this unit may also turn off together Get Set Menu Language Th...

Страница 45: ...e K L to select a desired option then press OK Setup Resets the setup menu to the default Format SD Card Available only when an SD Memory Card is inserted Initializes the SD Memory Card After confirma...

Страница 46: ...are turned on in the TV menu Ensure that the TV speakers are not muted No audio from the speaker system Increase the volume level of the speaker system Set Audio Output to Speakers in the setup menu...

Страница 47: ...screte intervals 44 100 times a second for CD audio by an analog to digital converter generating a stream of numbers On playback a digital to analog converter generates an analog signal based on these...

Страница 48: ...ic Experts Group JPEG is a method of compressing still picture files You can copy JPEG files on BD RE R DVD RW R CD RW R or SD Memory Card from a computer and play back the files in this unit MP3 MPEG...

Страница 49: ...Lithuanian 5866 Language Code Macedonian 5957 Malagasy 5953 Malay 5965 Malayalam 5958 Maltese 5966 Maori 5955 Marathi 5964 Moldavian 5961 Mongolian 5960 Nauru 6047 Nepali 6051 Norwegian NOR 6061 O R O...

Страница 50: ...imensions 3 9 x 5 1 x 4 0 inches 100 x 130 x 100 5 mm Weight front 1 19 lbs 0 54 kg rear 1 13 lbs 0 51 kg Center speaker System Full range satellite Impedance 4 Frequency response 180 Hz 20 kHz Dimens...

Страница 51: ...lens If this unit still does not perform properly although you refer to the relevant sections and to Troubleshooting in this manual the laser optical pickup unit may be dirty Consult your dealer or a...

Страница 52: ...EMBLY PARTS DEMO OR FLOOR MODELS FUNAI CORP AND ITS REPRESENTATIVES OR AGENTS SHALL IN NO EVENT BE LIABLE FOR ANY GENERAL INDIRECT OR CONSEQUENTIAL DAMAGES ARISING OUT OF OR OCCASIONED BY THE USE OF O...

Отзывы: