background image

PRECAUTIONS

PREPARATION

ADVANCED PLAYBACK

BASIC OPERATIONS

RECORDING

OPTIONAL SETTINGS

TROUBLESHOOTING

INFORMATION

EN

EN

9

PREPARATION

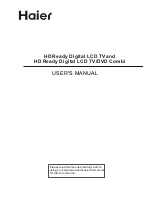
1.  DVD/VCR AUDIO OUT jack

p.10

•  Connect an RCA audio cable from here to the audio

input jack of your television or audio device. Standard 
connection for DVD/VCR use.

2. VCR AUDIO IN jack

p.22

• Connect an RCA audio cable from the audio output

jack of your camcorder, VCR, etc. to here.

3. DIGITAL AUDIO OUT COAXIAL* jack

p.12

• Connect a digital audio coaxial cable from here

to the digital audio coaxial in jack of a decoder or
audio receiver.

4. DVD AUDIO OUT* (analog) jack

p.11

•  Connect an RCA audio cable from here to the audio

input jack of your television or audio device.

5. S-VIDEO OUT* jack

p.11

• Connect an S-video cable from here to the S-video 

input jack of your television.

6. COMPONENT VIDEO OUT* jack

p.11

•  Connect component video cables from here to the 

component video input jacks of your television.

7. DVD/VCR VIDEO OUT jack

p.10

• Connect an RCA video cable from here to the

VIDEO input jack of your television or audio device. 
Standard connection for DVD/VCR use.

8. VCR VIDEO IN jack

p.22

• Connect an RCA video cable from here to the video 

output jack of your camcorder, VCR, etc.

*

For enhanced DVD viewing. DVD/VCR video and audio
connection required to view cassette tapes.

Note:

•  RCA audio and video cables are included for 

both VCR and DVD viewing. You can enhance
your DVD picture and sound quality with an
S-video cable, component video cables, or a
digital audio coaxial cable.

Please purchase

the necessary cables at your local store.

(Refer to pages 11-12.)

Rear Panel

DIGITAL

AUDIO OUT

COAXIAL

AUDIO

OUT

DVD

VCR

DVD/VCR

S-VIDEO

OUT

COMPONENT

VIDEO OUT

AUDIO IN

VIDEO IN

AUDIO OUT

VIDEO OUT

L

L

Y

R

R

C

B

C

R

3

5

4

6 7 8

L1

1

2

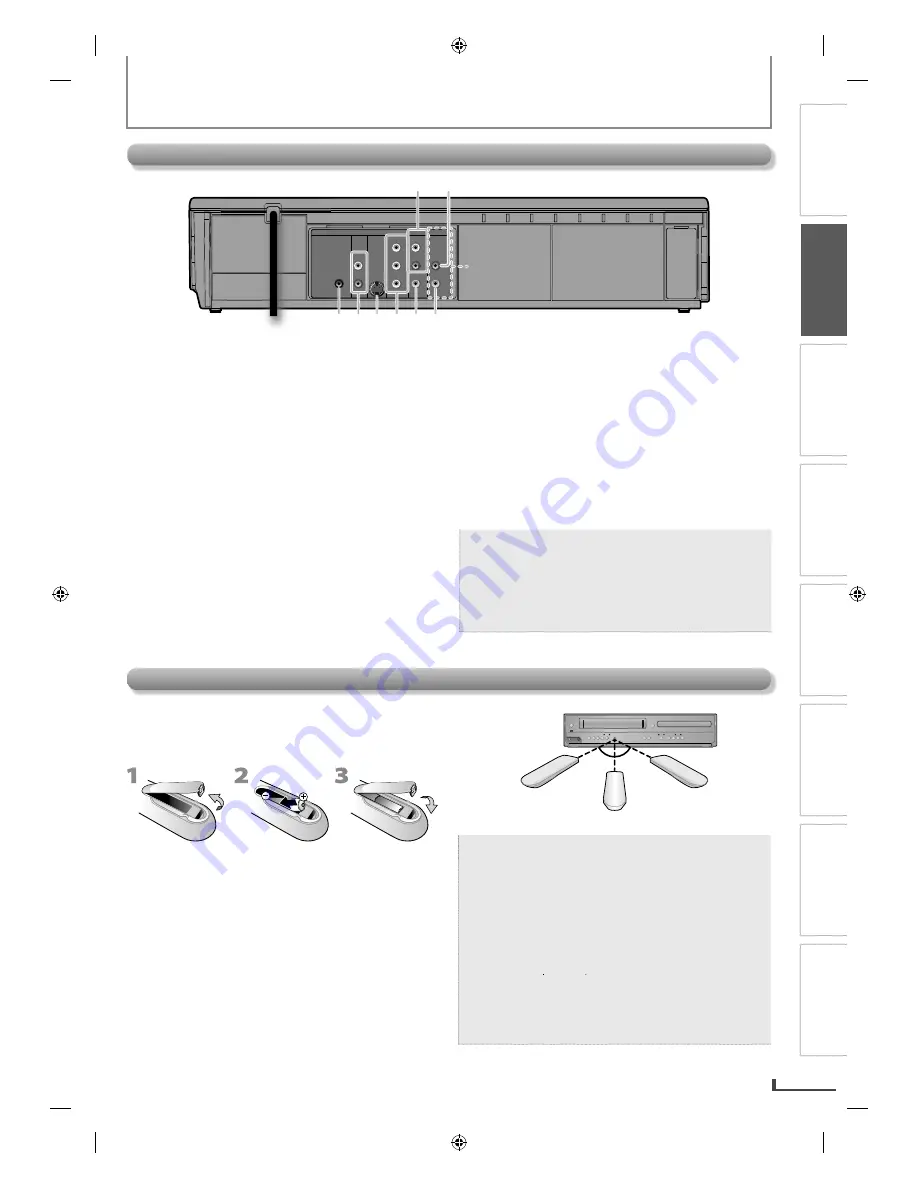
Install the 2 AA (1.5 V) batteries matching the polarity 
indicated inside battery compartment of the remote
control.

Keep the following in mind when using the remote
control:
• Make sure that there are no obstacles between the 

remote control and the infrared sensor window on the
unit.

• The maximum operable ranges of the unit are:

-

Line of sight

:   approx. 23 feet (7m)

-

Either side of center

:

approx. 16 feet (5m) within 30°

-

Above

:

approx. 16 feet (5m) within 15°

-

Below

:

approx. 10 feet (3m) within 30°

16 feet (5m)

30˚

30˚

16 feet (5m)

23 feet (7m)

Caution:   Never throw batteries into a fire.
Note:

• Do not mix different types of batteries together 

(e.g., Alkaline and Carbon-Zinc) or old batteries
with fresh ones. Although they may look similar,
different batteries may have different voltages.

• If the remote control is not to be used for a long

period of time, remove the batteries to prevent 
damage or injury from possible battery leakage.

• Do not try to recharge batteries; they can

overheat and rupture.

y

g

y

• Batteries should always be disposed of with

the environment in mind. Always dispose of 
batteries in accordance with applicable laws
and regulations.

Installing the Batteries for the Remote Control

E8K6AUD̲DV220MW9̲EN̲v1.1.indd   9

E8K6AUD̲DV220MW9̲EN̲v1.1.indd   9

2009/11/02   16:50:24

2009/11/02   16:50:24

Содержание DV220MW9 A

Страница 1: ...spu s de leerlo a n necesita ayuda consulte nuestro servicio de asistencia en l nea en www magnavox com support o llame al tel fono 1 800 605 8610 y tenga a mano el producto y n mero de model serial P...

Страница 2: ...ufacturer 12 Use only with the cart stand tripod bracket or table specified by the manufacturer or sold with the apparatus When a cart is used use caution when moving the cart apparatus combination to...

Страница 3: ...ields or in a place subject to dust or strong vibration Avoid a place with drastic temperature changes Install the unit in a horizontal and stable position Do not place anything directly on top or bot...

Страница 4: ...L SETTINGS OPTIONAL SETTINGS Changing the DVD Settings in the setup menu 23 PARENTAL Setting 24 INITIALIZE 25 TROUBLESHOOTING TROUBLESHOOTING Troubleshooting Guide 26 INFORMATION INFORMATION Maintenan...

Страница 5: ...h labels scratches stains blemishes etc HD DVD Blu ray disc Caution The sound may not be heard on the following disc super audio CD Note Only the sound recorded on the normal CD layer can be delivered...

Страница 6: ...modo de disco actual VCR mode Press to display the current time cassette tape counter and L1 L2 Pulse para visualizar la hora actual el contador del casete y L1 o L2 7 VCR 7 VCR VCR VCR p 13 p 13 Pres...

Страница 7: ...tte tape Pulse para comenzar la reproducci n de un disco o casete 25 STOP C p 14 DVD mode Press to stop disc playback Pulse para detener la reproducci n del disco VCR mode Press to stop the playback r...

Страница 8: ...udio cable from the audio output jack of your camcorder and other such devices here 14 REW E VCR p 15 Press to rewind the cassette tape or to view the picture rapidly in reverse during playback rewind...

Страница 9: ...sound quality with an S video cable component video cables or a digital audio coaxial cable Please purchase the necessary cables at your local store Refer to pages 11 12 Rear Panel DIGITAL AUDIO OUT...

Страница 10: ...4 switch to either 3 or 4 whichever the TV channel is least used in your area 2 Turn on your TV and choose the same channel as you set the RF modulator s channel 3 4 switch to Note The quality of pict...

Страница 11: ...audio L To audio L input jack input jack To audio L input jack DIGITAL AUDIO OUT COAXIAL AUDIO OUT DVD VCR DVD VCR S VIDEO OUT COMPONENT VIDEO OUT AUDIO IN VIDEO IN AUDIO OUT VIDEO OUT L L Y R R CB C...

Страница 12: ...R this unit or Dolby Digital decoder digital audio receiver DIGITAL AUDIO COAXIAL IN DIGITAL AUDIO COAXIAL IN DIGITAL AUDIO OUT COAXIAL OUT DVD VCR DVD VCR OUT NT T AUDIO IN VIDEO IN AUDIO OUT VIDEO O...

Страница 13: ...n unplugged for more than 30 seconds Turning on Unit for the First Time Press VCR first Please note most instructions in this manual refer to remote control use 1 Be sure your TV s input is set to VID...

Страница 14: ...o start playback Pulse PLAY para comenzar la reproducci n PLAY DISC IN DVD VCR OPEN CLOSE AUDIO REC RECORD PLAY STOP EJECT TIMER REC IR TRACKING SOURCE PREV STOP PLAY NEXT If the protection tab has re...

Страница 15: ...ote For DVD set STILL MODE to FIELD in DISPLAY menu if pictures in the pause mode are blurred page 23 For VCR to prevent damage to the cassette tape still mode will automatically stop after 5 minutes...

Страница 16: ...vely as and 3 A maximum of 255 folders or 999 files may be recognized on one disc Up to 8 hierarchies can be recognized in one folder Files in the 9th or deeper hierarchies cannot be played back For M...

Страница 17: ...or VCR if a cassette tape ends during a search the time search will be canceled and the unit will rewind to the beginning of the cassette tape The time search is not available for programmed and rando...

Страница 18: ...ust the black level ON makes the dark areas brighter OFF shows the original picture as recorded 3 Press RETURN to exit Virtual Surround You can enjoy stereophonic virtual surround on your 2 channel st...

Страница 19: ...nd mode suitable for jazz music ROCK sound mode suitable for rock music POP sound mode suitable for pop music CLASSIC sound mode suitable for classic music OFF no effects original sound 3 Press RETURN...

Страница 20: ...g or satellite link refer to pages 21 22 Tape speed Recording playback time Type of tape T60 T120 T160 SP mode 1hour 2hours 2 2 3hours SLP mode 3hours 6hours 8hours Press RECORD until desired duration...

Страница 21: ...andby mode To Cancel a Timer Recording in Progress g g g g To Cancel a Timer Recording in Progress Press STOP EJECT C A on the unit Note for Timer Recording OTR If there is no cassette tape in the uni...

Страница 22: ...To Cancel the Satellite Link on Standby y y To Cancel the Satellite Link on Standby Press TIMER SET on the remote control or STOP EJECT C A on this unit Progress g To Cancel the Satellite Link in Prog...

Страница 23: ...DE AUTO FIELD FRAME Set the type of still image in pausing playback Select AUTO usually AUTO automatically selects the best resolution setting FRAME or FIELD based on the data characteristics of the p...

Страница 24: ...with those intended for adult and general use prohibited TIPS FOR LEVELS 8 ADULT DVD software of any grades adult general children can be played back 7 NC 17 no one under 17 admitted 6 R restricted u...

Страница 25: ...up the setup menu 2 Use to select then press OK 3 Press to select YES then press OK INITIALIZE_INITIALIZE INITIALIZE YES 4 Press 1 2 or 3 to select the desired language SELECT MENU LANGUAGE 1 ENGLISH...

Страница 26: ...No or poor playback picture Fine tune your TV Connect the video cable firmly Video or color fades in and out when making a copy of a cassette tape You cannot copy a copyrighted cassette tape Cannot re...

Страница 27: ...d on the video heads or the usage of rental or worn cassette tapes can cause this problem If a streaky or snowy picture appears during playback the video heads in your unit may need to be cleaned 1 Pl...

Страница 28: ...TIVES OR AGENTS SHALL IN NO EVENT BE LIABLE FOR ANY GENERAL INDIRECT OR CONSEQUENTIAL DAMAGES ARISING OUT OF OR OCCASIONED BY THE USE OF OR THE INABILITY TO USE THIS PRODUCT THIS WARRANTY IS MADE IN L...

Отзывы: