background image

16

6.6. Playback mode

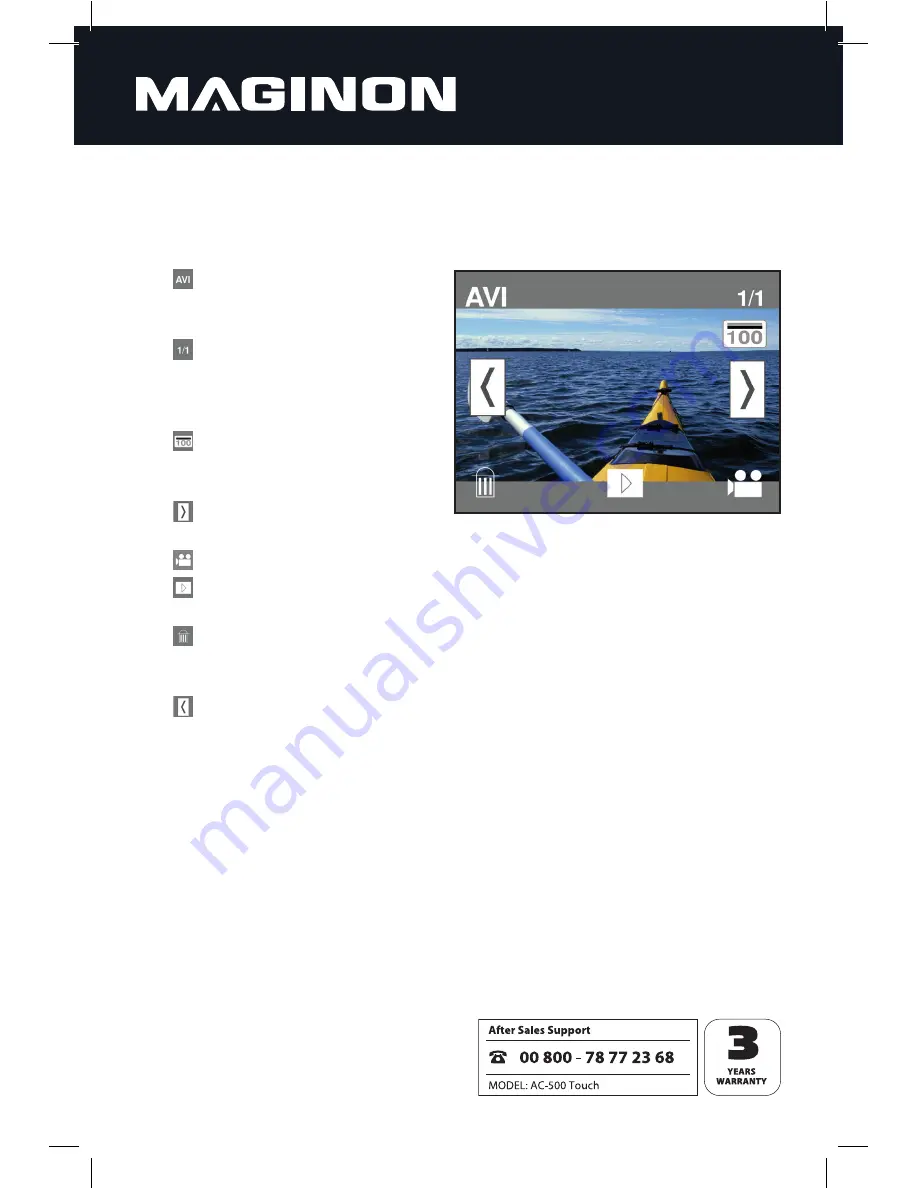
In playback mode you can view the videos and photos stored on the memory card. 

You can also delete individual recordings directly on the camera.
The following displays and functions are available on the monitor in playback mode:
1.  [


] Type of shot: This shows what 

type of shot the selected file is. "AVI" 

represents a video, "JPG" is a photo.

2.  [


] File count: Shows the 

sequential number of the current 

recording as well as the total 

number of recordings.

3.  [


] Folder: Specifies the name of 

the current folder on the memory 

card.

4.  [


] Scroll forward: Touch the sym-

bol on the monitor to move to the next recording.

5.  [


] Recording mode: Touch this symbol to change back to recording mode.

6.  [


] Start playback: Here you can start and stop the video recording playback. You 

can also fast-forward and rewind during playback.

7.  [


] Delete: If you want to delete the current recording, touch this symbol on 

the monitor. A message then appears asking whether the recording really is to be 

deleted ("yes") or not ("no").

8.  [


] Scroll back: Touch the symbol on the monitor to move to the previous 

recording.

Содержание AC-500

Страница 1: ......

Страница 2: ......

Страница 3: ...ase receipt Store them carefully with the operating instructions When passing the device on to a third party be sure to include the instruction manual 1 Package contents Unpack the camcorder carefully and check that all the items listed below are included 1 MAGINON AC 500 Touch 2 4 GB microSDHC memory card with SD card adapter 3 Helmet mount 4 4 x 3M adhesive stickers 5 Underwater housing 6 USB ca...

Страница 4: ... Using the underwater protective housing 9 5 4 Using the helmet mount 10 6 OPERATING THE CAMCORDER 11 6 1 Switching the camcorder on and off 11 6 2 Setting the shooting mode 12 6 3 Video recording 13 6 4 Taking photos 14 6 5 Vehicle mode 15 6 6 Playback mode 16 7 CONNECTING TO A COMPUTER 17 8 TECHNICAL DATA 18 9 SYSTEM INFO MAINTENANCE AND DISPOSAL 19 9 1 Care 19 9 2 Storage 19 9 3 Disposal 19 10 ...

Страница 5: ...ssories may only be used by persons who are physically and mentally capable of operating them safely Risk of electric shock due to moisture and humidity The camcorder and USB cable must not be exposed to drips or splashes In addition containers filled with liquids such as vases or glasses must not be placed on them or in their immediate vicinity There is a risk of fire and electric shock Do not ch...

Страница 6: ...egrated battery must not be thrown into a fire short circuited or taken apart There is a risk of fire and explosion Dispose of the battery in accordance with local battery recycling requirements information can be obtained from your local council Injuries and property damage Only place the camcorder on stable surfaces Otherwise the camera could fall or tip over which could damage it or cause injur...

Страница 7: ...ories 1 Action Camcorder 2 4 GB microSDHC memory card inclu ding SD card adapter 3 Underwater protective housing 4 USB cable 5 Helmet mount 6 3M adhesive stickers 4 pc 7 Operating instructions not shown 8 Warranty documents not shown 1 2 3 4 5 6 ...

Страница 8: ...6 4 2 Views of the camera Front and back views Left and right views Lens TFT monitor Microphone Charge indicator Operation LED Mode switch Slot for carrying loop ...

Страница 9: ...7 Top view Bottom view On Off button Shutter button Memory card slot Mini USB port Reset ...

Страница 10: ... side of the memory card with writing on it is facing the monitor and the contacts on the memory card are inserted first Push the memory card into the camcorder until you hear it click To remove the memory card push it again The memory card will then be pushed out of the device slightly and can be removed Note Format a memory card on the computer before you use it for the first time in the camcord...

Страница 11: ...ide of the underwater protective housing is clean and dry before you put the camcorder in it In particular check that there is no dirt on the seal and the seal is undamaged before each use Make sure there is a memory card in the camcorder and the mode switch is set to your desired shooting mode The camera shouldn t be used more than one hour underwater to prevent any dama ges Note It takes a maxim...

Страница 12: ...ompletely open the housing and remove the camera Always dry the underwater protective housing before opening it in order to avoid getting moisture on the camcorder Note The underwater protective housing also provides protection from rain or water spray for example when the Action Camcorder is mounted on a helmet However please note that the sound quality is reduced on recordings made while using t...

Страница 13: ... surface of the helmet or surf board The adhesive pads can be removed from virtually any surface without leaving a residue The Action Camcorder can only be used on the helmet mount when inside the underwater protective housing To do this screw the screw mount tightly onto the tripod thread on the underwater housing Then sli de the screw mount into the recess on the mount plate until you hear it cl...

Страница 14: ...kewise the camcorder automatically switches off once the battery charge level gets too low In this case the battery symbol is displayed on the monitor before switching off While a video is being recorded the camcorder monitor will switch off after a while to save power The recording then keeps running the operation LED lights up red Briefly press the on off button to switch the monitor back on 6 2...

Страница 15: ...HD 1280 x 720 pixels and 640 640 x 480 pixels 3 Digital zoom Touch the symbol to enlarge the view 4 Magnification Shows the current magnification of the digital zoom 5 Digital zoom Touch the symbol to shrink the view 6 Playback Touch this symbol to change the playback mode 7 Mode symbol Video mode is displayed 8 Battery symbol Shows the charge status of the integrated battery 9 Date Time Touch the...

Страница 16: ...ch the symbol to enlarge the view 4 Magnification Shows the current magnification of the digital zoom 5 Digital zoom Touch the symbol to shrink the view 6 Playback Touch this symbol to change to playback mode 7 Mode symbol Photo mode is displayed 8 Battery symbol Shows the charge status of the integrated battery 9 Date Time Touch the symbol to set the date and time on the camcorder Then select the...

Страница 17: ...mcorder switches between HD 1280 x 720 pixels and 640 640 x 480 pixels 3 Digital zoom Touch the symbol to enlarge the view 4 Magnification Shows the current magnification of the digital zoom 5 Digital zoom Touch the symbol to shrink the view 6 Playback Touch this symbol to change to playback mode 7 Mode symbol Vehicle mode is displayed 8 Battery symbol Shows the charge status of the integrated bat...

Страница 18: ...he total number of recordings 3 Folder Specifies the name of the current folder on the memory card 4 Scroll forward Touch the sym bol on the monitor to move to the next recording 5 Recording mode Touch this symbol to change back to recording mode 6 Start playback Here you can start and stop the video recording playback You can also fast forward and rewind during playback 7 Delete If you want to de...

Страница 19: ...played on the camcorder monitor The operation LED will also be continuously lit The files can be found on the memory card in subfolders in the DCIM folder In the 100MEDIA subfolder you will find videos recorded in video mode as well as the photos the RECORDER subfolder contains files made in vehicle mode System requirements Windows Macintosh Pentium III 800 MHz or higher Windows XP Vista 7 8 512 M...

Страница 20: ...ox 10 minutes GByte VGA approx 8 minutes GByte Storage medium microSD SDHC memory cards up to 32 GB Digital Zoom 4 X Waterproofing To a depth of up to ten metres in the underwater protective housing provided Power supply Integrated rechargeable lithium ion battery 440 mAh Ports Mini USB 2 0 Charging function USB charging function USB 2 0 or higher necessary Microphone Integrated microphone Dimensi...

Страница 21: ...n the camcorder should not be stored in very cold or hot environments 9 3 Disposal Dispose of the packaging in an environmentally friendly man ner and in the collection containers provided Batteries should not be disposed of in household waste The consumer is legally obliged to return used batteries to municipal collection points or to a place where batteries are sold The adjacent label indicates ...

Страница 22: ...valid for three years Please refer to the warranty card enclosed separately for details Please contact our hotline before sending in your defective device Service address Sertronics LTD MAGINON Service 45 Regal Drive Walsall Enterprise Park Walsall WS2 9HQ United Kingdom Tel 00 800 78 77 23 68 Manufacturer s address supra Foto Elektronik Vertriebs GmbH Denisstr 28A 67663 Kaiserslautern Germany ...

Страница 23: ... of interference This includes interference that may impair functions or cause malfunctions If this device causes interference to radio and television reception this is determined most easily by switching the device on and off the user should try to eliminate the interference using the following measures Turning the receiving antenna in a different direction or relocating it Increasing the distanc...

Страница 24: ...h 6 Mode symbol 13 14 15 Mounting plate 11 O On off button 7 12 Operation LED 6 12 P Package contents 1 Photo mode 12 14 Photo quality 14 Photo resolution 20 Playback 13 14 15 16 ending 16 starting 16 Playback mode 16 Power supply 20 R Reset 7 S Safety tips 3 Screw mount 11 Scrolling back 16 Scrolling forward 16 Service 23 Shooting mode 12 16 Shutter button 7 Storage 21 Switching off 12 Switching ...

Страница 25: ......

Страница 26: ......

Страница 27: ......

Страница 28: ...supra Foto Elektronik Vertriebs GmbH Denisstr 28A D 67663 Kaiserslautern Germany 91396 05 2014 2001 3837 ...

Отзывы: