background image

10

Operating basics

Turning the recorder on

Complete the installation according to the instructions in the “Using your recorder 

in a vehicle” section. Once the vehicle engine is started the recorder automatically 

turns on. 

Setting the date and time

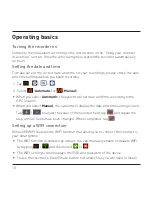
To make sure of the correct date and time for your recordings, please check the date 

and time settings before you begin recording.

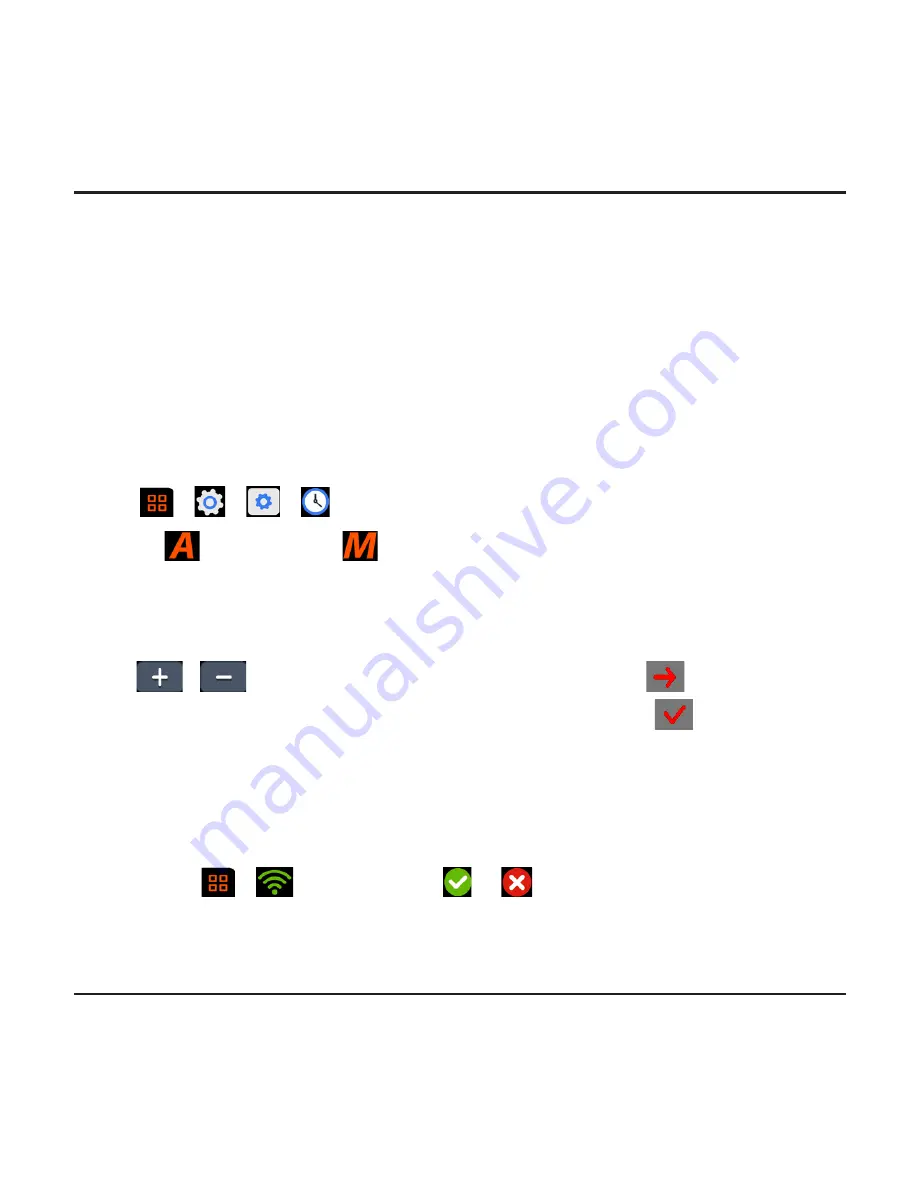
1. Tap 

 > 

 > 

 > 

 .

2. Select 

 (

Automatic

) or 

 (

Manual

):


ƒ

When you select 

Automatic

, the system will set date and time according to the 

GPS location.


ƒ

When you select 

Manual

, the system will display the date and time setting screen.

Tap 

 / 

 to adjust the value of the selected field; tap 

 and repeat the 

step until all fields have been changed. When completed, tap


.

Setting up a WIFI connection

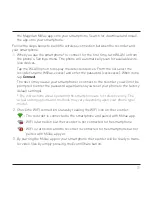
MiVue 658 WIFI features the WIFI function that allows you to connect the recorder to 

your smartphone.


ƒ

The WIFI function is enabled by default. You can manually enable or disable WIFI 
by tapping 

 > 

 and then select 

 or 

 .


ƒ

The WIFI setting screen displays the SSID and password of the device.


ƒ

To use the recorder's Event/Share button to transfer files you will need to install 

Содержание MiVue 6 series

Страница 1: ...User Manual MiVue 6 Series...

Страница 2: ...658 WIFI model...

Страница 3: ...provides a way for consumers to recycle certain Magellan equipment As part of this program all Magellan GPS models will be accepted Visit magellanGPS com for more information Magellan Take Back Progra...

Страница 4: ...the receiver The battery is rechargeable and should not be removed In the event it should need to be replaced please contact Magellan Technical Support FCC RF Radiation Exposure Statement 1 This Tran...

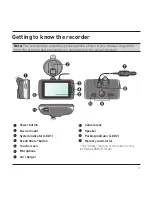
Страница 5: ...creen 6 Microphone 7 Car charger 8 Camera lens 9 Speaker 10 Parking indicator LED 2 11 Memory card slot s The Share function of this button is only for MiVue 658 WiFi model Note The screenshots and ot...

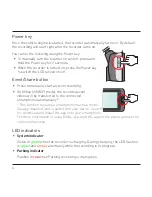
Страница 6: ...ing On MiVue 658 WIFI model the recorded event videos will be transferred to the connected smartphone automatically This function requires a smartphone that has the Mi Vue app installed and is paired...

Страница 7: ...ferent to provide various function and information of your device Example Button Description Tap to enter the Settings Menu Tap to manually enable Parking mode Tap to take a photo Tap to start recordi...

Страница 8: ...label facing the rear side of the recorder 2 To remove the card gently push the top edge of the card inwards to release it and pull it out of the slot CAUTION DO NOT apply pressure to the center of th...

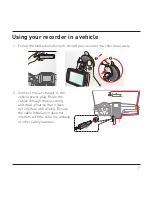
Страница 9: ...corder in a vehicle securely 2 Connect the car charger to the vehicle power plug Route the cables through the top ceiling and the A pillar so that it does not interfere with driving Ensure the cable i...

Страница 10: ...ocation for mounting the device in a vehicle Never place the device where the driver s field of vision is blocked If the car s windscreen is tinted with a reflective coating it may be athermic and imp...

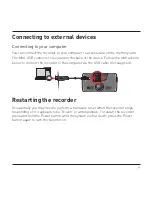
Страница 11: ...Follow the instructions below to connect the recorder to the computer via the USB cable not supplied Restarting the recorder Occasionally you may need to perform a hardware reset when the recorder st...

Страница 12: ...ll set date and time according to the GPS location When you select Manual the system will display the date and time setting screen Tap to adjust the value of the selected field tap and repeat the step...

Страница 13: ...smartphone to connect to the recorder you will not be prompted to enter the password again unless you reset your phone to the factory default settings The instructions about operating the smartphone a...

Страница 14: ...G sensor will prompt the recorder to start recording the event You can change the sensitivity level 6 levels from Low to High of the G sensor by tapping If you want to manually start an event recordi...

Страница 15: ...car stops moving for about 5 minutes or tap to manually start Parking mode while continuous recording is in prog ress The feature is triggered by the G sensor of the device You can change the con fig...

Страница 16: ...4 During playback you can While playing videos tap to play the previous next video Tap to start or pause the playback While viewing photos tap to display the previous next photo Tap to return to the...

Страница 17: ...include sounds in the recordings The default setting is On WIFI Enables or disables WIFI The default setting is On Refer to the Setting up a WIFI connection section to learn how to connect the record...

Страница 18: ...e corder is in Parking mode LED Indicator The options are On and Off Video Recording Video Clip Length Sets the length of each video clip for a continuous recording 1 min 3 min or 5 min Video Resoluti...

Страница 19: ...after recording starts Select ing Standby will turn off the LCD in specified time but still display the time and speed information Language Sets the language Distance Unit Sets the preferred distance...

Страница 20: ...nager Download the Setup file from www MagellanGPS com and follow the on screen prompts to install it Double click Setup exe and follow the on screen prompts to install MiVue Manager Playing the recor...

Страница 21: ...ernet or when your MiVue model records without the GPS function G sensor chart displays data in 3 axis waveform about the car s shift for ward backward X to the right left Y and upward downward Z 3 By...

Страница 22: ...ecording files 4 Double click the desired file on the file list to start playback 5 The playback controls are described as follows 1 2 3 4 5 6 7 5 1 Skips to the previous next file on the list 5 2 Sta...

Страница 23: ...hat stores the recording files 7 2 Previews and prints the current video image 7 3 Saves the selected files to the specified location on your computer 7 4 Captures and saves the current video image to...

Страница 24: ...letely before use The screen surface can easily be scratched Avoid touching it with sharp objects Non adhesive generic screen protectors designed specifically for use on portable devices with LCD pane...

Страница 25: ...harging Use only the charger supplied with your device Use of another type of charger may result in malfunction and or danger This product is intended to be supplied by a LISTED Power Unit marked with...

Страница 26: ...sing hazardous chemicals To reduce the risk of fire or burns do not disassemble crush puncture or dispose of in fire or water Use a specified battery in the equipment Important instructions for servic...

Страница 27: ...irements or that its operation will be uninterrupted error free or virus free The purchaser assumes the entire risk of using the software 2 PURCHASER S REMEDY PURCHASER S EXCLUSIVE REMEDY UNDER THIS W...

Страница 28: ...llan Service Center will void this warranty 6 EXCLUSION OF INCIDENTAL OR CONSEQUENTIAL DAMAGES a MAGELLAN SHALL NOT BE LIABLE TO PURCHASER b OR ANY OTHER PERSON FOR ANY INDIRECT INCIDENTAL OR CONSEQUE...

Страница 29: ...agellangps com support for answers to most questions If you can t find a solution there you can contact Magellan Technical Support directly by e mail at support us cs magellangps com or call 800 707 9...

Отзывы: