background image

5

  EN

Power Supply

Be careful when handling the device and electrical power! To supply the unit with 
power, first connect the provided power cable to the unit (‘Power’) and then 
to a suitable power outlet. The device uses mains voltage (AC 100 V – 240 V)! 

 CAUTION! 


DO NOT OPEN THE UNIT. RISK OF ELECTRICAL SHOCK.

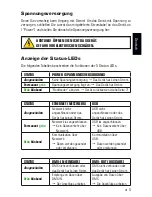
Description Of Status LED Codes

The following tables describe the LED status codes on the front of the device.

STATUS

STATUS LED POWER

Powered off

Power cable not connected. 

 The device has no power.

Permanently 

green

Connected to power. 


The power is on.

Blinking 

green

Bootloader activated. 

 Reset the device (see page 7).

STATUS

STATUS LED ETHERNET

STATUS LED USB

Powered off

Ethernet not connected  
or the device has no power.

USB not connected  
or the device has no power.

Permanently 

green

Connected to Ethernet.

 No data is sent or  

     received over Ethernet.

Connected to USB.

 No data is sent or  

     received over USB.

Blinking 

green

Communicating over 
Ethernet.


Sending or receiving data  

     over Ethernet.

Communicating over
USB. 


Sending or receiving data  

     over USB.

STATUS

STATUS LED DMX-IN

STATUS LED DMX-OUT

Powered off

DMX not connected  
or the device has no power.

DMX not connected  
or the device has no power.

Blinking 

green

Receiving data via DMX-IN.


The input port works.

Sending data to DMX-OUT.


The output ports work.

Содержание LUNA

Страница 1: ...Quick Start Guide T echnical Manual LUNA...

Страница 2: ...u fully understand all information This MADRIX LUNA Quick Start Guide is written in English and German Diese Kurzanleitung wurde in englischer und deutscher Sprache verfasst Developed and made in Germ...

Страница 3: ...s or actions that inoage GmbH does not have influence on no matter if the damages as well as consequential damages are direct or indirect whether they are special damages or others nor if the damage i...

Страница 4: ...device for a long time It is recommended to always use galvanic isolation e g an opto isolator opto coupler splitter Avoid unwanted voltage on the DMX lines cables at all times Do not remove any part...

Страница 5: ...AC 100 V 240 V TO WORK DO NOT USE ANY OTHER VOLTAGE BECAUSE IT CAN DAMAGE THE DEVICE Power supply Power consumption DMX512 OUT DMX512 IN DMX512 ports OUT DMX512 ports IN Ethernet Art Net USB port Cas...

Страница 6: ...Blinking green Bootloader activated Reset the device see page 7 STATUS STATUS LED ETHERNET STATUS LED USB Powered off Ethernet not connected or the device has no power USB not connected or the device...

Страница 7: ...in And 5 Pin XLR Connector Layout The images below outline the general pin layout of 5 pin and 3 pin XLR ports 5 4 3 2 1 2 3 1 Please note MADRIX LUNA features 5 pin female XLR connectors and one 5 pi...

Страница 8: ...ADRIX LUNA You can find the default IP address on the back side of the device Step 4 The web configuration tool will be launched You will have access to different settings such as the IP address Reset...

Страница 9: ...he latest information please check the website www madrix com 2 0 GHz dual core CPU OpenGL 2 1 graphics card NVIDIA recommended 2 GB RAM 1 GB free harddisk space 1280 x 768 screen resolution Network c...

Страница 10: ...please choose your preferred language and confirm with OK You may abort the process at any time by clicking Cancel Fourth the Choose Components window allows you to select which items you want to ins...

Страница 11: ...power Step 3 Connect MADRIX LUNA to your computer using network cabling Step 4 Assign correct network settings for your PC in the Windows operating system Recommended default settings IP address 10 0...

Страница 12: ...or For more information please read the MADRIX user manual Device Configuration In MADRIX Web Configuration You can access the web configuration also through MADRIX if Art Net is configured Go to Pref...

Страница 13: ...d RoHS Declaration Of Conformity The device complies with the requirements set forth in the council Directive of the law of the Member States relating to electromagnetic compatibility 2004 108 EC the...

Страница 14: ...projects Use suitable network components to create a network and connect the devices to a network switch 1 GBit s Where do I activate the Sync Mode You can activate it in the MADRIX Software under Pre...

Страница 15: ...Sie sich dass Sie alle Informationen verstanden haben Diese Kurzanleitung wurde in englischer und deutscher Sprache verfasst Entwickelt und hergestellt in Deutschland Impressum inoage GmbH Wiener Str...

Страница 16: ...n auf die inoage GmbH keinen Einfluss hat ganz gleich ob es sich um direkte oder indirekte Sch den und Folgesch den ob es sich um spezielle Sch den handelt oder ob diese vom Besitzer oder einer dritte...

Страница 17: ...wird empfohlen das Ger t immer durch galvanische Trennung abzusichern z B durch Optokoppler Es sollte zu keiner Zeit Fremdspannung auf den DMX Kabeln anliegen Entfernen Sie keine Teile vom Ger t oder...

Страница 18: ...hnische Daten NUTZEN SIE AUSSCHLIESSLICH 100 V 240 V WECHSELSTROM F R DIE SPANNUNGSVERSORGUNG DES GER TES Stromversorgung Stromaufnahme DMX512 Ausgabe DMX512 Eingabe DMX Anschl sse DMX Anschluss Netzw...

Страница 19: ...m Gr n blinkend Bootloader aktiviert Ger t zur cksetzen siehe Seite 7 STATUS ETHERNET NETZWERK USB Ausgeschalten Netzwerk nicht angeschlossen oder das Ger t hat keinen Strom USB nicht angeschlossen od...

Страница 20: ...n tig 5 polig Belegung 3 polig 1 Masse 2 DMX 3 DMX 4 Frei 5 Frei 1 Status LED f r Ethernet Netzwerk 2 Status LED f r USB 3 Status LED f r DMX IN Eingabe 4 Status LED f r DMX OUT Ausgabe 5 Status LED f...

Страница 21: ...ebbrowser und geben Sie die IP Adresse des MADRIX LUNA ein Zu finden auf der R ckseite des LUNA Schritt 4 Das Fenster f r die Konfiguration IP Adresse usw ffnet sich Zur cksetzen auf Werkseinstellunge...

Страница 22: ...g auf www madrix com Zweikern Prozessor mit 2 0 GHz Grafikkarte mit OpenGL 2 1 NVIDIA wird empfohlen 2 GB RAM 1 GB freier Festplattenspeicherplatz Monitoraufl sung von 1280 x 768 Netzwerkkarte Soundka...

Страница 23: ...rache aus Best tigen Sie mit OK Der Installationsvorgang kann zu jeder Zeit mit Cancel Abbrechen beendet werden Das vierte Fenster stellt die Komponenten zur Auswahl Eine Erkl rung ist f r jede Kompon...

Страница 24: ...RIX LUNA her Schritt 3 Verbinden Sie das Ger t mit Ihrem Computer ber Netzwerk Schritt 4 Stellen Sie die richtigen Netzwerkeinstellungen f r den PC im Windows Betriebssystem ein Empfohlene Standardein...

Страница 25: ...Sie die DMX Ausgabe unter Systemeinstellungen Ger teverwaltung Reiter DMX Ger te und aktivieren Sie Einschalten f rjedenben tigtenAusgangunter Einstellungen Schritt 6 Stellen Sie die virtuelle LED Ma...

Страница 26: ...eueste Version dieser Kurzanleitung sowie Software Updates f r MADRIX inkl Treiber aktueller Firmware und aktueller Versionen der Handb cher sind im Internet erh ltlich unter www madrix com Hilfe und...

Страница 27: ...Sie geeignete Netzwerk komponenten um ein Netzwerk aufzubauen und die Ger te an einen Netzwerk Switch 1 GBit s anzuschlie en Wo kann ich den Modus zur Synchronisation einstellen Dieser kann in der MA...

Страница 28: ...www madrix com...

Отзывы: