16
17
Both of these buttons have a triple function.
Fast rewind and fast forward are achieved while
the DV source is in stop mode, viewable slow
rewind and slow forward in playback mode, and
frame-by-frame backward and forward in pause
mode.
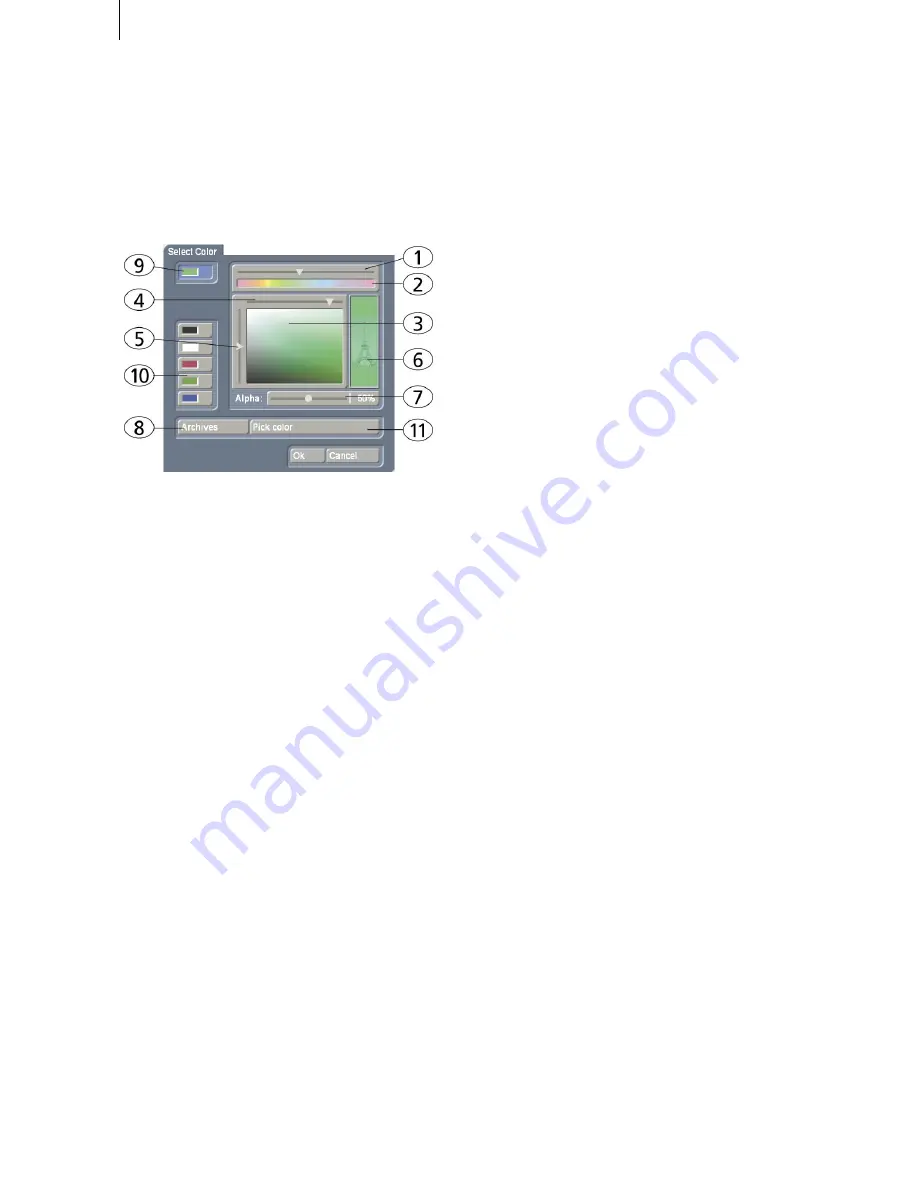
The color box
The color box enables you to select a color.
Clicking on the palette arrow
(1)
enables you to
choose a specific color. Scroll through the color
palette
(2)
until your desired color is displayed
in the color window below
(3)
. After confirming
this color by clicking the left trackball button you
can define the color more precisely. Click in the
large color window and use the upper arrow
(4)
to scroll left or right in order to attain the desired
saturation. Use the left arrow
(5)
to scroll up or
down to set the color brightness. With a little
practice you can specify your desired color by si-
multaneous use of both arrows. The intersection
point of both arrows (if you imagine them exten-
ding until they touch within the box) indicates
the selected color, which is always displayed to
the right in the rectangle
(6)
. Clicking on the left
trackball button confirms the setting. You can
also click directly on the color you wish without
having to use the arrow keys, by simply clicking
on the desired color within the color window (3).
The color that you selected is at the same time
displayed in the top left
color button (9)
for as
long as the button remains activated.
Beneath it you will see five other
color buttons/
memory buttons (10)
, which allow you to select
frequently-used colors quickly and conveniently.
To assign your preferred colors to the memory
buttons, first activate a memory button and then
select a color in the big color window. Once
the required color is assigned to the memory
button, activate another memory button or the
upper color button
(9)
.
In many cases (e.g. when titling) the color box
provides the
Alpha option (7)
. Here you let the
desired color shine through your motif displayed
on the right
(6)
, (the Eiffel tower is shown here
as an example). You can specify the alpha value
in percent by moving the scroll bar. The lower
the percent value the more transparent your
selected color and the more clearly your motif
shines through.
Clicking on the "
Pick color
” button
(11)
opens
the first frame of the scene that is selected in
the scene bin (in the case of the “
New
” menu)
or in the storyboard (in the case of the Effects
menus). There is a toolbar in the foreground
containing several buttons:
If you have opened the color box from an
effects menu, you can first of all use the top
left selection button to specify whether the
scene (“
Effect
”) that is currently selected in the
storyboard or another freely selectable scene
(“
Choose
") should be displayed.
Clicking on “
Choose Scene
” opens the scene
bin and you can specify a scene from which
you want to capture the color. If the upper
selection button was previously set to “
Effect
”
it will automatically switch to “
Choose
” after
you select another scene. You can then use the
selection button to jump easily back and forth
between the two scenes.
(By activating the color box in the transition ef-
fect menu, you can use the two „
Left scene
“ and
„
Right scene
“ buttons allowing you to switch
back and forth between the respective scenes.)
You can use the slider control or separate
buttons at the bottom to roll through the
selected scene frame-by-frame. (In the case of
image-processing effects, you also have the
option of rolling through the entire length of the
effect, i.e. through several scenes.)
The “
Position
” and “
Size
” buttons allow you
to adjust further settings for the color capture
function. The smaller the little selection box is,
the more precisely you can specify the color. In
the little “
Color
” box, you can view the color
over which the box is currently placed. If there
are several colors contained within the area
of the selection box, an average color value is
taken.
After you click on “
Ok
” you will see that your
selection is applied to the color window of the
color box. If you click on “
Cancel
”, you will
close the menu without applying any settings
changes.
Содержание SMART EDIT 5
Страница 1: ...User manual SMART EDIT 5 2nd edition ...
Страница 100: ...274 06 06 ...


