Macherey-Nagel NANOCOLOR VIS II Скачать руководство пользователя страница 21

21 

Quickstart guide NANOCOLOR

®


UV

/

VIS

 II / VIS II V 1.02 / 08.15
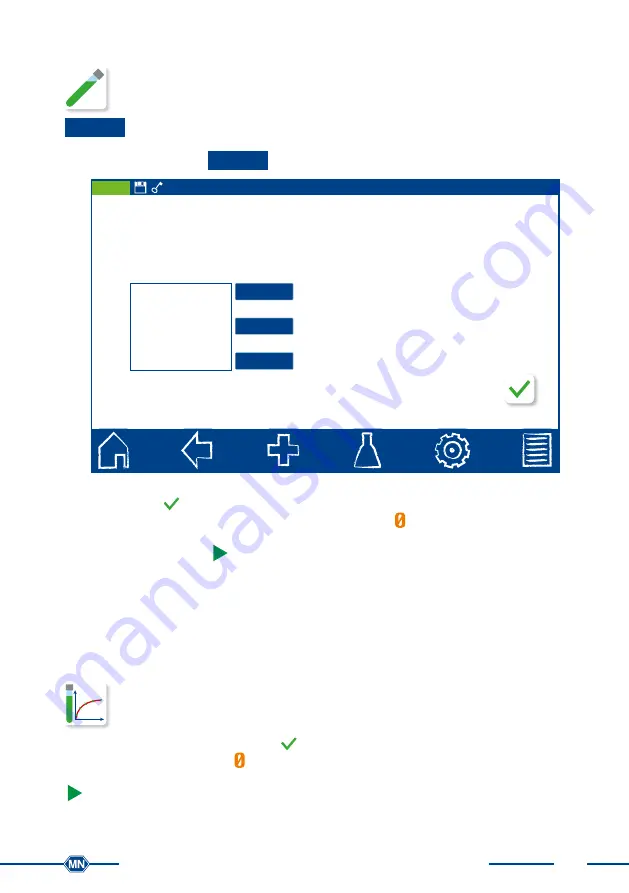
6.1.3 Absorbance

Abs|E


The basic function “Absorbance” enables the measurement of a sample’s absor-

bance against a zero solution. After having selected this method, a window will 

appear asking for the wavelength of the measurement. By pressing the 

Add

  button a set of wavelengths can be selected. It is possible to add up to 

10 wavelengths to the list. The wavelenghts list can be cleared or selected entries can be 

deleted by pressing the 

Remove

 button.

UV/VIS II

Open Mode, 28.10.2014, 10:57

OK

Add desired wavelengths to the list

Remove

Clear

Add

560 nm
720 nm

Absorbance

Fig. 16: Absorbance 

Confirming with 

 will open the measurement window. The instrument asks for a zero 

measurement. Inserting the zero solution and pressing 

 will initiate the zero measure-

ment. After the successful measurement of the zero solution, the sample solution need 

to be inserted. Pressing 

 will start the measurement process. After the measurement 

has been completed, the measurement result is displayed in the result window. 
It is possible to perform more than one measurement in a row. The results are then listed 

in a list on the left side of the result window.
Detailed information for each measurement can be called up by choosing an entry from 

the list.
6.1.4 Kinetics

The basic function “Kinetics” enables the measurement of a sample’s kinetics 

against a zero solution. After having selected this method, a window will appear 

asking for the measurement time, a time interval and the measurement wave-

length. Confirming the entries with 

 opens the measurement window. Inserting the 

zero solution and pressing 

 will initiate the zero measurement. After the successful 

measurement of the zero solution, the sample solution needs to be inserted. Pressing 

 starts the measurement process. A diagram will be displayed showing the live-re-

cording of the measurement results.

Содержание NANOCOLOR VIS II

Страница 1: ...Smart photometry NANOCOLOR VIS II NANOCOLOR UV VIS II Quickstart guide Distributed By...

Страница 2: ......

Страница 3: ...et up location 10 3 2 Package content 10 4 Outer appearance 11 4 1 Front and side view 11 4 2 Back view 12 5 Operating instruction 13 5 1 Connectivity 13 5 2 Turning on the instrument 13 5 3 Operation...

Страница 4: ......

Страница 5: ...comfortable and enjoyable handling of the spectrophotometer Thus the spectrophotometer is the ideal laboratory photometer for the entire spectrum of water analysis 1 1 Technical description A halogen...

Страница 6: ...More than 200 preprogrammed tests and special methods 100 user defined methods absorbance transmission factor kinetics 2 point calibration scan nephelometric turbidity measurement Turbidity measureme...

Страница 7: ...W H 400 440 170 mm 360 400 110 mm Weight 6 5 kg 4 0 kg Warranty 2 years Housing protection type IP20 Protection rating class 1 class 3 Declaration of conformity EMC directive 2014 30 EU EN 61326 1 200...

Страница 8: ...power cable or power adapter only 2 2 Biological risk When using the instrument it may be necessary to handle hazardous chemicals or biologically harmful samples Please adhere to the following guideli...

Страница 9: ...UV VIS II features a halogen and a deuterium lamp The NANOCOLOR VIS II features a halogen lamp Both get very hot during opera tion Hence there is a risk of severe burns Before exchanging the lamps le...

Страница 10: ...re not to damage its contents Remove the instrument and all other parts carefully Check the package inst rument and accessories for visible damages In case a part is damaged please contact your distri...

Страница 11: ...Side view UV VIS II a a b c e Fig 3 Front view VIS II f Fig 4 Side view VIS II a Stereo speakers b 10 1 HD touch screen with PCAP c Universal cuvette slot for tube tests of 16 mm OD and rectangular c...

Страница 12: ...Back view UV VIS II 7 1 2 3 4 8 6 Fig 6 Back view VIS II 1 USB A interface 2 USB B interface 3 Ethernet LAN interface 4 RS 232 interface 5 Connection for power supply 110 240 V 50 60 Hz 6 Main switch...

Страница 13: ...l as laboratory infor mation management systems LIMS Next to the electrical connection Fig 6 8 5 more types of interfaces are available within the NANOCOLOR VIS II as indicated on page 10 1 x SDHC car...

Страница 14: ...eter features a 10 1 HD display with a projective capacitive touch screen PCAP The instrument s cover glass is non reflecting It can be easily and conveniently cleaned with the microfiber cloth includ...

Страница 15: ...for projective capacitive touch screens Wearing protective gloves does not impair handling the instrument properly In selected menus you can zoom in and out by moving two fingers in opposite direction...

Страница 16: ...unctions Home icon By pressing this icon at any position in the menu one is guided back to the start screen see Fig 7 Start screen p 14 From the start screen it is not possi ble to get back to the las...

Страница 17: ...ving it out of the blue colored area UV VIS II Open Mode 28 10 2014 10 57 Fig 12 Editing the favorites bar 5 3 4 Option buttons and check boxes Option buttons are framed in black Activated option butt...

Страница 18: ...ple Place Printer Sound Memory Settings Date Time Region Language Select region AR Argentina AT sterreich AU Australia BE Belgique BE Belgi BG Fig 13 Predefined list UV VIS II Open Mode 28 10 201 0 0...

Страница 19: ...ation of an absorbance with a user defined factor After having selected this method a window will appear asking for the factor and the wavelength for the measurement and calculation Confirming with op...

Страница 20: ...rming the entries by pressing will open the measurement window Inserting the zero solution and pressing will initiate the zero measurement Then the standard solution needs to be inserted Pressing will...

Страница 21: ...ement of the zero solution the sample solution need to be inserted Pressing will start the measurement process After the measurement has been completed the measurement result is displayed in the resul...

Страница 22: ...zero solution and pressing initiates the zero measurement After the successful measurement of the zero solution the sample solution needs to be inserted Pressing starts the measurement process After...

Страница 23: ...d the icons below the result window different sample information can be added Removal of the cuvette or leaving the menu via the remainder of the task bar icons quits the measurement process and store...

Страница 24: ...est for a zero solution will appear After insertion of the rectangle cuvette the measurement is initiated by pressing After the successful measurement of the zero solution the sample solution needs to...

Страница 25: ...nt process A graphic depicting the wavelengths will appear The scan of the whole wavelength range can be observed live After the measurement has been completed the complete scan will be displayed in t...

Страница 26: ...or type to be measured the field light source and observer are automatically filled in These can always be manually changed In this case however the selection of the color number automatically indicat...

Страница 27: ...ber can be inserted via the numeric keypad for example insert 044 for the NANOCOLOR Hardness Ca Mg test If the number is correct information about the test will appear on the display Confirming with w...

Страница 28: ...ed on the factory in stalled 16 GB micro SDHC card Furthermore a data backup can be performed through the menu option In this case internal data are saved on the SDHC card UV VIS II Open Mode 28 10 20...

Страница 29: ...urement Type Sample Number Begin Date End date Method User Location Type Author Operator Fig 22 Measurement memory Measurement results can be printed selected or exported as csv file The memory menu a...

Страница 30: ...ed as IQC measurements The IQC menu can be entered by pressing Sub sequent selection of opens the IQC memory The results saved in this memory pro vide amongst others the basis for the IQC control char...

Страница 31: ...SDHC card or a connected USB drive Additionally one can recover an existing backup from the SDHC card Please note that in case of recovering an existing backup the complete instrument storage will be...

Страница 32: ...local and national legal regulations EU Directive 2012 19 EU MACHEREY NAGEL disposes old instruments free of charge Note Disposal using public waste disposal facilities is not permitted In case of dis...

Страница 33: ...icates and Material Safety Data Sheets Customized special products Easy ordering and short delivery times Large number of catalogs flyer and product information of course free of charge Contact Techni...

Отзывы: