background image

wind, except that the sails are pulled in closer to the centerline of
the boat, and you are now trying to sail as close into the wind as
you can.  This is tougher to do, and the boat won’t go as fast as
when sailing across the wind.  The following drawing shows the
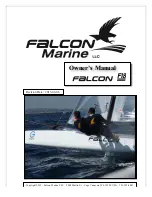
boat sailing toward the wind.  This is as close into wind as you are
going to get.  

Sailing into the wind

Notice the smooth wind flow across the sails, and the lack of tur-
bulence.  Wind is being properly diverted toward the rear of the
boat, and like the blast of air coming out of the rear of a jet, push-
ing the boat forward and sideways.  More of the force is now side-
ways, so the boat will tend to lean more, but it will still squirt for-
ward, since the daggerboard is keeping it from going sideways.

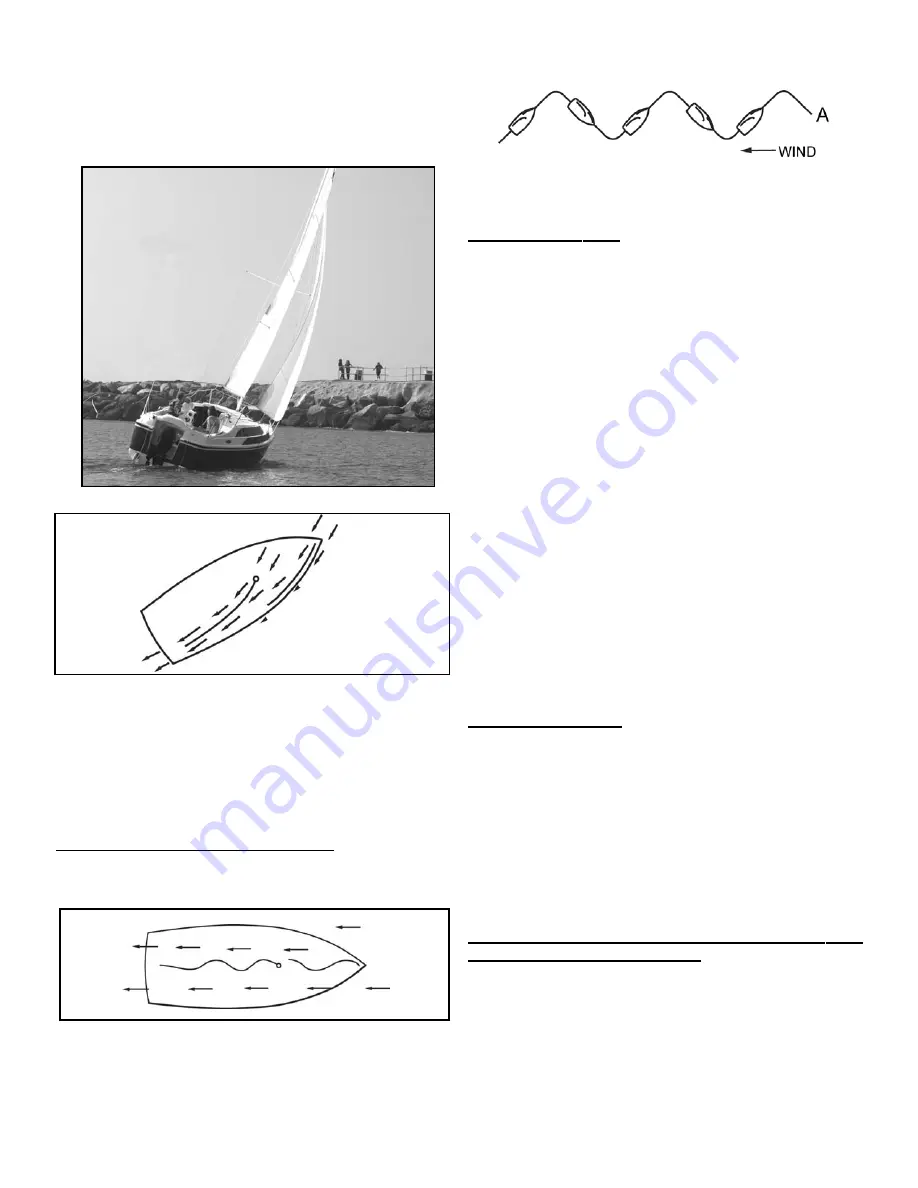
SAILING STRAIGHT INTO  THE  WIND

.  You can’t.  The

sails will flap like flags, divert no wind, and you will just sit there,
frustrated, dead in the water.  This is being in “irons”.

Trying to sail , unsuccessfully,  straight into the wind.

So how do you get to point A in the above drawing if you can’t
sail directly toward it.  You zig zag, (tack) like this.

Zig zagging (tacking) into the wind

THE FIRST DAY OUT

.   Launch the boat on a nice day with a

light breeze.  There should be just enough wind to move the boat
around.  (You have to be moving if you expect the rudder to
work.) Fill the ballast tank. Make sure the rudders and dagger-
board are all the way down. Start the engine.  Power slowly out to
the middle of a calm body of water, where there is nothing to
bump into, point into the wind, and put up the mainsail.  Keep the
engine running slowly, moving the boat about 2 mph.  With the
engine running and moving the boat forward, try to duplicate what
you see in the above diagrams.  Sail with the wind, across the
wind and as close into the wind as you can go.  Blunder around
like this for a while, trying to match the angle of the boom to the
wind as you see in the diagrams.  After a half hour or so of this,
you will get a good feel of what works and what doesn’t.  If you
screw up, or the sails shove the boat in a direction that you don’t
wish to go, overpower the sails with the engine.  Use reverse if
you have to stop.  In a tug of war between the engine and the sails
in moderate winds, the engine will win.  

Then raise the jib.  Remember that the jib control line is pulled in
on the side of the boat away from the wind.  The line going to the
other side is left loose.  As you zig zag into the wind (tacking),
you will have to release the jib line (sheet) from one side and pull
it in on the other.  The mainsail control line (mainsheet) takes care
of itself.  You don’t have to reset it each time you turn through the
direction from which the wind is blowing.

STOPPING THE BOAT

.   If you are sailing, with the engine off,

you can always stop the boat by turning into the wind and letting
go of the jib control line and the mainsail control line.  When you
do this, the wind pressure is off of the sails, the boat will coast a
few more boat lengths and come to rest.  This also is good for
docking when the dock is upwind.  A motor is better.

HOW DO YOU KNOW IF THE SAILS ARE SET AT THE
PROPER  ANGLE  TO  THE  WIND?

There are some simple

tricks that are used by the experts.  When sailing in the same
direction as the wind (called “running”), just let the sails out until
they are at right angles to the wind.  You are trying to catch as
much wind as possible.  Unfortunately, the mainsail blocks the
wind from hitting the jib, so the jib will just hang, unless you can
hold it out on the opposite side of the mainsail, as shown below.
This adds sail area, but it only works when the wind is coming
from directly behind the boat.

Page 23

Содержание 26 M 2009

Страница 1: ...RUDDERS AND DAGGERBOARD FULL UP SAILS REMOVED NO ONE ON THE CABIN TOP OR FOREDECK ALWAYS BEFORE OPERATING THE BOAT CHECK TO CONFIRM THAT THE BALLAST TANK IS FULL THE WATER LEVEL IN THE BALLAST TANK SH...

Страница 2: ...could be instant capsize If the ballast tank is empty the boat will not be self righting NEVER POWER THE BOAT OVER 6 MILES PER HOUR WITH THE DAGGERBOARD OR RUDDERS DOWN If you hit something at high s...

Страница 3: ...lways wear eye protection or shield your eyes when working near any battery and remove all metal rings and jewelry Never expose a battery to open flames or sparks Do not smoke near a battery It could...

Страница 4: ...s tight It will not jiggle loose and can be easily undone even after being pulled tight under really heavy loads Bowline knot SECURING A LINE TO A CLEAT The proper way to secure a line to a cleat is s...

Страница 5: ...spreaders with 1 4 x 2 bolts and lock nuts The nuts face the lower end of the mast Tighten the nuts tight Spreader tube attachment The end of the spreader tubes should be located as in the follow ing...

Страница 6: ...bolt is better than rope Extra rope tie downs are always a good precaution Insert the mast carrier into the sockets near the captain s seat as shown below Fasten the carrier with bolts and lock nuts Y...

Страница 7: ...nd make sure the snap latch is all the way down and locked Try to lift the trailer off the ball to make sure the hitch is securely fastened to the ball Insert a 1 4 x 1 1 2 bolt and lock nut through t...

Страница 8: ...the trailer is pulled from a dead stop The surge brake system has an electronic disconnect tied in with your car s lights that disengages the surge brakes when you try to back up TOWING THE BOAT AND...

Страница 9: ...fully onto the pin and that the ring ding can then be rotated freely without coming out of the hole in the pin Do not release forward pressure on the mast until the forestay is connected If you have t...

Страница 10: ...and the wire forestay is attached to the front of the boat the winch line is released and the side support wires go slack allowing easy removal The side support wires are in effect self adjusting RAI...

Страница 11: ...ll and the boat is loaded so that the molded in waterline is par allel with the water Use a level to establish a true vertical and adjust the wires so that the mast is tilted to the rear as shown When...

Страница 12: ...d by a fiberglass dam that helps keep water from sloshing out of the vent hole and into the bilge of the boat The vent hole also allows you to check the level of the water in the ballast tank There wi...

Страница 13: ...se to the trailer to prevent the boat from sliding backward off of the trailer Make sure the boat is centered on the trailer If you pull the boat out of the water and find that the nose of the boat is...

Страница 14: ...ockets in the rear edge of the sail as shown The short batten goes in the top pocket The other three battens are of equal length Make sure that the rear edge of the batten is tucked into the pocket se...

Страница 15: ...error is not having the halyard tight enough However don t get it so tight that the sail has long vertical wrin kles along the mast JIB FORWARD SAIl OPTION Attach the forward corner of the jib to the...

Страница 16: ...o the winch and cleat at the rear of the cabin The line is shown below Daggerboard lifting line The daggerboard should be fully lowered when sailing into the wind to keep the boat from sliding sideway...

Страница 17: ...owing photo shows the rudder secured in the up position ready for powering or trailering Rudder secured in the up position Secure both lifting and lowering lines to keep them from getting caught in th...

Страница 18: ...the foam flotation blocks from the interior of your boat under any circumstances POWERING The boat is designed for an outboard motor of no more than 50 horsepower Do not use a larger engine Have the o...

Страница 19: ...when the tank is emptying or filling At dockside a hose end siphon inserted in the vent hole will empty the tank in about 12 minutes When powering at any speed over 6 mph make sure the dagger board is...

Страница 20: ...ing dealers repair or replace any sailboat part or sailboat equipment manufac tured by MacGregor which is proven to MacGregor s satisfaction to be defective by reason of faulty workmanship or material...

Страница 21: ...t fill out and return to MacGregor within ten days after the boat is sold to a retail customer the attached Warranty Registration Card It is further the responsibility of the dealer to furnish guidanc...

Страница 22: ...ontrol the angle of the sails to the wind with the sheets the lines that connect to the rear of the jib and to the rear of the boom The wind pushes on the sails and the boat moves Notice the turbu len...

Страница 23: ...Sail with the wind across the wind and as close into the wind as you can go Blunder around like this for a while trying to match the angle of the boom to the wind as you see in the diagrams After a h...

Страница 24: ...is doing an impersonation of a flapping flag the yarns will stream nicely to the rear You have to watch for the fluttering and bal looning to appear at the front edge of the mainsail Pull it in until...

Страница 25: ...ually the apparent wind will now be stronger than the true wind so you have more usable wind to sail in With each new change in wind speed or boat speed you will need a new sail trim When you watch th...

Страница 26: ...the boat level Junk in the boat is hard to move and it will just slow the boat down Light weight is very important downwind Going upwind added weight can some times be helpful Waves and chop tend to s...

Страница 27: ...hat are placed on the steering pedestal and on the cabin wall inside the boat These the decals contain important safety information and should not be removed If the decals become defaced or illegible...

Страница 28: ...Page 28...

Отзывы: