02
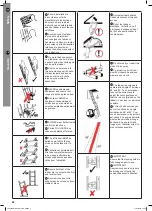
Safety
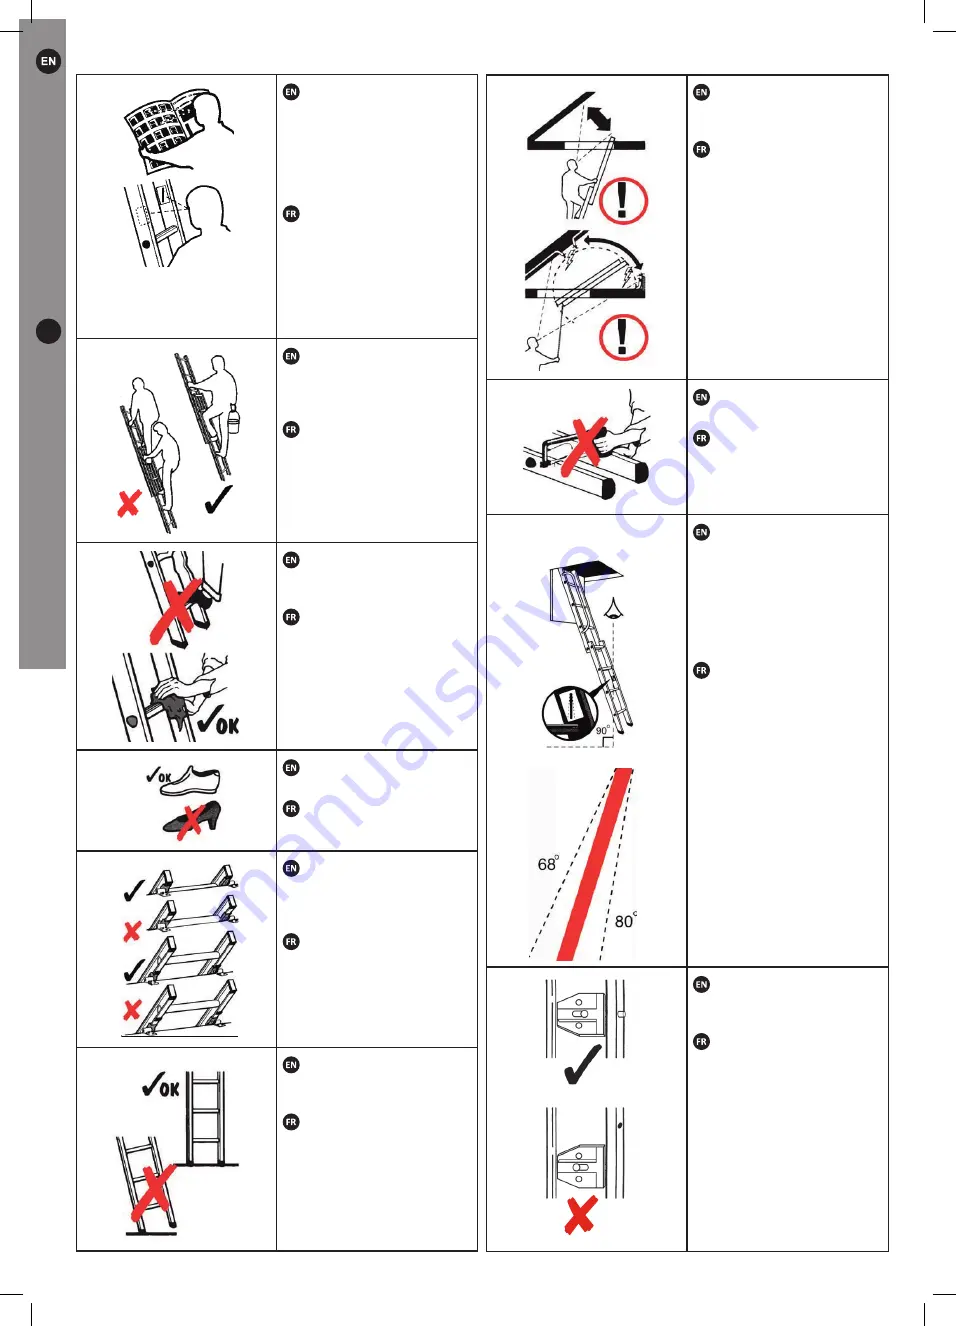
Ensure installation is
in accordance with the
manufacturer’s instructions.
Ensure you have read all
instructions and safety labels
and use ladder in accordance
with these.
Assurez-vous d’installer
le produit conformément
aux consignes du fabricant.
Assurez-vous d’avoir lu toutes
les consignes et les étiquettes
relatives à la sécurité, et
utilisez l’échelle en respectant
ces indications.
No more than one person
on a ladder at one time. Keep
a secure grip when climbing up
and down the ladder.
Seule une personne à la
fois est autorisée sur l’échelle.
Gardez toujours une bonne
prise en main de l’échelle
lorsque vous montez ou
descendez.
NEVER use damaged
equipment and ensure that
rungs are dirt and grease free.
N’utilisez JAMAIS un
équipement endommagé et
veillez à ce que les marches
soient exemptes de salissure et
de graisse.
ALWAYS wear flat bottomed
and firm soled shoes.
Portez TOUJOURS des
chaussures plates et fermes.
The loft ladder MUST be
pulled down fully to the top
stops on both sides prior to
use.
L’échelle escamotable doit
être tirée complètement vers
le bas jusqu’à atteindre les
butées supérieures des deux
côtés pour l’utilisation.
Ensure both feet of the
ladder are in contact with a firm
and level surface.
Assurez-vous que votre
échelle repose sur une surface
stable et plane.
Avoid electrical hazards.
Check clearances at top and
access.
Éviter tout danger
électrique. Veillez à ce qu’il
y ait assez d’espace en haut
de l’échelle pour accéder à
l’endroit prévu.
Do not modify or repair this
product in any way.
Ce produit ne doit être ni
modifié ni réparé de quelque
manière que ce soit.
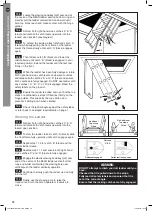
The ladder is designed to
operate at an angle of between
68˚ and 80˚. To ensure ladder
is set at the correct angle
adjust the catch positions so
that the red line (marked on the
ladder) is as close to vertical as
possible.
Votre echelle est coonçue
pour être utilisée à un angle
variant entre 68° et 80°. Pour
vous assurer que votre produit
est utilisé à un angle approprié,
ajustez les points de blocage
de façon à ce que les traits
rouges (sur l’échelle) soient le
plus verticaux possible.
IMPORTANT
Ensure that the locking catch is
fully engaged prior to use.
IMPORTANT
Assurez-vous que les cliquets
de blocage sont tout à fait
enclenchés avant l’utilisation.
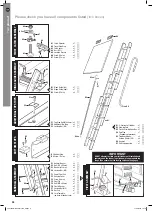
Tools required:
B1
B2
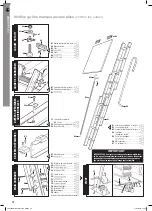
Slide the hinge guides (B1 & B2) onto the rear
frame stiles. The brackets should be positioned
outwards, with the double holed half uppermost (see
diagram).
4.2
C1
C2
C3
Permanent top stop
Slide all the way up to the factory–fitted
permanent top stops.
4.3
Do not replace the plastic end tips at this
stage (see later at step 6.5).
4.4
3 Section Operating Heights
Millimetres
Feet & Inches
Notes
2133 to 2286
7’ 0” to 7’ 6”
Fit additional top stops
2286 to 2415
7’ 6” to 7’ 11”
Do not fit additional top stops
2415 to 2565
7’ 11” to 8’ 5”
Fit additional top stops
2565 to 2705
8’ 5” to 8’ 10
1
/
2
”
Do not fit additional top stops
2705 to 2845
8’ 10
1
/
2
” to 9’ 4”
Fit additional top stops
2845 to 3000
9’ 4” to 9’ 10”
Do not fit additional top stops
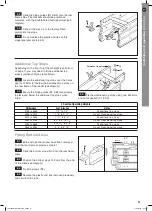
Additional Top Stops
Depending on the floor to loft floor height (see bottom
of page 1), you may need to fit the additional top
stops provided (C2) (see table below).
Locate the additional top stops over the holes
approx 150mm (6") below the permanent top stops on
the rear frame of the ladder (see diagram).
Ensure the hinge guides (B1 & B2) are already
in place and below the additional top stops when
fitted.
5.2
5.1
Fix the additional top stops using two M4 bolts
and nuts supplied (C1 & C3).
5.3
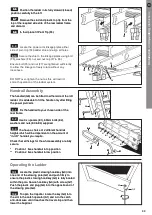
Fitting Bottom Stops
Both end tips should now have been removed
from the rear frame at previous step 4.1.
Slide the bottom stops (D1) onto the rear frame
stiles.
Position the bottom stops 150 mm from the end
of the stiles (see diagram).
Fix with screws (D2).
Replace the plastic end tips removed previously
and secure with studs.
6.2
6.1
6.5
6.4
6.3
D1
D2
Right
side
Left
side
150 mm
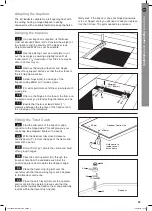
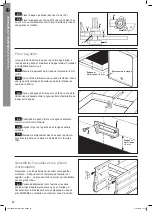
Adapting the trapdoor
The loft ladder is suitable for a loft opening let flush
into the ceiling, having a hinged trapdoor opening
downwards, with a suitable fastener to keep the hatch
firmly shut. If the trapdoor does not hinge downwards,
or is not hinged at all, you will need to adapt or replace
it so that it does. The parts needed are enclosed.
Hanging the trapdoor
G5
Minimum
of 1" (26mm)
Use the existing cover as a template to cut
out the new piece, ensuring a slightly loose fit all
round, (3mm (
1
/
8
”) maximum). Your DIY store may be
able to do this for you.
1.2
Remove the existing trapdoor and hinges.
Prise off any support battens so that the four faces of
the loft trap frame are flat.
1.3
Screw hinges (G5) to one edge of the
trapdoor using 20mm (
3
/
4
”) wood screws
1.4
For extra performance fill the screw holes with
wood glue.
1.5
Offer up the hinges to the face of the frame on
the same end as you intend setting the ladder, and fix.
1.6
Ensure that there is at least 26mm (1”)
clearance between the top face of the trapdoor and
the top edge of the framework.
1.7
Fitting the Twist Catch
A1
A2
A4
A3
Find the mid-point of the trapdoor edge
opposite to the hinged side. This will give you your
centre line (see diagram). Mark with a pencil.
2.1
With the trapdoor fully closed measure
exactly 26mm (1”) in from the edge of the frame and
mark with a pencil.
2.2
Drill a 13mm (½”) hole in the centre and sand
off any rough edges.
2.3
Pass the catch operator (A1) through the
trapdoor hole from the underside such that the
position pointer points towards the trapdoor edge.
2.4
Place the travel stop ring (A2) over the
operator such that the securing tag is at 45 degrees
to the trapdoor centre line.
2.5
Place the catch lever (A3) over the operator
and locate into the operator groove such that the
lever points towards the trapdoor near edge and fully
locates within the travel stop ring (A2).
2.6
Trapdoor
Trapdoor Centre Line
26mm
ø13mm
Hole centre to
inside face of
hatch frame
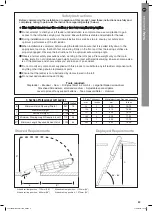
Stowed Requirements
Deployed Requirements
68°- 80°
* At handrail low position - 710mm (28”)
At handrail top position - 965mm (38”)
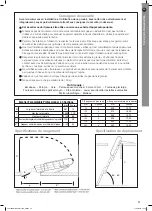
Safety Instructions
Before commencing the installation or operation of this product, read these instructions carefully and
completely, noting in particular the instructions regarding safety (below).
This ladder should never be used as a free standing leaning ladder.
Do not attempt to climb your loft ladder until installation is complete. Use a second ladder to gain
access to the loft while carrying out the work. Ensure that this is stable and suitable for the task.
During installation and operation, follow all instructions step by step to ensure your safety and
optimum performance of the loft ladder.
When installation is complete, before using the ladder make sure that it is pulled fully down to the
appropriate top stops, that both feet are resting firmly on the floor and that the locking catches are
properly engaged. Observe the instructions for the optimum safe working angle.
Observe normal safety precautions when working in the loft space. Place weight only on the main
ceiling joists. Do not drill above head height. Avoid contact with electrical wiring. Ensure someone else
is on the premises and knows where you are in case of an accident.
Do not modify any component supplied with this product or substitute any loft ladder component with
anything other than genuine replacement parts.
E
Do not exceed maximum load of 150kg.
nsure that the ladder is not obstructed by items stowed in the loft.
3 Section Professional Loft Ladder
mm Inches
B
Minimum Hatch Opening (Width)
381
15
C
Maximum Height
3000
118
Minimum Height
2133
84
D* Minimum Stowing Height Required In Loft
710
28
E** Minimum Length Required Behind Hatch
1120
44
C
** At handrail low position - 1120mm (44”)
At handrail top position - 1370mm (54”)
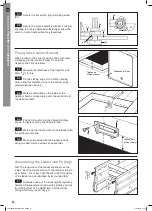
Fixing the Location Bracket
When turned to the correct position, the catch lever
will engage in the location bracket to hold the
trapdoor shut. Fix as follows:
Position the catch location bracket (A5) as
shown in diagram, along the horizontal line.
3.4
Thickness of Door
Thickness
of Door +9mm
Thickness
of Door +9mm
A6
A5
Mark a vertical line on the inside of the
trapdoor frame corresponding with the centre line of
the trapdoor catch.
3.3
Measure the thickness of the trapdoor, add
9mm (
3
/
8
”) to this.
3.1
On the closing edge of the hatch opening,
draw a line this distance up from the bottom edge
parallel with the opening.
3.2
Match up the indent mark on the bracket with
the vertical centre line.
3.5
Make guide holes with the bradawl and fix,
using two 20mm wood screws supplied (A6).
3.6
Secure the travel stop ring (A2) using screw
(A7).
2.7
Secure the catch assembly with M12 nut (A4)
ensuring the nut is tightened sufficiently to allow the
catch to rotate freely without any looseness.
2.8
Rear
Frame
Front
Fram
e
Assembling the Ladder and Fittings
N.B. The long sides of the ladder are known as the
‘stiles’. Each complete section of the ladder is known
as a ‘frame’. For correct identification, the front frame
of the ladder can be identified by its rounded feet.
Carefully push out the studs (lightly tap with a
hammer if necessary) and remove the plastic end tips
from the bottom of the REAR frame of the ladder,
noting which way round they go.
4.1
A1
A4
A7
A3
A2
A3
A2
45°
F (Floor Thickness)
A (Minimum Hatch Opening Length)
mm
Inches
mm
Inches
76.0
3
400.0
15.75
102.0
4
412.0
16.25
127.0
5
425.0
16.75
153.0
6
438.0
17.25
178.0
7
450.0
17.75
203.0
8
463.0
18.25
If a new trapdoor is required, its thickness
must not exceed 20mm (3/4”). Consider the weight of
the trapdoor and the security of the hinge screws.
Chipboard and MDF may not be suitable.
1.1
Stepladder • Bradawl • Saw • Drill plus 13mm & 2mm bit • Large flat bladed screwdriver
Crosshead Screwdriver: small and medium • Adjustable spanner/pliers
Lever to prise off any support battens • Tape measure/Ruler • Hammer
D
*
E**
A
B
F
FR
Sécurité
28/04/2016 14:52
03
Safety
instructions
Tools required:
B1
B2
Slide the hinge guides (B1 & B2) onto the rear
frame stiles. The brackets should be positioned
outwards, with the double holed half uppermost (see
diagram).
4.2
C1
C2
C3
Permanent top stop
Slide all the way up to the factory–fitted
permanent top stops.
4.3
Do not replace the plastic end tips at this
stage (see later at step 6.5).
4.4
3 Section Operating Heights
Millimetres
Feet & Inches
Notes
2133 to 2286
7’ 0” to 7’ 6”
Fit additional top stops
2286 to 2415
7’ 6” to 7’ 11”
Do not fit additional top stops
2415 to 2565
7’ 11” to 8’ 5”
Fit additional top stops
2565 to 2705
8’ 5” to 8’ 10
1
/
2
”
Do not fit additional top stops
2705 to 2845
8’ 10
1
/
2
” to 9’ 4”
Fit additional top stops
2845 to 3000
9’ 4” to 9’ 10”
Do not fit additional top stops
Additional Top Stops
Depending on the floor to loft floor height (see bottom
of page 1), you may need to fit the additional top
stops provided (C2) (see table below).
Locate the additional top stops over the holes
approx 150mm (6") below the permanent top stops on
the rear frame of the ladder (see diagram).
Ensure the hinge guides (B1 & B2) are already
in place and below the additional top stops when
fitted.
5.2
5.1
Fix the additional top stops using two M4 bolts
and nuts supplied (C1 & C3).
5.3
Fitting Bottom Stops
Both end tips should now have been removed
from the rear frame at previous step 4.1.
Slide the bottom stops (D1) onto the rear frame
stiles.
Position the bottom stops 150 mm from the end
of the stiles (see diagram).
Fix with screws (D2).
Replace the plastic end tips removed previously
and secure with studs.
6.2
6.1
6.5
6.4
6.3
D1
D2
Right
side
Left
side
150 mm
Adapting the trapdoor
The loft ladder is suitable for a loft opening let flush
into the ceiling, having a hinged trapdoor opening
downwards, with a suitable fastener to keep the hatch
firmly shut. If the trapdoor does not hinge downwards,
or is not hinged at all, you will need to adapt or replace
it so that it does. The parts needed are enclosed.
Hanging the trapdoor
G5
Minimum
of 1" (26mm)
Use the existing cover as a template to cut
out the new piece, ensuring a slightly loose fit all
round, (3mm (
1
/
8
”) maximum). Your DIY store may be
able to do this for you.
1.2
Remove the existing trapdoor and hinges.
Prise off any support battens so that the four faces of
the loft trap frame are flat.
1.3
Screw hinges (G5) to one edge of the
trapdoor using 20mm (
3
/
4
”) wood screws
1.4
For extra performance fill the screw holes with
wood glue.
1.5
Offer up the hinges to the face of the frame on
the same end as you intend setting the ladder, and fix.
1.6
Ensure that there is at least 26mm (1”)
clearance between the top face of the trapdoor and
the top edge of the framework.
1.7
Fitting the Twist Catch
A1
A2
A4
A3
Find the mid-point of the trapdoor edge
opposite to the hinged side. This will give you your
centre line (see diagram). Mark with a pencil.
2.1
With the trapdoor fully closed measure
exactly 26mm (1”) in from the edge of the frame and
mark with a pencil.
2.2
Drill a 13mm (½”) hole in the centre and sand
off any rough edges.
2.3
Pass the catch operator (A1) through the
trapdoor hole from the underside such that the
position pointer points towards the trapdoor edge.
2.4
Place the travel stop ring (A2) over the
operator such that the securing tag is at 45 degrees
to the trapdoor centre line.
2.5
Place the catch lever (A3) over the operator
and locate into the operator groove such that the
lever points towards the trapdoor near edge and fully
locates within the travel stop ring (A2).
2.6
Trapdoor
Trapdoor Centre Line
26mm
ø13mm
Hole centre to
inside face of
hatch frame
Stowed Requirements
Deployed Requirements
68°- 80°
* At handrail low position - 710mm (28”)
At handrail top position - 965mm (38”)
Safety Instructions
Before commencing the installation or operation of this product, read these instructions carefully and
completely, noting in particular the instructions regarding safety (below).
This ladder should never be used as a free standing leaning ladder.
Do not attempt to climb your loft ladder until installation is complete. Use a second ladder to gain
access to the loft while carrying out the work. Ensure that this is stable and suitable for the task.
During installation and operation, follow all instructions step by step to ensure your safety and
optimum performance of the loft ladder.
When installation is complete, before using the ladder make sure that it is pulled fully down to the
appropriate top stops, that both feet are resting firmly on the floor and that the locking catches are
properly engaged. Observe the instructions for the optimum safe working angle.
Observe normal safety precautions when working in the loft space. Place weight only on the main
ceiling joists. Do not drill above head height. Avoid contact with electrical wiring. Ensure someone else
is on the premises and knows where you are in case of an accident.
Do not modify any component supplied with this product or substitute any loft ladder component with
anything other than genuine replacement parts.
E
Do not exceed maximum load of 150kg.
nsure that the ladder is not obstructed by items stowed in the loft.
3 Section Professional Loft Ladder
mm Inches
B
Minimum Hatch Opening (Width)
381
15
C
Maximum Height
3000
118
Minimum Height
2133
84
D* Minimum Stowing Height Required In Loft
710
28
E** Minimum Length Required Behind Hatch
1120
44
C
** At handrail low position - 1120mm (44”)
At handrail top position - 1370mm (54”)
Fixing the Location Bracket
When turned to the correct position, the catch lever
will engage in the location bracket to hold the
trapdoor shut. Fix as follows:
Position the catch location bracket (A5) as
shown in diagram, along the horizontal line.
3.4
Thickness of Door
Thickness
of Door +9mm
Thickness
of Door +9mm
A6
A5
Mark a vertical line on the inside of the
trapdoor frame corresponding with the centre line of
the trapdoor catch.
3.3
Measure the thickness of the trapdoor, add
9mm (
3
/
8
”) to this.
3.1
On the closing edge of the hatch opening,
draw a line this distance up from the bottom edge
parallel with the opening.
3.2
Match up the indent mark on the bracket with
the vertical centre line.
3.5
Make guide holes with the bradawl and fix,
using two 20mm wood screws supplied (A6).
3.6
Secure the travel stop ring (A2) using screw
(A7).
2.7
Secure the catch assembly with M12 nut (A4)
ensuring the nut is tightened sufficiently to allow the
catch to rotate freely without any looseness.
2.8
Rear
Frame
Front
Fram
e
Assembling the Ladder and Fittings
N.B. The long sides of the ladder are known as the
‘stiles’. Each complete section of the ladder is known
as a ‘frame’. For correct identification, the front frame
of the ladder can be identified by its rounded feet.
Carefully push out the studs (lightly tap with a
hammer if necessary) and remove the plastic end tips
from the bottom of the REAR frame of the ladder,
noting which way round they go.
4.1
A1
A4
A7
A3
A2
A3
A2
45°
F (Floor Thickness)
A (Minimum Hatch Opening Length)
mm
Inches
mm
Inches
76
3
400
15.75
102
4
412
16.25
127
5
425
16.75
153
6
438
17.25
178
7
450
17.75
203
8
463
18.25
If a new trapdoor is required, its thickness
must not exceed 20mm (3/4”). Consider the weight of
the trapdoor and the security of the hinge screws.
Chipboard and MDF may not be suitable.
1.1
Stepladder • Bradawl • Saw • Drill plus 13mm & 2mm bit • Large flat bladed screwdriver
Crosshead Screwdriver: small and medium • Adjustable spanner/pliers
Lever to prise off any support battens • Tape measure/Ruler • Hammer
D
*
E**
A
B
F
LF37093 MacAllister.indd 3
28/04/2016 14:52
LF37093 MacAllister 1219_PRINT
4
11/12/2019 14:18


