background image

19

WARNING!

 The starting position should be as described 

in the instruction handbook. (Fig. A) is the defined starting 

position. User should start the engine behind the lever. 

DO NOT start the engine standing beside the deck as (Fig. B).

02   

Stopping

Release the brake bar (2) to stop the engine and blade.

Содержание MLMP300HP46

Страница 1: ...面同意 不得对本文件进行复制 变更或修改 PROCESS BLACK SEPARATIONS JOB INFO VERSION PID 00001 Agency job SUME10979 Product Description 46cm Hand push Rotary Lawnmower Brand Mac Allister Brand Contact jennifer bliss kingfisher com Barcode 3663602939788 Vendor Sume No of new line drawings xx Page size A5 No of printed pages 28 2 R 4 5 6 7 8 18 09 17 TB 02 10 17 DLS 26 10 17 DLS 00 00 17 INITIALS 00 00 17 INITIALS 00 00...

Страница 2: ...Preparation 4 Assembly 11 Use 16 21 ...

Страница 3: ...These instructions are for your safety Please read them thoroughly before use and retain for future reference x2 Unleaded Petrol SAE10W 30 Engine Oil 02 01 ...

Страница 4: ...n the use adjustment and operation of the product including prohibited operations 02 Preparation While mowing always wear substantial footwear and long trousers Do not operate the product when barefoot or wearing open sandals Thoroughly inspection the area where the product is to be used and remove all objects which can be thrown by the product WARNING Refuel outdoors only and do not smoke while r...

Страница 5: ...unctioning Stop the product according to instructions in this manual before leaving the operator s position and park it Disengage all cutting device s and drive clutches before starting the engine Start the engine or switch on the engine carefully according to instructions and with feet well away from the cutting devices s Do not tilt the product when starting the engine or switching on the engine...

Страница 6: ...e product if there is an open fire in the vicinity Always use suitable aids such as funnels and filler necks Do not spill any fuel on the product or its exhaust system There is a risk of ignition However if fuel should be spilled the you must remove it carefully from all parts of the product Any residue which may be present must be completely removed before the product is operated Exhaust gases an...

Страница 7: ...ng dangers can arise in connection with the structure and design of this product Health defects resulting from vibration emission if the product is being used over long periods of time or not adequately managed and properly maintained Injuries and damage to property due to broken application tools or the sudden impact of hidden objects during use Danger of injury and property damage caused by flyi...

Страница 8: ...materials Risk of fire flammable materials Hot surface do not touch High temperatures on the product s surfaces and structural parts that could cause burns if they are touched The product can also stay hot for a longer period of time after operation This product produces noxious exhaust fumes If the product is used improperly these fumes can lead to poisoning a loss of consciousness or death Noxio...

Страница 9: ... and FEET AWAY Keep hands and feet away Cutting device continues to rotate after the product is switched off Wait until all machine components have completely stopped before touching the product Pay special attention when working on the cutting device Objects thrown by the product could hit the user or other bystanders Always ensure that other people and pets remain at a safe distance from the pro...

Страница 10: ...C12YC Spark plug gap 0 51mm Sound level Sound pressure level at operator s position 82 4 dB Uncertainty 3 0 dB Sound power lever 94 9 dB Uncertainty 0 38 dB Guaranteed sound power level 96 dB Vibration Level Hand arm vibration 6 7 m s2 Uncertainty 1 5 m s2 The sound values have been determined according to noise test code given in EN ISO 5395 2 using the basic standards ISO 3744 and ISO 11094 Wear...

Страница 11: ...11 02 01 4a x 2 4c 4b 4a 5 4b x 2 4c x 2 5 x 1 17a x 2 17a 17b 20 17b x 2 20 x 1 Assembly ...

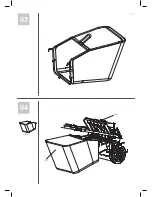
Страница 12: ...12 03 04 19 x 1 18 19 ...

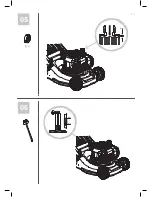
Страница 13: ...13 05 06 5mm 7 x 1 Max Min ...

Страница 14: ...14 Your product 1 2 3 4a 4b 4c 5 6 7 8 9 10 11 12 13 14 15 16 22a 22b 22c 22 22d 22e 17b 18 19 20 23 21 17a ...

Страница 15: ...ion knob with M8 nut b thicker washer 18 Rear deflector guard c square neck bolt 19 Grass catcher 5 Wire clip 20 Rope guider 6 Fuel tank 21 Recoil starter handle 7 Fuel tank cap 22 Cutting device blade 8 Air vents a Engine shaft 9 Primer b Square key 10 Air filter case c Blade adaptor 11 Spark plug connector d Cone washer 12 Wheel e Blade tension bolt 13 Muffler 23 Spark plug wrench 14 Oil tank ca...

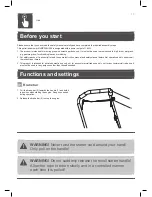
Страница 16: ...ore first operation and to observe all the instructions therein 3 This product is intended for private domestic use only not for any commercial trade use only not for any commercial trade use It must not be used for any purposes other than those described Functions and settings 01 Brake bar 1 Pull the brake bar 2 towards the handle 1 and hold it in position when starting the engine Keep it squeeze...

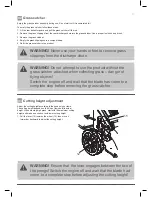
Страница 17: ...t to use the product without the grass catcher attached when collecting grass danger of flying objects Switch the engine off and wait that the blade has come to a complete stop before removing the grass catcher 03 Cutting height adjustment Adjust the cutting height according to the needs of your lawn The cutting height depends on the kind of lawn and its actual height When mowing high grass start ...

Страница 18: ...that the air vents are always unobstructed and clear Clean them if necessary with a soft brush Blocked air vents may lead to overheating and damage the product 6 Release the brake bar immediately if you are disturbed while working by other people entering the working area Always let the product come to a complete stop before averting 7 Do not overwork yourself Take regular breaks to ensure you can...

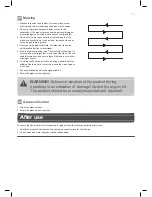
Страница 19: ... described in the instruction handbook Fig A is the defined starting position User should start the engine behind the lever DO NOT start the engine standing beside the deck as Fig B 02 Stopping Release the brake bar 2 to stop the engine and blade ...

Страница 20: ...aight lines along one of the sides This will keep the rows even and ensure that all the lawn is cut without missing any spots 6 Circle around flower beds When reaching a flower bed in the middle of the lawn cut a row or two around the circumference of the bed 7 Pay special attention when changing direction 8 Empty the grass catcher regularly Fig 15 WARNING Extensive vibration of the product during...

Страница 21: ... 8 after every use with a cloth and brush 3 Remove stubborn dirt with high pressure air max 3 bar 4 Check for worn or damaged parts Replace worn parts as a necessary or contact an authorised service centre for repair before using the product again WARNING Always switch the product off disconnect the spark plug connector and let the product cool down before performing inspection maintenance and cle...

Страница 22: ...daptor 22c and key 22b 5 Replace the cutting device with a new one of the same type Slide the key 22b into the slot on the spindle 22a Refit the blade adaptor 22c locking the cone washer 22d and blade tension bolt 22e Tighten the blade tension bolt clockwise with 35 N m min 40 N m max to ensure safe operation of the product 6 Lubricate the cutting device 22 after each use to prolong the life span ...

Страница 23: ...d specialist to adjust it if necessary WARNING DO NOT use the product with defective or loose wires NOTE A full grass catcher will reduce the performance of this product Refer to the B S operator s manual for maintain below parts Air filter Carburettor Spark plug Muffler Fuel Valve play Engine oil 04 Spare parts Replacement parts 1 The following parts of this product may be replaced by the consume...

Страница 24: ...ff and disconnect the spark plug connector 2 Adjust the height to the highest position as described above 3 Attach transportation guards if applicable 4 Always transport the product by its handle 1 5 Protect the product from any heavy impact or strong vibrations which may occur during transportation in vehicles 6 Secure the product to prevent it from slipping or falling over loss of fuel damage an...

Страница 25: ...tank with clean fresh fuel 3 2 Clean or replace fuel tank cap 3 3 Clean air filter 4 Engine operates erratically 4 1 Spark plug is defective 4 2 Spark plug gap is incorrect 4 3 Air filter is dirty 4 1 Install new correctly gapped plug 4 2 Set gap between electrodes at 0 51 mm 4 3 Clean air filter 5 Engine idles poorly 5 1 Air filter is dirty 5 2 Air vents are clogged 5 3 Cylinder fins are blocked ...

Страница 26: ...elivered and the product is function properly Recycle the package afterwards Guarantee This product carries a guarantee of 24 months starting from the day of purchase Please retain your receipt as a proof This guarantee specifically excludes losses due to Normal wear and tear including accessory wear Overload misuse or neglect Failure of consumable items such as batteries Repairs attempted by anyo...

Страница 27: ...5 2 2013 A1 2016 A2 2017 The EMC Directive 2014 30 EU EN ISO 14982 2009 The Outdoor Noise Directive 2000 14 EC 2005 88 EC Measured Sound Power Level 94 9 dB A Guaranteed Sound Power Level 96 dB A Conformity assessment procedures Annex VI of the directive The Emission of Pollutants directive 97 68 EC as last amended by directive 2012 46 EU EC type approval NO e11 97 68SA 2012 46 2856 01 Engine mode...

Страница 28: ... W2 6PX United Kingdom Distributor B Q plc Chandlers Ford Hants SO53 3LE United Kingdom www diy com SFD Limited Trade House Mead Avenue Yeovil BA22 8RT United Kingdom Manufacturer Kingfisher International Products Limited 3 Sheldon Square London W2 6PX United Kingdom ...

Отзывы: