background image

CXA Series   

User Manual

Lynx Pro Audio S.L

3

www.lynxproaudio.com

INTRODUCTION

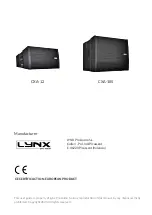
This manual describes the recommended installation procedure for the constant curvature line source 
CXA-12 in combination with the subwoofer CXA-18S.

The CXA is intended as a flexible solution for both fixed installations and touring where wide coverage is 
required from as few line array elements as possible.

Designed to be flown either horizontally or vertically, this line source system can be used as a single element 
or a combination of a maximum of 4 cabinets in array configuration delivering a 72º coverage in the vertical 
plane. Our custom HF Multidriver Waveguide system delivers 100H x 18V precise coverage for a multitude 
of installations. Thanks to its careful construction it can also be installed for symmetrical HF dispersion.

The CXA Array models are self-powered (Class D) with  switching power supply and 1400W of amplification 
each. They are also controlled by the latest generation of Digital Signal Processing with a DSP integrated in 
to each cabinet, optimizing all the system components and electronics, providing maximum system efficiency 
and total protection.

CONTENTS


• SAFETY PRECAUTIONS 


• SYSTEM OVERVIEW

  CXA-12 

       5

  CXA-18S       6


BACK PANEL 


7


CONNECTORS AND CONNECTIONS 


8


• CONFIGURING THE DIGITAL SIGNAL PROCESSOR


CONFIGURING THE DSP OPTIONS 


12


CONFIGURATION PANEL 


12


SELECT AND RUN PRESET 


12


• ONLINE CONTROL SYSTEM   


13


• RAINBOW 3D ACOUSTIC SIMULATION SOFTWARE 


14


• HARDWARE AND ACCESSORIES 


15


• APPLICATION EXAMPLES 


16 


• HOW TO USE THE FLYING FRAME ON CXA-12  


18


• ASSEMBLY OF SV-CXA  


20


• FITTING THE CXA-12 CABINETS TO THE FLYING FRAME 

22


• FITTING THE CXA-18S CABINETS TO THE FLYING FRAME 

23


• FITTING THE CXA-12 WITH CXA-18S CABINETS 


24


• THE CEILING BRACKET 


25


• CERTIFICATIONS AND GUARANTEE   


26

Содержание CXA Series

Страница 1: ...USER MANUAL Lynx Pro Audio S L Valencia Spain www lynxproaudio com info lynxproaudio com CXA series CXA 12 CXA 18S V 21 04...

Страница 2: ...UCT CXA 12 LYNX Pro Audio S L Calle 1 Pol Ind Picassent E 46220 Picassent Valencia This user guide is property of Lynx Pro Audio S L Any reproduction of this manual by any means is strictly prohibited...

Страница 3: ...nstalled for symmetrical HF dispersion The CXA Array models are self powered Class D with switching power supply and 1400W of amplification each They are also controlled by the latest generation of Di...

Страница 4: ...peration Unplug the loudspeaker during storms or when it s being used for a long time Hearing damage risk Thesesystemscanreproducelargequantitiesofsoundpressurewhichcandamagehearing Takeprecautions if...

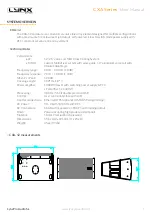
Страница 5: ...6 bit double precision DSP Control User control interface with LCD Control connections Ethernet OCS optional USB DSP programming AC Power 90 264V 50 60 Hz with PFC AC Connectors 16A Neutrik powerCon T...

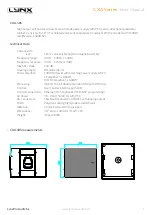
Страница 6: ...Hz 3dB Max SPL Peak 132 dB Coverage angle Omnidirectional Power amplifier 1400W Class D with switching power supply PFC LF amplifier 1 x 800W MF HF amplifier 1 x 600W Processing 48 KHz 56 bit double p...

Страница 7: ...the same rear pannel including the connectors and digital control display USB connection signal INPUT signal OUTPUT Main Link Main input Available when the user has requested the cabinets to be suppli...

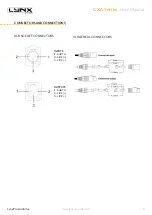
Страница 8: ...CXA Series User Manual Lynx Pro Audio S L 8 www lynxproaudio com CONNECTORS AND CONNECTIONS XLR AEREAL CONNECTORS OUTPUTS 1 EARTH 2 LIVE 3 LIVE INPUTS 1 EARTH 2 LIVE 3 LIVE XLR SOCKET CONNECTORS...

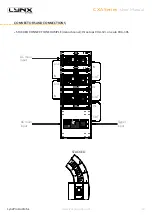
Страница 9: ...E mono channel four tops CXA 12 two sub CXA 18S This is the maximal CXA configuration delivering a 72 coverage in the vertical plane Total coverage 100 H x 72 V AC main input AC main input Link IN OUT...

Страница 10: ...x Pro Audio S L 10 www lynxproaudio com STACKED CONNECTION EXAMPLE mono channel three tops CXA 12 one sub CXA 18S AC main input AC main input Link IN CONNECTORS AND CONNECTIONS STACKED Signal input Li...

Страница 11: ...ynx Pro Audio S L 11 www lynxproaudio com FLOWN CONNECTION EXAMPLE mono channel three tops CXA 12 one sub CXA 18S AC main input Link IN CONNECTORS AND CONNECTIONS Signal input OUT IN FLOWN AC main inp...

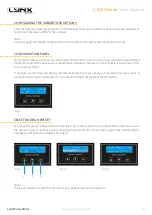
Страница 12: ...nd information such as amplification module temperature input signal level and name of the current preset Fig1 If changes are not made the display will automatically dim to save energy and avoid unnec...

Страница 13: ...ute polarity and phase You can also activate the air absorption compensation and select the SOLO mode How does it work Via Ethernet cable or wireless Once installed the O C S software automatically de...

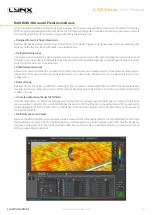
Страница 14: ...ofers line arrays columns and individual boxes as you desire Also the line arrays can be placed in stack or flown configuration Beam steering Rainbow 3D has the ability to add DSP processing to the si...

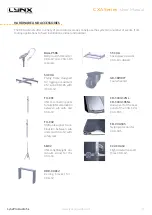
Страница 15: ...esigned for rigging a maximum of 2 sub CXA 18S with 4 CXA 12 TU C01 35mm connecting pole forsatellitecombination between sub units and CXA 12 TU C02 M20 pole support com bination between sub units and...

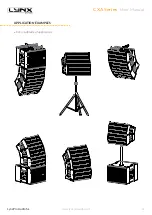
Страница 16: ...CXA Series User Manual Lynx Pro Audio S L 16 www lynxproaudio com APPLICATION EXAMPLES For a multitude of applications...

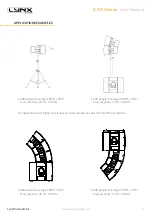
Страница 17: ...100 H x 18 V Freq response 70 Hz 18 KHz For applications with higher low frequency demand add one sub unit CXA 18S per channel 500 people Coverage 100 H x 36 V Freq response 35 Hz 18 KHz 800 people C...

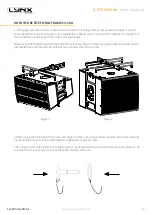
Страница 18: ...ingly When using the flying frame with the CXA 12 enclosures Figure 1 they are supported via 2 points with 1 lateral plate incorporated in each cabinet and a special steel pin per side When using the...

Страница 19: ...XA Series User Manual Lynx Pro Audio S L 19 www lynxproaudio com HOW TO USE THE FLYING FRAME SV CXA When using the flying frame with the CXA 18S sub units NOTE Only use the four STRAIGHT parts provide...

Страница 20: ...ser Manual Lynx Pro Audio S L 20 www lynxproaudio com ASSEMBLY OF THE FLYING FRAME SV CXA When using the flying frame with the CXA 12 line array units Part ANGULATED NOTE Only use the two ANGULATED pa...

Страница 21: ...ese shackles and orientate the system to your requeriments Fix the shackles to the elevation system e g motors lifts and elevate enough so as to fix the SV CXA on to the first cabinet CXA 12 or sub CX...

Страница 22: ...d with the flying frame SV CXA In case of failure the link system used should be capable of supporting the total weight of the complete system If the system is installed outdoors check that the suppor...

Страница 23: ...TTING THE CXA 18S CABINETS TO THE FLYING FRAME To fly the CXA 18S cabinets is very easy with the flying frame SVA CXA For a typical CXA array configuration you can fly a combination of a maximum 2 sub...

Страница 24: ...com FITTING CXA 12 WITH CXA 18S CABINETS To fly the CXA 18S cabinets is very easy with the flying frame SVA CXA For a typical CXA array configuration you can fly a combination of a maximum 2 sub enclo...

Страница 25: ...ype support in your ceiling Then you have to mount a lateral plate in each side of the cabinet where you will find 3 screws aligned Lateral plate Justunscrewtheupperandlowerscrews don t touch the cent...

Страница 26: ...tive 2011 65 UE RAEE WEEE 2012 19 UE In accordance with Harmonized European Norms EN 60065 2014 Audio video and similar electronic apparatus Safety requirements EN 55032 2012 Electromagneticcompatibil...

Страница 27: ...e life of this guarantee All our products undergo rigorous tests and quality controls We guarantee the characteristics described here within and their quality against any fabrication defect The user l...

Отзывы: