background image

FlarmView² Version 2.60  


April 2018 


Page 13 of 31 

4


Working with the FlarmView

2


4.1


Tree structure 

The FlarmView

has four modes, info, Waypoint, Task and Setup mode.  


Info 

Flarm 

Waypoint 

Task 

Setup 


4.2


Main screen description 

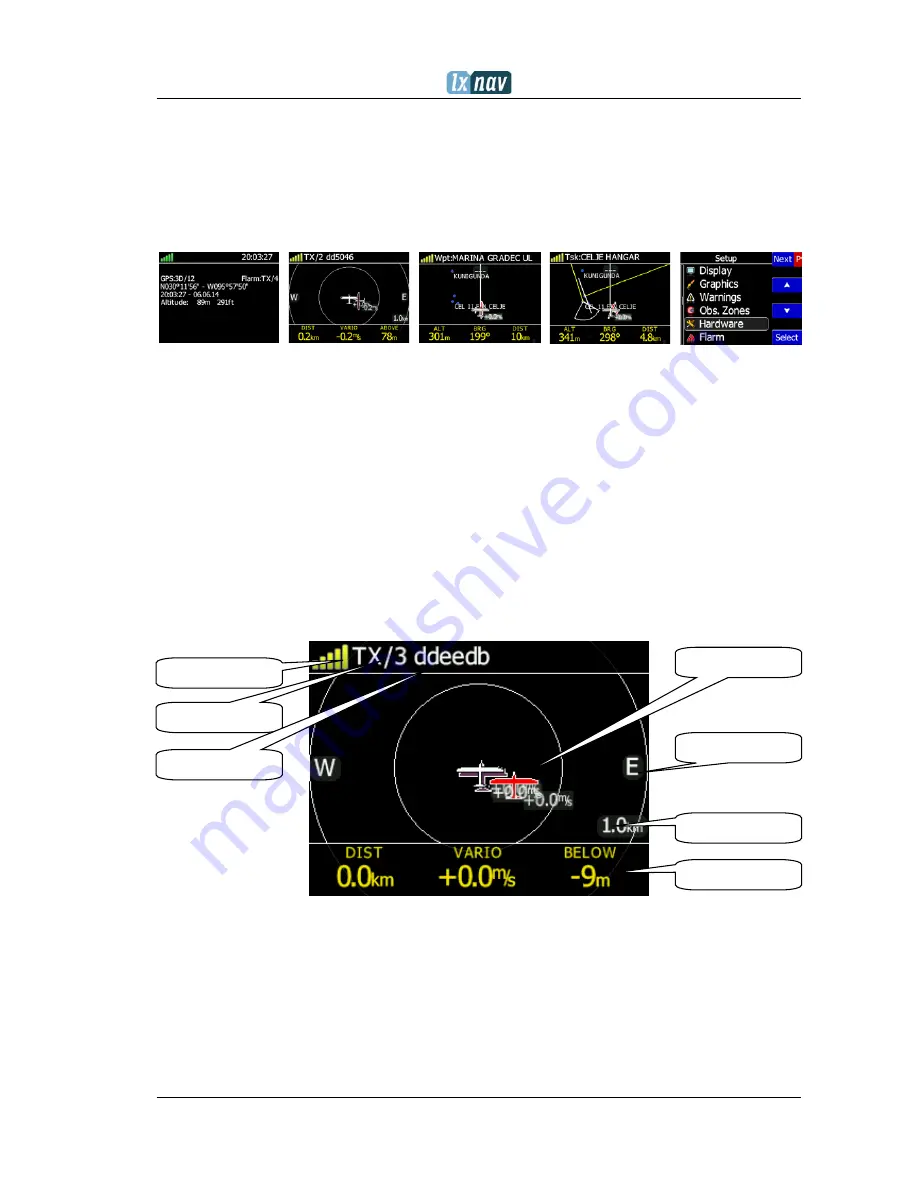
The main navigation screen consists of a map with coloured airspace, waypoints with names 

or task (depends on which page you are looking at). The status line indicates the status of 

the GPS, indicates the chosen waypoint that you are navigating to. Menu buttons appears, 

when you press any one of the buttons. Each button has its own function which is described 

on the button label. The functions of buttons are mostly related to the page where you are 

(waypoint, task, flarm, info, setup). If there is no label on the button, this button has no 

function. 

In the centre top of the map is the “off course” indicator, which helps the pilot fly in the right 

direction. At the bottom of the map screen  there  are three navboxes, showing bearing, 

distance to the target and the pressure altitude. 


Status of Flarm 
TX/3,  (TX) means, that flarm device transmits data, (3)  means, that Flarm receives data 

from three Flarm devices.  
 
Flarm identification is a 6 digit hexadecimal number, which can be used to identify each 

target. 

Flarm Targets 

GPS status 

Flarm status 

Flarm ID 

Navboxes 

Zoom level 

East side 

Содержание FlarmView2

Страница 1: ...FlarmView2 Version 2 60 LXNAV d o o Kidričeva 24 3000 Celje Slovenia tel 386 592 33 400 fax 386 599 33 522 info lxnav com www lxnav com ...

Страница 2: ...larmView2 13 4 1 Tree structure 13 4 2 Main screen description 13 4 2 1 Flarm symbols 14 4 3 Info screen 14 4 4 Flarm screen 15 4 5 Waypoint screen 15 4 6 Task screen 15 4 7 Setup Menu 16 4 7 1 Display 16 4 7 2 Graphics 16 4 7 2 1 Map orientation 16 4 7 2 2 Airspace 16 4 7 2 3 Waypoints 16 4 7 2 4 Glider and Track 17 4 7 2 5 Task 17 4 7 2 6 Flarm 17 4 7 2 7 Theme Setup 17 4 7 3 Warnings 17 4 7 4 O...

Страница 3: ... 24 6 Editing of a task 26 7 Installation 27 7 1 Installing the LXNAV FlarmView2 27 7 2 Connecting LXNAV FlarmView2 27 7 2 1 Ports and Wiring 27 7 2 1 1 LXNAV FlarmView2 port RJ11 27 7 2 1 2 LXNAV FlarmView2 wiring 28 8 Flarmnet Update 29 9 Firmware Update 30 9 1 Updating LXNAV FlarmView Flash integrity failed 30 10 Revision History 31 ...

Страница 4: ...or parts and labour provided that the customer pays for shipping costs This warranty does not cover failures due to abuse misuse accident or unauthorized alterations or repairs THE WARRANTIES AND REMEDIES CONTAINED HEREIN ARE EXCLUSIVE AND IN LIEU OF ALL OTHER WARRANTIES EXPRESSED OR IMPLIED OR STATUTORY INCLUDING ANY LIABILITY ARISING UNDER ANY WARRANTY OF MERCHANTABILITY OR FITNESS FOR A PARTICU...

Страница 5: ...FlarmView Version 2 60 April 2018 Page 5 of 31 Packing Lists LXNAV FlarmView2 FlarmView2 cable SD card ...

Страница 6: ... buttons on the FlarmView2 FlarmView2 monitors the vertical speed and altitude of each object on the screen The housing is made of robust ABS plastic On the left side of the unit there is a rocker button on the right side there are 4 rubber push buttons A 4 GB solid state disk is used for data storage Data downloadable through a USB connection which is compatible with all operating systems MS Win ...

Страница 7: ...SD card for data exchange Serial RS232 interface for PDA connection Size and weight Outline dimension 65 x 42 x 18 mm Weight 36g Power Power input 9V 16V DC input Consumption 0 84W 70mA 12V 2 3 Rocker button The rocker button has several actions you can press it or move it left or right Moving the rocker button will increase or decrease the sound volume when on an info page On pages with the map t...

Страница 8: ...ed red on the label This indicates that the button has two functions The blue option is operated with a short press and the red option with a long press For labels with two options the second option is typically the opposite function of the first option e g Next Previous Insert Delete Ok Cancel forward backward The functions of buttons are mostly related to the current page waypoint task flarm inf...

Страница 9: ...n from one control to another use up or down buttons By pressing the EDIT button access to the control that is displayed is possible 3 1 1 Buttons on FlarmView2 Each of the four buttons have dynamically set functions When you press a button beside the button will appear a blue label with the action assigned to that button in that context On the main screen the top button always performs the functi...

Страница 10: ...n a push of the button will confirm the edited value long press Ok C will cancel editing and exit that control If a Long press is available part of the button label will be a Gray colour For the example above a long press of the top button B has a back function A long press of the bottom button has a Cancel function The Flarm ID field is not editable this is because the flarm identification number...

Страница 11: ...lection boxes are used to select a colour from a list of predefined colours Use the up down buttons to select the appropriate colour 3 1 6 Checkbox and Checkbox List A checkbox enables or disables a particular parameter Press the EDIT button to toggle the value If an option is enabled a check mark will be shown otherwise an empty rectangle will be displayed 3 1 7 Slider selector Some values like v...

Страница 12: ...wn buttons you can select the preferred value and confirm it with the OK push button 3 2 Normal operation During normal operation mode the user can use the FlarmView2 as simple navigation airspace indicator and Flarm radar display There are five pages information page Flarm radar waypoint page task page and setup page ...

Страница 13: ...its own function which is described on the button label The functions of buttons are mostly related to the page where you are waypoint task flarm info setup If there is no label on the button this button has no function In the centre top of the map is the off course indicator which helps the pilot fly in the right direction At the bottom of the map screen there are three navboxes showing bearing d...

Страница 14: ...f an undirected warning such as a PCAS warning being so close that we can t display as described above a warning looks like the following picture All targets are displayed as a glider symbols It s also possible to change the object s colour depending on the relative altitude to our position All received targets Flarm or PCAS are marked with the same type of symbol except undirected targets for whi...

Страница 15: ...ow PCAS traffic 4 5 Waypoint screen In this screen the pilot can navigate to a selected waypoint Select waypoint from opened CUP file or select landable waypoint from near list Near button 4 6 Task screen In this screen user can navigate to waypoints from a task switching between them edit task points and their zones Read more in chapter 6 CTR airspace APT asphalt RWY APT grass RWY WPT symbol ...

Страница 16: ...ed to Map Airspace Waypoints Glider and Track Task Flarm and Theme Setup settings 4 7 2 1 Map orientation Map orientation can be set to track up north up 4 7 2 2 Airspace User can define indication level of indication and colour of airspaces 4 7 2 3 Waypoints User can define the following settings Enable waypoints indication Label length from none to all characters Label font size 16px 18px and 24...

Страница 17: ... adjusts remaining time of inactive gliders on the list Inactive gliders are those where their signal was lost after active timeout they become inactive and remains only on the list Draw line to target Draw history tail behind the Flarm object Plane icon size Compass labels in inner circle If enabled then N E W S are in the inner circle of Flarm radar screen 4 7 2 7 Theme Setup User can change gra...

Страница 18: ...on of any known zone geometry separately for start turn point and finish Using parameters in the zone dialogue it is possible to describe all types of observation zones Angle12 defines the orientation of the observation zone Available values for Direction are Symmetric This is the most common selection for turn point Fixed This is mostly used for assigned areas Next will orient the observation zon...

Страница 19: ...hat the zone is a cylinder and 45 is the classical FAI sector Use Up Down buttons to select right angle Angle2 and Radius2 are used for more complex observation zone setups When changing observation zone parameters the screen is automatically updated to display the new zone 4 7 5 Hardware In the Hardware menu there are three sub items Communication Sounds NMEA test ...

Страница 20: ...7 5 3 NMEA test In this menu user can see which data is coming from the Flarm This page is very useful for trouble shooting Explanation of Flarm sentences GPGGA Global Positioning System Fix Data GPRMC Recommended minimum specific GPS Transit data PFLAU Operating status and priority intruder and obstacle data PFLAA Data on other moving objects around PCAS etc 4 7 6 Flarm If a Flarm is detected the...

Страница 21: ...er can download and upload files 4 7 7 1 Download flight data With FlarmView2 a user can download flights from Flarm through FlarmView2 on to the SD card in the FlarmView2 4 7 7 2 IGC to KML FlarmView2 can convert the IGC file to a KML which can be used for Google Earth software ...

Страница 22: ...ints However the smaller the waypoint the faster the FlarmView2 display will operate 4 7 7 4 Airspaces CUB file format for airspace is supported There is no limitation in file size however the smaller the airspace file the faster the FlarmView2 display will operate 4 7 7 5 FlarmNet FlarmNet data can be loaded also in this section 4 7 8 Units All units are user configurable ...

Страница 23: ...hich run specific procedures as listed below 00666 Resets all settings on FlarmView2 to factory default 99999 Will erase all data on Flarm device 30000 Will delete Flarmnet user file on FlarmView2 4 7 10 About Under the about menu a user can see the version and serial number of the FlarmView2 ...

Страница 24: ...ghts on the clock as red or orange PCAS target information has only a range and no direction A warning can be dismissed with a short press of any button Dismiss time can be configured in setup 5 1 1 Selecting and switching between targets The target can be selected using Up Down middle two buttons If the target disappears when it is selected the FlarmView2 will still indicate information about the...

Страница 25: ...on of the threat In the first image two gliders are approaching from the left side at the same altitude and one from back right the second screen is an example of undirected warning AC mode Middle number shows horizontal distance to the target The last picture indicates an obstacle warning ...

Страница 26: ... of characters that are available from the list of waypoint names available Using the button you can move to the next character right the red part of the label B indicates one space back or one character to the left using a longer press of the button A similar function for the OK button where you can confirm a selected waypoint or with the C you can cancel the selection of a waypoint The previous ...

Страница 27: ...ry simple A square hole with dimensions 14mm x 15mm need to be cut Peel off protection film and stick the FlarmView2 to the instrument panel 7 2 Connecting LXNAV FlarmView2 FlarmView2 can be connected to any Flarm or ADS B device with the FlarmView2 cable 7 2 1 Ports and Wiring 7 2 1 1 LXNAV FlarmView2 port RJ11 1 2 3 4 5 Pin numbers ...

Страница 28: ... 2018 Page 28 of 31 Pin number Description 1 Power input 12VDC On version 2 2 Power input 3 3VDC On version 1 3 GND 4 input Data in RS232 receive line 5 output Data out RS232 transmit line 6 Ground 7 2 1 2 LXNAV FlarmView2 wiring ...

Страница 29: ...larm net database can be updated very easily Please visit http www flarmnet org Download file for LXNAV LX8000 LX8080 LX9000 or click on following link http www flarmnet org files lxfile php FLN type file will be downloaded Copy flarm fln file to SD card of FlarmView2 ...

Страница 30: ...web site section downloads firmware http www lxnav com download firmware html Copy fv2 fw file to FlarmView s2 SD card Turn on FlarmView Firmware update will take a few seconds If the update procedure is interrupted LXNAV FlarmView will not start It will cycle in bootloader application with red message Flash integrity failed Bootloader application is waiting to read the right firmware from SD card...

Страница 31: ...sion 1 02 August 2015 Chapter 5 7 5 3 explanation of NMEA sentences October 2015 Added more detailed descriptions Added chapters from 4 7 2 1 4 7 2 7 Added chapters 4 7 7 1 4 7 7 5 Added chapter 9 and 9 1 November 2016 Updated ch 4 7 3 July 2017 Added chapter 4 2 1 April 2018 Updated chapter 4 7 3 ...

Отзывы: