Lutron Electronics SeeTouch QS Series Скачать руководство пользователя страница 7

3b

.

  For wallstations with partition function: 

  2-button wallstations that control one partition: 

The LEDs on the wallstation will alternately blink. 
On each 

GRAFIK Eye

 QS control unit within the 

partitioned space, press and hold the top button 
on the lighting column until its LEDs flash in unison. 
The control units will then function together when the 
partition is open.

  All other partition wallstations: On the wallstation, 

press the button you want to use to control partition 
function. Its LED will blink slowly. Then, on each 

GRAFIK Eye

 QS control unit that is related to that 

partitioned space, press and hold the top button on 
the lighting column until its LEDs flash in unison.  
For multiple partitions, repeat for additional buttons 
on the partition wallstation, and the related control 
units.

Note:

  To stop a control unit from “listening” to a 

wallstation, put the wallstation in setup mode, 
then press and hold (for 3 seconds) the 

bottom

 button on the lighting keypad of the 

control unit you want to stop listening.

  Proceed to Step 4.

7

Occupant Copy 

Installation Instructions

Programming

  The next step is to configure which 

GRAFIK Eye

®

 QS control unit or window 

treatment “listens” when the wallstation 
“talks”, depending on your wallstation’   s 
function. You will perform only one of Steps 
3a through 3e for each wallstation.
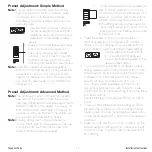
3a

.  

For wallstations with scene, panic, or 
sequence functions:

 Press and hold the top 

button on the 

GRAFIK Eye

 QS control unit lighting 

column until its LEDs flash in unison. Repeat for each 
control unit you want to “listen” to the wallstation for 
the selected function.

Note:

  To stop a control unit from “listening” to a 

wallstation, put the wallstation in setup mode, 
and press and hold (for 3 seconds) the 

bottom


button on the lighting keypad of the control unit 
you want to stop listening.

  Proceed to Step 4.

OK

1


2


3


4


5


6

           Press and hold the top button on the lighting column  for 

3 seconds to make control unit “listen”.

OK

1


2


3


4


5


6

           Press and hold the top button on the lighting column  for 

3 seconds to make control unit “listen”.

OK

1


2


3


4


5


6

Press and hold 
for 3 seconds to 
make control unit 
stop “listening”.

Содержание SeeTouch QS Series

Страница 1: ... QSWE 4BN R QSWE 4BI R QSWE 5BRLN R QSWE 5BRLI R QSWE 5BRLIRN R QSWE 5BRLIRI international R QSWE 6BRLN R QSWE 6BRLI R QSWE 7BRLN R QSWE 7BRLI R QSWE 8BRLN R QSWE 8BRLI R QSWE 8BRLIRN R QSWE 8BRLIRI R QSWE 10BRLN R QSWE 10BRLI Please Read Low Voltage PELV Class 2 USA 24 V 30 mA ...

Страница 2: ...l units can each power a maximum of 3 wallstations 610 m 2000 ft maximum wiring length 0 40 C 32 104 F operating temperature 100 devices per link seeTouch QS Sivoia QS power panel and GRAFIK Eye QS each count as one device 100 zones maximum per link Refer to the system installation guide for power cable and data ca ble control link wiring restrictions and limitations Control Link Wiring Power Two ...

Страница 3: ...30 mm measured center to center of mounting holes 3 Prepare Wallstations Remove the faceplate and set aside ON OFF ON OFF ON OFF 4 Prepare wires Strip insulation from wires so that 9 5 mm 3 8 in of bare wire is exposed Each wallstation terminal accepts up to two 1 0 mm2 18 AWG wires Note Wiring may be done in a Daisy Chain or T Tap configuration as shown below 9 5 mm 3 8 in LUTRON LUTRON LUTRON LU...

Страница 4: ...ct closure input connect the input to terminal A of the wallstation sensor contact closure input connector If using two contact closure inputs connect the inputs to terminals A and B Connect the common side of the contact closure inputs to terminal C Contact Closure Input Wiring Notes for Contact Closure Inputs Verify compatibility of external contact closure input devices The contact closure inpu...

Страница 5: ...adapter for insert versions with the adapter screws Then snap in the buttons and faceplate 8 Turn Power ON Turn ON control breaker or replace main fuse Notes Unprogrammed out of the box QS wallstations and control units will all work together until they are reprogrammed otherwise Typical Mounting Diagram Exploded View Wallbox Control Mounting screws Adapter Buttons Faceplate Adapter screws ...

Страница 6: ... control unit In order for shade wallstations to control exclusively a given group of window treatments as opposed to all window treatments in the system each shade wallstation must be individually configured to talk to its respective window treatments Only one wallstation can be in setup mode at a time 1 Enter Setup Mode Press and hold simultaneously for 3 seconds the top and bottom buttons not i...

Страница 7: ...eypad of the control unit you want to stop listening Proceed to Step 4 7 Occupant Copy Installation Instructions Programming The next step is to configure which GRAFIK Eye QS control unit or window treatment listens when the wallstation talks depending on your wallstation s function You will perform only one of Steps 3a through 3e for each wallstation 3a For wallstations with scene panic or sequen...

Страница 8: ...ns on the wallstation with their respective zones Note To stop a zone from listening to a wallstation put the wallstation in setup mode and press simultaneously the raise and lower buttons on the zone you want to stop listening Proceed to Step 4 3e For wallstations configured for shade function Note Entering setup mode will cause the window treatments to move between their open and close limits Be...

Страница 9: ... When some or all EDUs assigned to a wallstation are moving press any button on the wallstation to immediately stop all assigned EDUs The position that each EDU moves to when any but the top or bottom button is pressed is now programmable see page 13 No matter how or from where their movement is commanded whenever all the assigned EDUs come to a stop and match their programmed positions for one of...

Страница 10: ...eparate spaces A contact closure will open the partition a contact opening will close the partition Wallstations programmed for partitioning are only used for partitioning and each button is configured to control different combinations of control units When the partition between two GRAFIK Eye QS control units is open the control units act together 2B Partition 2 button wallstations only The top b...

Страница 11: ...4B 5BRL 5BRLIR 6BRL Left Right 7BRL Left Right 8BRL 8BRLIR Left Right 10BRL Left Right 1 Off 1 Off 5 Off 9 Off 13 Off 1 2 5 6 9 10 13 14 X X X X X X 1 2 Off 1 2 Off 5 6 Off 9 10 Off 13 14 Off 1 3 5 7 9 11 13 15 X X 1 3 Off 1 3 Off 5 7 Off 9 11 Off 13 15 Off 1 4 5 8 9 12 13 16 X X 1 4 Off WT 1 4 Off 5 8 Off 9 12 Off 13 16 Off 1 5 5 9 9 13 X X X See 3B WT WT 3 Groups See3B See3 B X X X X X See 2B WT...

Страница 12: ...its only for those EDUs assigned to it 2 Select the EDU you want to to adjust using the top button on the shade keypad Each time you press the top button a different EDU that is assigned to that shade keypad will open and close in an 203 mm 8 in range to indicate it is selected Press the top button until the EDU for the window treatment you wish to adjust moves You can also use the bottom button w...

Страница 13: ...t the open and close limits have been set correctly 1 On the shade keypad whose preset you wish to adjust press and hold the top and bottom buttons simultaneously for 3 seconds The LEDs next to the buttons will flash EDUs electronic drive units for the assigned window treatments will move to their closed limits and EDUs for unassigned window treatments will move to their open limits 2 Press the pr...

Страница 14: ...y Wallstation is miswired Wallstation is not powered Wallstation is not wired to the correct set of lights Wallstation is not programmed to the correct device Column is not programmed Miswire or loose connection at wallstation s or processor on the control link common and power connections 1 and 2 Wallstation has been programmed incorrectly Column is not programmed Miswire or loose connection at w...

Страница 15: ...dow treatment fabric is caught on something Open and close limits have been reversed No power is going to keypad All presets are set to the same height Communications link is not wired to the EDU EDU has been unassigned from keypad Open and close limits are the same EDU has been unassigned from keypad All presets are set to the same height EDU is not wired correctly Keypad is not wired correctly E...

Страница 16: ...r fraud or for death or personal injury resulting from its own negligence or any other liability if and to the extent that the same may not be limited or excluded as a matter of law This warranty does not affect the statutory rights of consumer purchasers of this product Although every attempt is made to ensure that catalogue information is accurate and up to date please check with Lutron EA befor...

Отзывы: