


maXim
S & M)
Operator Manual V3
Page 6
LSC Lighting Systems (Aust) Pty. Ltd
3 GETTING
CONNECTED
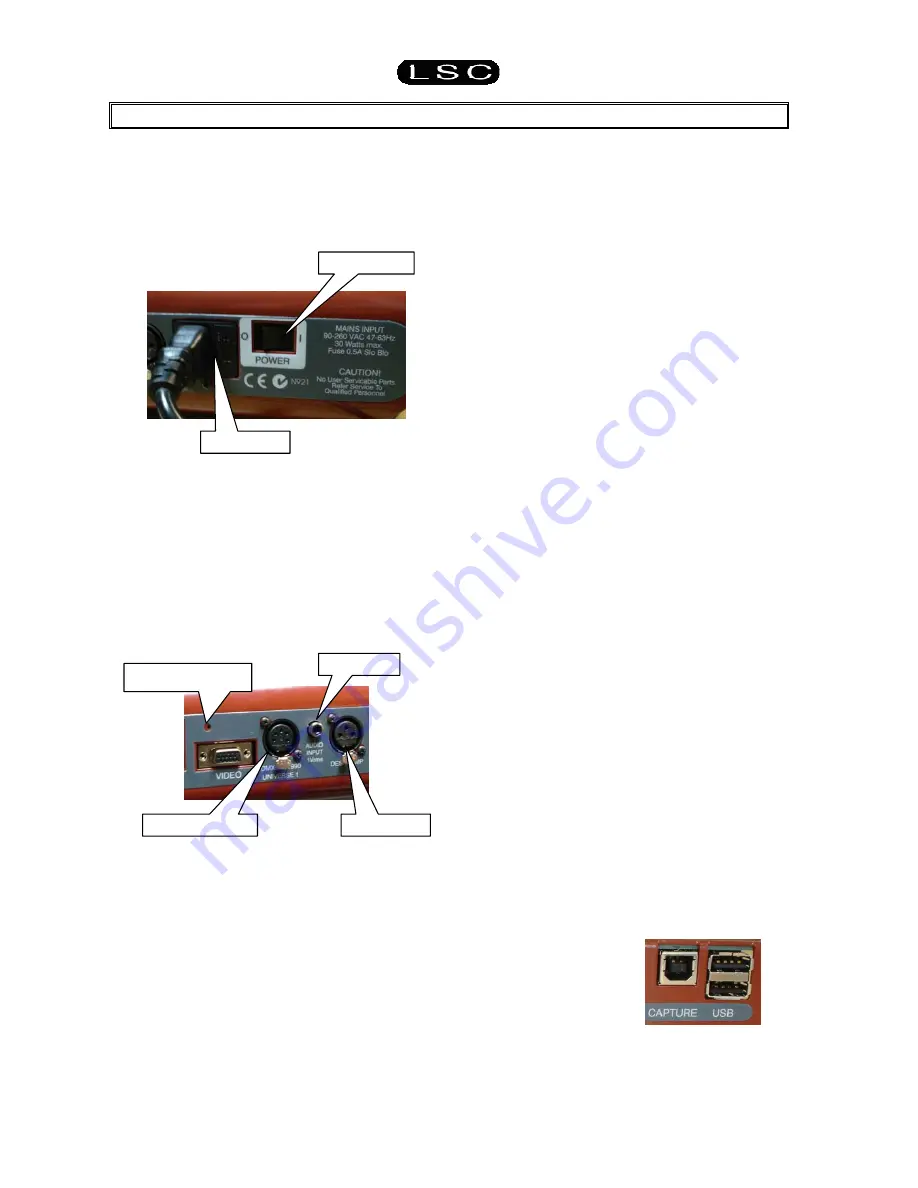
3.1 POWER
INPUT
An IEC mains input socket is located on the rear
panel and a POWER switch is beside the power
input. The
maXim
has a universal power supply
that will operate on voltages between 90 volts and
260 volts with a frequency range from 47 to 63
Hz.
3.2
DMX DIGITAL OUTPUT (DMX 512)
The
maXim
S
and
M
models have a single
DMX512 output connector located on the rear
panel. Connect a DMX data cable from the
DMX512 output of the
maXim
to the DMX512
input of your equipment (dimmers, moving fixtures
etc) and set the required DMX slot address on
your equipment.
Note: DMX512A together with some typical
setups and address settings are described in
the “DMX-512”section.
3.3 VIDEO
MONITOR
If your maXim is fitted with the optional VGA
output, connect a SVGA (or better) computer
monitor to the 15 pin VIDEO connector on the rear
of the
maXim
. See “VIDEO” in the “UTILITIES”
section for more details.
3.4 SWITCHING
ON
At this point, with the mains power and DMX
connected, the
maXim
is ready to be operated.
Simply switch on the “POWER” switch located
near the mains input connector on the rear of the
maXim.
The
maXim
will commence its start up procedure.
After briefly displaying the opening message, the
maXim
will commence operating in exactly the
same state that it was in when it was last switched
off. All the scenes, stacks, chases, patches etc
will be as they were.
3.5 SWITCHING
OFF
The maXim has an inbuilt back up power supply.
When the power is switched off (or there is an
unexpected blackout), you will hear a click
followed a few seconds later by another click. The
maXim keeps operating on its own power supply
until the second click is heard. During this time all
memories are automatically saved to non volatile
storage.
NOTE: In the event of a short loss of mains
power (a “brown out”) the maXim will continue
to operate for a few seconds due to the
storage capacity of its internal power supply.
3.6
POWER SUPPLY RESET
In the unlikely event that your maXim does not
shut down after the second click you can force it
to do so by momentarily pressing the
power
supply reset
switch. Remove the power then
insert a small insulated pointer into the small hole
to the left of the “DMX UNIVERSE 1” connector.
3.7 FUSE
A 0.5Amp slow blow fuse is located in a slide out
tray beside the mains input socket.
Should the fuse blow, remove the mains lead and
slide out the fuse tray. Pop out the blown fuse and
replace it with a 0.5 Amp slow blow fuse. A
spare
fuse
is provided in the slide out fuse tray. Replace
the spare fuse if you use it.
3.8 AUDIO
INPUT
The audio input is used for “Sound To Light”
effects. See the “STL” section for details.
3.9 DESK
LAMP
A goose-neck desk lamp may be connected to
this socket. The socket provides both power and
mounting for the lamp. There is an internal self-
resetting thermal fuse for the power to the lamp.
3.10 USB CONNECTORS (OPTIONAL)
You can plug a USB “flash disk” memory device
into the top USB connector for the external
storage of your maXim shows and also for
software upgrades. The bottom USB is not used
on S and maXim models.
3.11 CAPTURE
(OPTIONAL)
Capture is a programme
that lets you simulate your lighting shows on a
computer. See the separate “Capture” section for
details.
Fuse Holder
DMX Universe 1
Desk Lamp
Power Supply Reset
Power Switch
Audio Input


