4
REPAIR PROCEDURES / LIMITED WARRANTY
All products from LRP electronic GmbH (hereinafter called ”LRP“) are manufactured according to the highest quality
standards. LRP guarantees this product to be free from defects in materials or workmanship for 90 days (non-european
countris only) from the original date of purchase verified by sales receipt. This limited warranty doesn´t cover defects,
which are a result of misuse, improper maintenance, outside interference or mechanical damage. This applies among
other things on:
This applies among other things on:
• Engine disassembly by customer
• Any modification of the engine done by the customer
• Rust inside the engine
• Dust or dirt inside the engine
• Damaged engine due to glow plug failure
• Overheating
• Scratches inside the engine caused by dirt or dust
• Water in fuel
• Wrong break-in procedure
• Damaged piston due to piston stop devices
• Damaged cylinder exhaust port due to piston stop devices
• Breakages at high rpm without engine load
To eliminate all other possibilities or improper handling, first check all other components in your model and the trouble
shooting guide, if available, before you send in this product for repair. If products are sent in for repair, which do ope-
rate perfectly, we have to charge a service fee according to our pricelist.
With sending in this product, the customer has to advise LRP if the product should be repaired in either case. If there
is neither a warranty nor guarantee claim, the inspection of the product and the repairs, if necessary, in either case
will be charged with a fee at the customers expense according to our price list. A proof of purchase including date of
purchase needs to be included. Otherwise, no warranty can be granted. For quick repair- and return service, add your
address and detailed description of the malfunction.
If LRP no longer manufactures a returned defective product and we are unable to service it, we shall provide you with
a product that has at least the same value from one of the successor series.
The specifications like weight, size and others should be seen as guide values. Due to ongoing technical improve-
ments, which are done in the interest of the product, LRP does not take any responsibility for the accuracy of these
specs.
LRP-DISTRIBUTOR-SERVICE:
• check www.LRP.cc
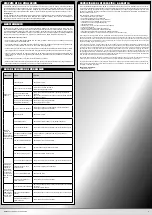
AFTER RUN
TROUBLE SHOOTING GUIDE
Use after-run oil to keep everything lubricated after you have finished your day. After-run oil helps for an easy start the
next time and protects your internals against rust. Use only „after-run oil“ specially formulated for R/C engines. Do not
use silicone shock oil or similar as they will seriously harm your engine. We recommend to use our LRP After-Run oil
(No. 37910), which you should use regularly after using your engine.
Procedure:
First let the tank run completely empty at idle until it runs out of fuel (try re-starting it several times), next put a few
drops down the open carburetor and a few drops down the glow plug hole. Spin it over for 5 seconds on the starter
box and you are done.
PROBLEM
REASON
SOLUTION
Engine does
not start
Glow plug defective
- replace glow plug
Glow plug does not work
properly
- check the condition of the glow plug
- check the glow plug igniter
Engine is set too rich
(too much fuel, hits back)
- check carburetor settings, repeat tuning procedure
- unscrew the glow plug completely and use startbox for 5sec
Engine is too lean
(too little fuel, does not start)
- check carburetor setting, repeat tuning procedure
Engine doesn’t suck in the fuel
- check the fuel line for possible damage
- check the carburetor setting
Engine stops
after a short
time after glow
plug igniter
has been dis-
connected
Glow plug defective
- replace glow plug
Bad fuel
- replace fuel by fresh and correct type of fuel
Bad carburetor setting
- check the carburetor setting, repeat tuning procedure
Dirt in fuel line or carburetor
- clean fuel line, clean & check carburetor
Fuel line damaged
- replace fuel line
Loose glow plug or cooling
head
- tighten glow plug and/or cooling head
Air filter old or dirty
- clean or replace air filter
Performance
decreases
after reaching
operating
temperature or
engine stalls
from time to
time
Engine is set too lean
- check the carburetor setting, repeat tuning procedure
Glow plug defective or wrong
type
- replace the glow plug by a correct type
Engine runs too hot
- run-in process is not completed
Shims under comb. chamber
wrong
- check number of shims
Engine still
keeps running
at high RPM
for a moment
when you
release the
throttle
Bad carburetor setting
- open mid-range needle ¼ turn at a time and re-adjust idle-speed
- set idle speed lower
Glow plug, wrong type (too hot) - use glow plug with higher number (e.g. go from 5 to 6)
Shims under comb. chamber
wrong
- check number of shims
MAINTENANCE
Treat your engine with care and check it frequently. Due to the extremely high RPM this engine produces, any fault
can cause serious damage. All moving parts inside the engine are subject to wear, you must know if a piston/liner/
conrod has worn out and if they need to be replaced. If you replace one part, please check if everything else is still in
good shape at the same time. If you only change one part and other parts are in bad shape, there’s the possibility that
there will be a new failure soon!
Some important matters:
• Clean the outside of the engine properly before you open it. Any dust or dirt which gets into the engine could make
considerable damage.
• Check the conrod frequently. If you want to replace the conrod, be sure the big end of your crankshaft is still round
and at a good size. If not, also replace the crankshaft.
• When you start putting your engine back together, make sure that each part is totally clean before installation and
please use some oil (after-run is suited well) to lubricate everything.
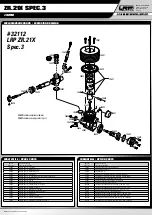
• Be careful that each part has its correct direction, especially piston/liner/conrod. Please also check the explosion
drawing. The lubrication hole in the conrod should be facing to the front (direction to the carburetor).
• Before you install the combustion chamber, please doublecheck that you installed all head shims.
• Use a hex wrench to install the screws. When you start to feel resistance, stop turning the screw. Repeat this for each
screw, use the star-technique to tighten all the screws completely. Do not overtighten them!
MA00263 © LRP electronic GmbH 2016


