background image


LOTEK   |   

USE OF PINPOINT COMMANDER (PPC)


14 


2.6.


Settings 


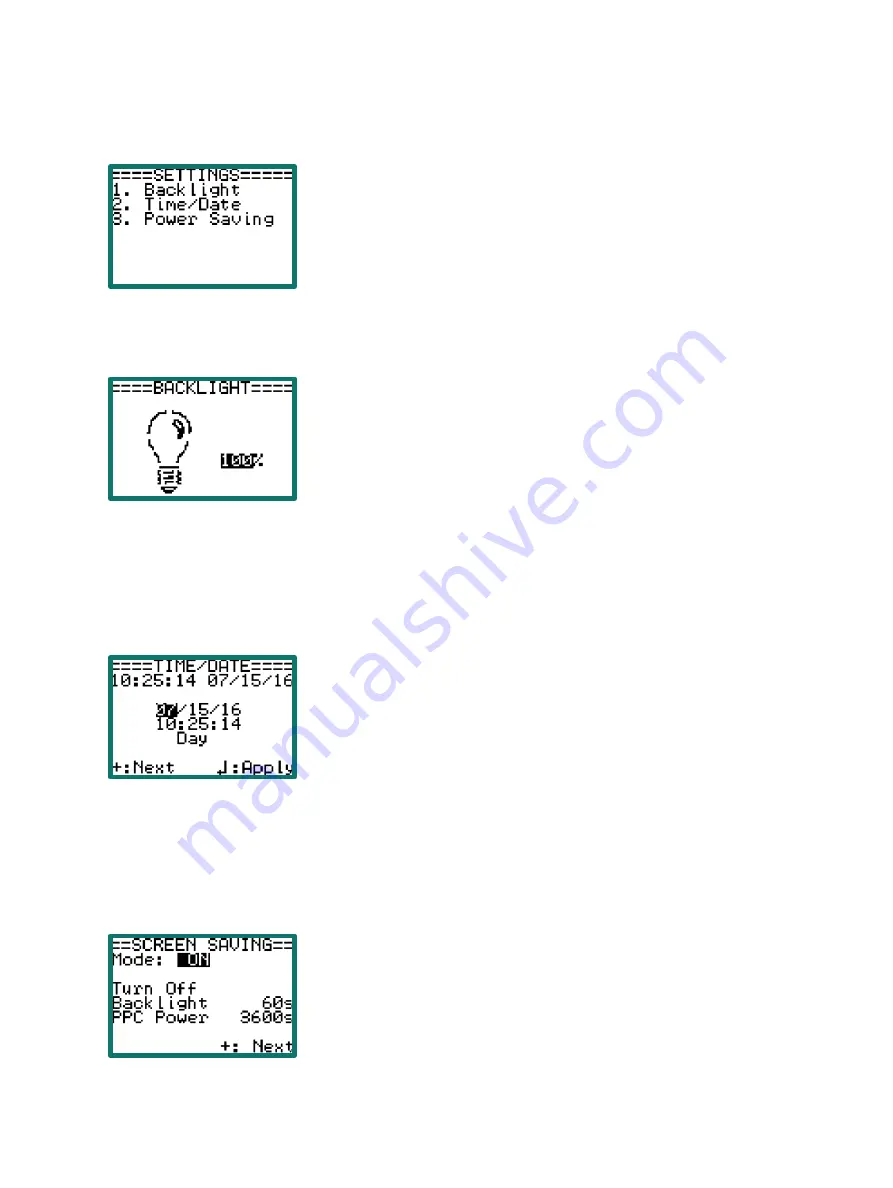
The Settings submenu allows you to tune the LCD backlight to your own 
preferences, adjust time & date and set a screen saving schedule to save 
battery power.


2.6.1.


Backlight 


The LCD backlight consumes significant battery power during normal 
operations. The PPC allows user to adjust the LCD backlight to fit the ambient 
light . Use Up and Down arrow keys to change the backlight to a comfortable 
level. 100% presents brightest and 0% presents the darkest.  


Use the Enter key to enter the new selection. Use the Escape key to go back to the previous menu. If the Escape 
key is used before the Enter key, the backlight setting does not change. 
 

2.6.2.


Time/Date 


The PPC comes with an internal RTC (Real Time Clock).  
 
NOTE: Every time the PPC has its batteries removed, it requires that time and 
date is entered. If not, downloaded data files will be presented with an 
incorrect time stamp.


The time/date is presented on six editable fields. Use the Up / Down keys to modify the number in the 
highlighted field. Use the Enter key to enter the highlighted number only. Use the Plus key key to jump to the 
next field without entering the number. 

2.6.3.


Screen Saving 


The PPC unit has a screen saving mechanism to save battery power. When 
power saving is enabled, the PPC will turn off the Backlight after a specific 
period of inactivity that you can adjust. PPC Power defines when it will enter 
sleep mode after a specific period of inactivity.  


Содержание PinPoint Commander

Страница 1: ...USER MANUAL REVISION 02 22 FEB 2018 MGPS12 PinPoint Commander ...

Страница 2: ...6 2 4 2 GROUP 7 2 4 3 TYPE 7 2 4 4 TRACK AUTOMATIC OR MANUAL 8 2 4 5 SCHEDULE 8 2 4 6 START 9 2 4 7 LOG 11 2 5 UPLOAD 11 2 5 1 GROUP 12 2 5 2 TYPE 12 2 5 3 MODE 13 2 5 4 UPLOAD 13 2 5 5 LOG 13 2 6 SETTINGS 14 2 6 1 BACKLIGHT 14 2 6 2 TIME DATE 14 2 6 3 SCREEN SAVING 14 2 7 TOOLS 15 2 7 1 INFORMATION VIEWER 15 2 7 2 USB DRIVE 16 2 7 3 ABOUT 16 2 8 POWER OFF 17 3 ID LIST CREATION AND DATA DOWNLOAD 1...

Страница 3: ...EK INTRODUCTION 2 3 2 ID LIST CREATION 17 3 3 DATA DOWNLOAD 17 3 4 SCHEDULE UPLOAD 18 4 ENERGY SAVING CONSIDERATION 18 5 SELECTION OF ANTENNA 19 6 STORAGE AND MAINTENANCE 19 APPENDIX 1 FIRMWARE UPGRADE 19 ...

Страница 4: ... Schedule where it will operate unattended following a schedule Separate solar power can be used to power the unattended unit 1 2 Specification Items Parameters Size mm 159 4 L x 77 9 W x 33 5 H 1 Weight g 240g without batteries 295g with 3 AA type alkaline batteries PC Connection Mini USB Operating Temperature 20C 50C Storage temperatures 40C 50C Power Source External USB or DC source Min 5V Max ...

Страница 5: ...dit mode change digital value Enter key 1 Select the highlighted menu item and enter sub menu 2 Execute an operation 3 Confirm a change Escape key 1 Back to higher level menu 2 Escape from a task Plus key 1 Wake up PPC from power off mode by holding for 5 seconds 2 Wake up PPC from screen saving mode 3 Toggle between screens 4 Modify contents ...

Страница 6: ...ags collars that are within communication range autonomous mode etc 2 Upload Can upload new schedules etc to the tag that has been previously loaded onto the PPC 3 Settings setup of PPC unit operation including change of backlight update of time date and modifications of screen savings parameters 4 Tools Viewing tag ID list and statistics of downloaded data Connection to a PC to download collected...

Страница 7: ...in communication range It will display detected tags collars IDs and data statistics only 2 Data Data from contacted tags collars are downloaded to onboard micro SD card Move the Up Down keys to highlight download options The mark indicates current selection To activate your selection press the Enter key Use Escape key to exit When Data is highlighted an additional option called Threshold appears ...

Страница 8: ... Enter key to select the group of interest The sign marks selected group When a group is selected the EDIT LIST allows you to enable or disable an ID from the list by clicking the Enter key When a tag is selected a mark is added to the end of the tag ID When a tag is de selected a X mark is added to the end of the tag ID The de selected tag ID will be skipped during tag data download By default al...

Страница 9: ... and the Enter key entered the Track Mode sub menu indicates if the PPC is configured for Automatic or Manual tracking by the mark next to the item Highlighting the Automatic or Manual option and selecting the Enter key will change the option 2 4 5 Schedule The SCHEDULE allows you to leave the logger in the field to download data autonomously SCHEDULE allows autonomous download where the unit peri...

Страница 10: ...has been found the unit initiates data download The PPC will repeat the download operations until all the tags in the tag list were searched for The PPC displays working status during tag searching and data downloading No user involvement is required during t from the bottom line Depending on the numbers of tags the amount of data and RF environment the download operation can last minutes or hours...

Страница 11: ...with first In the automatic mode it chooses the order in which to download data or status If no tag was found then the list is empty and the PPC stops data download operation In the example on the left the PPC is initializing data download from tag ID 123 If initialization fails and the time out is reached this tag will be skipped and the PPC will move to the next tag on the list or in manual mode...

Страница 12: ...specifier at the end of the line to indicate the download status There are four types of specifiers as described below Specifier Meaning Completely downloaded Partially downloaded X Failed to download Blank No download action due to no data or unwanted data type L Applicable to Solar Tag L indicates the solar voltage of tag has detected low during data downloading causing the PPC to terminate the ...

Страница 13: ...o 2 5 2 Type The Type submenu defines which schedule will be uploaded If All is indicated selecting this option provides a screen that displays the type of schedule being uploaded Here we have the option to upload both the GPS and Beacon schedules Highlighting the line using the Up Down keys then selecting will either insert a or a X where the x indicates do not upload this option If you select on...

Страница 14: ...u displays the number of schedules total for all schedule types to upload In the example above section 2 5 it shows 4 Selecting this option you will see the broadcast screen where it tries to connect to the tags in the group Test20 in this case It will display Link after a few seconds followed by the Upload Log screen The files with the have uploaded The 0044137 S01 indicates tag ID 44136 has uplo...

Страница 15: ...the Enter key the backlight setting does not change 2 6 2 Time Date The PPC comes with an internal RTC Real Time Clock NOTE Every time the PPC has its batteries removed it requires that time and date is entered If not downloaded data files will be presented with an incorrect time stamp The time date is presented on six editable fields Use the Up Down keys to modify the number in the highlighted fi...

Страница 16: ... displays groups uploaded to PPC ID lists within groups downloaded data files and sensor information such as ambient temperature and battery voltage ID List allows group selection and viewing a group s ID list Highlight a group from the list and press the Enter key to view IDs Use the Up Down keys to scroll IDs Use the Escape key to go back to the previous menu Selecting a group will list the Tag ...

Страница 17: ...ernal USB drive The embedded micro SD in PPC is now directly accessible by the PC The PC may need to download a few drivers from the Internet before it can recognize the new USB device so it can take a few minutes before it shows up in the file manager After a successful connection is made previously prepared ID lists can be updated and downloaded data can be copied When the PPC unit is connected ...

Страница 18: ...lars IDs needs to be created This ID list file must be created in the PP Host and the instructions are available in PinPoint Host user guide The resulting list name is IDList PPC and it is stored on PPC onboard micro SD card This is transferred to the PPC using the PP Host application under Tools Upload IDList to PPC The PPC has a limited memory space allowing up to 256 tags be searched at a time ...

Страница 19: ...you can set the RF link to be on for a specified number of hours per day and during this time they are in receive mode for 20ms every 10 seconds on Channel 1 If a valid Tag hello message is detected during this 20ms window and the address matches then the tag will switch to continuous receive mode on channel 2 for 20 seconds If either the Hello or Tag ID does not match the tag goes back to sleep W...

Страница 20: ...e PPC is normally supplied with the latest firmware but sometimes you may be required to upgrade the firmware for fault resolution or new features The PPC can be returned to Lotek Biotrack or Sirtrack but the PPC is supplied with the necessary components for the user to upgrade the unit themselves The firmware upgrade of PPC is implemented through the USB port using the PinPoint Host Application R...

Страница 21: ...0 Select the location of the PPC Firmware Remove the batteries from receiver put magnet on the right side of PPC LCD Using the USB cable to connect PPC and PC the Upgrade Firmware button becomes active and the Found 1 device is indicated ...

Страница 22: ...LOTEK APPENDIX 1 FIRMWARE UPGRADE 21 Wait for the upgrade to finish and then select Close ...

Отзывы: