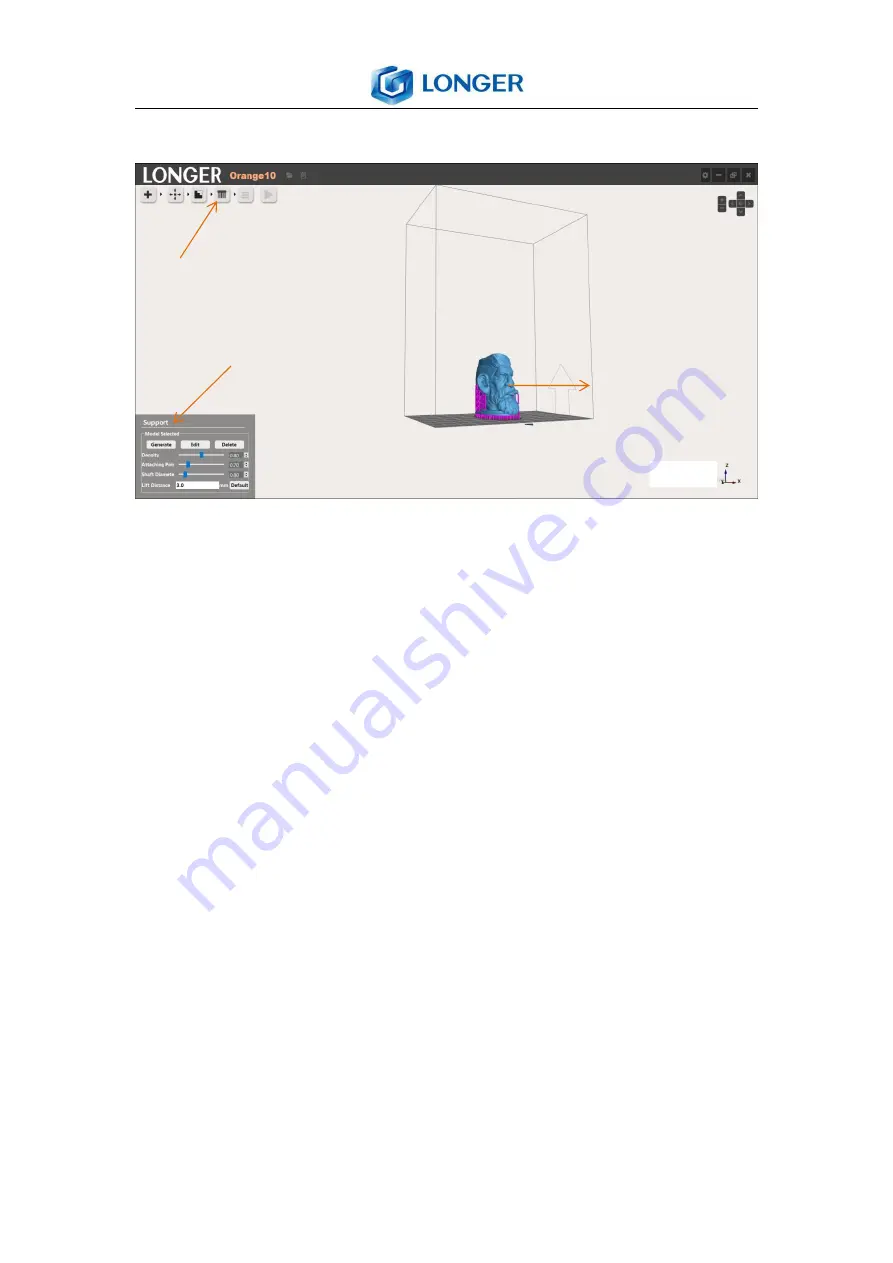
background image

19

www.longer3d.com

[email protected]

6.9 Support

Support

: Select the model, click support icon, edit the parameters,

click Generate icon.

Generate

: generate support for the selected model.

Edit

: edit the support parameters, the support positions are showed

by purple point.

Add support by left click

at desired position of the

model;

delete support by left click the purple point

. It can rotate the

model by holding down the right mouse, and drag the model by

holding down the mouse wheel.

Delete

: delete the support of selected model.

Density

: the density of generating support, the bigger value, more

support will be generated. The suggested value is between about

0.8

.

Attaching Point

: the diameter of supports that contact model, the

bigger diameter, the stronger support, but harder to spin off. The

suggested value is about

0.6

.

Содержание Orange10

Страница 1: ...www longer3d com info longer3d com LONGER Technology Orange10 LCD 3D Printer User Manual Version1 0...

Страница 2: ...reen Description 5 5 1 Main Menu 5 5 2 File 5 5 3 Job 7 5 4 Setting 8 5 5 More 9 5 6 Leveling 10 6 Software User Manual 12 6 1 PC Requirements 12 6 2 software installation 12 6 4 Printing Procedure 14...

Страница 3: ...st be read carefully before installation and operation of the printer The non compliance with warnings and instructions may result in printer damage or individual injury And the user should be solely...

Страница 4: ...m Build Speed 30mm h 100 m layer thickness Material Photopolymer Resin Light Source UV LED 405nm Software LONGER Operation System Windows 7 8 10 64 bit Connectivity TF card Format STL Screen 2 8 inch...

Страница 5: ...m info longer3d com 3 Product Overview 3 1 The 3D printer description Z aix Building platform fixed screw Vat fixed screw Touch screen Thermal via Building platform Leveling fixed screw Hood TF card P...

Страница 6: ...Resin 250mL 1 Card 5 Release Film 1 Screw Kits 1 Hexagon Wrench 1 5mm Hexagon Wrench 2mm Hexagon Wrench 2 5mm Hexagon Wrench 3mm Hexagon Wrench 4mm 4 Active Your 3D Printer Put the printer on a flat...

Страница 7: ...rface which contains File and Setting File the list of printing files and selection of file to print Setting move the Z axis check LCD and LED information of the printer 5 2 File File list all printin...

Страница 8: ...start printing Cancel the printing operation Select the file to print from the list the selected file will be surrounded by red frame Click the START a pop up window appears to confirm the operation C...

Страница 9: ...me from start printing Real time temperature of LED PCB Pause the printing job The status will change to pausing when start to pause and switch to paused after the current layer is printed over Cancel...

Страница 10: ...status Confirm the stop printing Cancel the stop operation 5 4 Setting 1 Move move the Z axis 10 50 Move up the Z axis Move down the Z axis Move the Z axis by 1mm change move distance by clicking the...

Страница 11: ...to home page 2 LED Turn on the LED light and a white picture will be showed to confirm that the LCD and LED are ok make sure there is no resin in the vat otherwise the resin will be cured Turn off the...

Страница 12: ...l Number the ID of the printer Firmware Version the version of printer s firmware 5 6 Leveling 1 Turn on the printer move up the Z axis take out the building plate install it as the picture as shown b...

Страница 13: ...ess and hold it then fasten the leveling fixed screws diagonally 4 Drag the A4 paper and feel the force of dragging the paper The leveling is suitable when it needs some force to drag the paper Howeve...

Страница 14: ...pour into the resin It needs to add resin manually if the volume of model is bigger than resin left in the vat during printing 6 Software User Manual 6 1 PC Requirements Windows 7 8 10 64 bit MAC 6 2...

Страница 15: ...ww longer3d com info longer3d com C Program File 86 longerware the installation will begin To complete the installation by clicking Finish the slice software will run and create a shortcut on the desk...

Страница 16: ...such as translate rotate scale and clone 3 Fix the error 4 Generate support if necessary 5 Slice the model 6 Generate and save the printing job file to TF card 7 Connect to the TF card to printer 8 Se...

Страница 17: ...ete Tools Bar Open Edit Fix Support Slice Print View Bar Building Volume Building Platform Model Menu Bar Open load the stl model Delete delete the selected model Tools Bar Open load the stl model Edi...

Страница 18: ...slice the model Print set the printing parameter generate and save the printing job View Bar Top view Bottom view Left view Right view Isometric view Printer Setting select the kind of printer Minimiz...

Страница 19: ...is out of range 6 7 Edit There are three edit submenus translate rotate scale The frame of submenu appears red if it is selected Translate select the model and translate icon one way to adjust the pos...

Страница 20: ...s of the selected model such as holes non manifold inverted normal and click Fix to auto repair the error s If there are some errors that cannot be repaired by software it needs to use other professio...

Страница 21: ...sition of the model delete support by left click the purple point It can rotate the model by holding down the right mouse and drag the model by holding down the mouse wheel Delete delete the support o...

Страница 22: ...e difficult to remove The suggested value is about 0 8 Lift Distance the distance between the model and building platform is lifted by generating support The suggested value is between 0 to 3mm Defaul...

Страница 23: ...so the layer number is set to 6 when the layer thickness is 50 m and sets to 3 layers when layer thickness is 100 m Start slice the model with the setting layer thickness Sliced will show behind the T...

Страница 24: ...r input the number of layer in the blank 6 11 Generating Job File Choose the same material type as printing material from material list click Start to generate a printing job file with a file suffix o...

Страница 25: ...rinting parameters of selected material Exposure the parameters about exposure Exposure Time the exposure time to cure a layer thickness of photopolymer resin except bottom layers The default time is...

Страница 26: ...ce value is 2mm Lift Speed1 the separation speed for slow motion range The default speed is 48mm min It can decrease the separation force by adjusting the value to 30mm min for the model with fine siz...

Страница 27: ...ng on the desktop Remove the model by metal scrapper with attention Pour the ethanol with 95vol concentration into a container immerse the model into ethanol and shake it gently then swash the model w...

Страница 28: ...t 5 LED broken 6 LCD broken 7 bottom layer is small 1 tighten the building platform 2 level the platform again 3 level the platform again 4 make bottom time is right 5 check the LED voltage and LED re...

Страница 29: ...lding platform when tighten and loosen it 6 Keep the printer cover closed during usage 7 Clean up the resin vat before the change of a new kind resin 8 Keep the building platform and printer clean and...

Страница 30: ...Bottom height 0 3mm Lift Distance1 2mm Lift Speed1 48mm Lift Distance2 2mm Lift Speed2 300mm Notes The model is tilted about 45 The reasons are 1 the layer has self supporting function when the degre...

Отзывы: