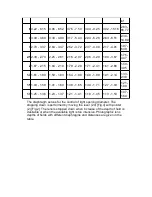
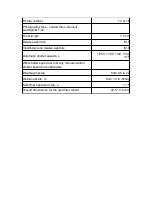
LOMO Lubitel 166 Скачать руководство пользователя страница 6

inf

6

4.22 - 6.15

4.06 - 6.52

3.76 - 7.50

3.44 - 9.25

3.02 - 15.16

2.63 - 
66.77

4

3.49 - 4.69

3.38 - 4.90

3.17 - 5.43

2.94 - 6.28

2.63 - 8.51

2.34 - 
14.89

3

2.70 - 3.37

2.64 - 3.47

2.52 - 3.72

2.37 - 4.09

2.17 - 4.91

1.97 - 
6.49

2.5

2.30 - 2.74

2.25 - 2.81

2.16 - 2.97

2.06 - 3.20

1.90 - 3.67

1.75 - 
4.47

2

1.87 - 2.15

1.84 - 2.19

1.79 - 2.28

1.71 - 2.41

1.61 - 2.66

1.50 - 
3.05

1.7

1.61 - 1.80

1.59 - 1.83

1.54 - 1.90

1.49 - 1.98

1.41 - 2.14

1.33 - 
2.38

1.5

1.43 - 1.58

1.41 - 1.60

1.38 - 1.65

1.34 - 1.71

1.27 - 1.83

1.21 - 
1.99

1.3

1.25 - 1.36

1.23 - 1.37

1.21 - 1.41

1.18 - 1.45

1.13 - 1.53

1.07 - 
1.64

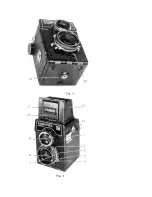
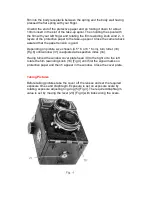
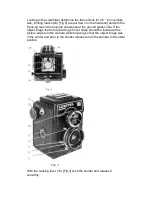
The diaphragm serves for the control of light opening diameter. The 
stopping down is performed by moving the lever (20) [Fig.4] with pointer 
(2) [Fig.2]. The lens is stopped down when increase of the depth of field is 
desirable or when the available light is too intensive. Photographic lens 
depths of fields with different diaphragms and distances are given in the 
table.

Содержание Lubitel 166

Страница 1: ...g It is enough to raise a little the reflex viewfinder cover to see deep between the light protective hoods a large and for any illumination distinct clear image according to which it is easy to fit frame limits when the object is already found or to find a new scene Image focusing is performed by slight rotation of a lens knurled mount Scales of distances diaphragms and exposures and all the cont...

Страница 2: ...ith metal light protective hoods that open simultaneously with raising the cover The viewfinder should be closed by the following procedures first close the magnifier then the side hoods the rear hood with a square window and at last the cover until its front frame lug catches with the viewfinder case lock catch Focusing the images on the ground glass circle and in film plane is performed simultan...

Страница 3: ...nt frame In this case the limits of the viewfinder field will be the image limits The distance scale is graduated at viewfinder lens mount in metres Diaphragm shutter is automatically giving the following speeds 1 250 1 125 1 60 1 30 1 15 s With shutter set to B any manual control shutter speeds are obtainable Selected exposure time is set by rotating the adjusting ring dog 5 Fig 3 to coincide the...

Страница 4: ...provided with the socket for it With shutter set to B index it remains opened from the moment of pressing the release lever till its releasing To activate the self timer it is necessary to set the selected automatic exposure cock the shutter turn the self timer lever 6 Fig 2 fully downward and to press the release lever 15 Fig 3 In 7 15 seconds the shutter will operate and the picture will be take...

Страница 5: ...ed the shutter may be set to any automatic exposure With flash bulb used the shutter should be set to 1 15 or B On releasing the shutter the synchronizer will act automatically Depth of field in metres with diaphragms 1 4 5 1 5 6 1 8 1 11 1 16 1 22 inf25 59 inf 20 57 inf 14 40 inf 10 47 inf 7 20 inf 5 24 inf 159 44 35 62 8 74 53 75 7 42 inf 6 25 inf 4 95 inf 3 97 inf 86 14 11 51 5 81 12 89 5 20 17...

Страница 6: ... 1 83 1 54 1 90 1 49 1 98 1 41 2 14 1 33 2 38 1 51 43 1 58 1 41 1 60 1 38 1 65 1 34 1 71 1 27 1 83 1 21 1 99 1 31 25 1 36 1 23 1 37 1 21 1 41 1 18 1 45 1 13 1 53 1 07 1 64 The diaphragm serves for the control of light opening diameter The stopping down is performed by moving the lever 20 Fig 4 with pointer 2 Fig 2 The lens is stopped down when increase of the depth of field is desirable or when th...

Страница 7: ......

Страница 8: ...n values 8 and 11 and distance scale between 8 and 15 are marked with white dots With diaphragm scale pointer and distance scale index set to these dots all the images of objects at a distance of 4 5 m to infinity are obtained sharp CAMERA OPERATION PROCEDURES Loading the Camera Taking the camera in your left hand open the camera back turning for this aim lock head 28 Fig 6 until the index on the ...

Страница 9: ...on is good Depending on picture size chosen 4 5 6 or 6 6 cm turn turret 33 Fig 6 until window 31 is adjusted at respective index 34 Having turned the window cover plate head 30 to the right or to the left rotate the film rewinding knob 18 Fig 3 until first the signal marks on protective paper and then 1 appear in the window Close the cover plate Taking Pictures Before taking pictures take the cove...

Страница 10: ...the required sharpness at the ground glass circle If the object image that is required to get most sharp should be located at the picture edge turn the camera while focusing so that the object image was in the center and prior to the shutter release return the camera to the initial position With the cocking lever 15 Fig 3 cock the shutter and release it smoothly ...

Страница 11: ...ctive paper end and keep the film until it is developed Take the spool out of supply spool receptacle and insert into that of the take up spool Further slightly turning film rewinding knob press it and the head of the take up spool spindle up to the stop Close the camera back Put cover on the camera lenses For convenience purposes adjust their mounts at the same level MAINTENANCE Handle the camera...

Страница 12: ...ewfinder lens relative aperture f 2 8 Automatic shutter speeds s 1 250 1 125 1 60 1 30 1 15 With shutter speed set to B any manual control shutter speeds are obtainable Diaphragm scale from 4 5 to 22 Distance scale m from 1 3 to infinity Self timer operation time s 7 15 Thread dimensions for the light filter mount 40 5 0 6 mm ...

Отзывы: