background image

                                               It is necessary in many situations with TIG welding to add a filler wire into the 
                                               weld pool to build up weld reinforcement and create a strong weld. Once 
                                               the arc is started the torch tungsten is held in place until a weld pool is 
                                               created, a circular movement of the tungsten will assist is creating a weld 
                                               pool of the desired size. Once the weld pool is established tilt the torch at 
                                               about a 75° angle and move smoothly and evenly along the joint. The filler 
                                               metal is introduced to the leading edge of the  weld pool. The filler wire is 
                                               usually held at about a 15° angle and fed into the  leading edge of the 
molten pool, the arc will melt the filler wire into the weld pool as the torch is moved forward.  

Also a dabbing technique can be used to control the amount of filler wire added, the wire is fed into
the molten pool and retracted in a repeating sequence as the torch is moved slowly and evenly 
forward.  It is important during the welding to keep the molten end of the filler wire inside the gas shield 
as this protects the end of the wire from being oxidised and contaminating the weld pool.                                                              

3.4.5 

Electrodes

Tungsten Preparation

Always use DIAMOND wheels when grinding and cutting. While tungsten is a very hard material, the 
surface of a diamond wheel is harder, and this makes for smooth grinding. Grinding without diamond 
wheels, such as aluminium oxide wheels, can lead to jagged edges, imperfections, or poor surface 
finishes not visible to the eye that will contribute to weld inconsistency and weld defects. 
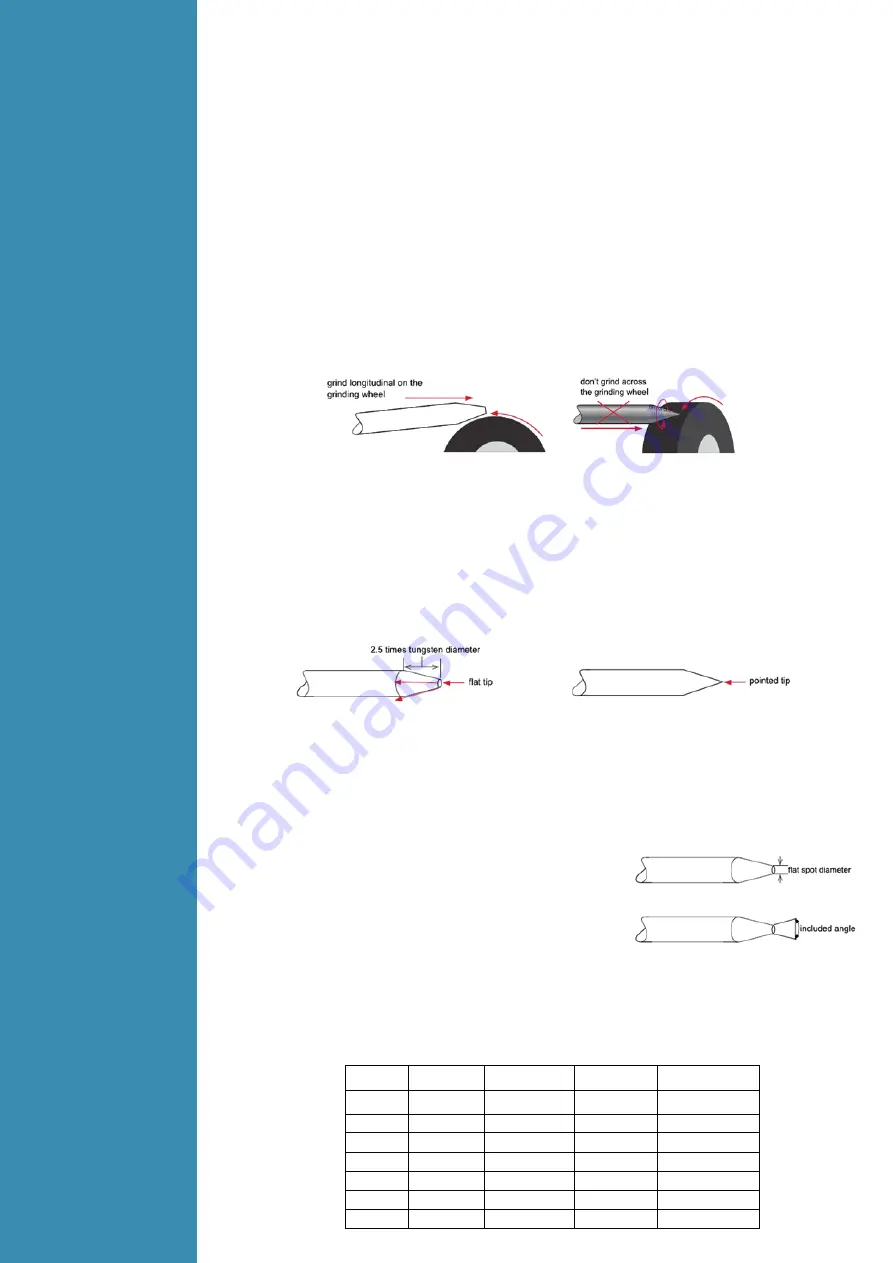
Always ensure to grind the tungsten in a longitudinal direction on the grinding wheel. Tungsten 
electrodes are manufactured with the molecular structure of the grain running lengthwise and thus 
grinding crosswise is “grinding against the grain.”  If electrodes are ground crosswise, the electrons have 
to jump across the grinding marks and the arc can start before the tip and wander. 
Grinding longitudinally with the grain, the electrons flow steadily and easily to the end of the tungsten
tip. The arc starts straight and remains narrow, concentrated, and stable.

Electrode Tip/Flat

The shape of the tungsten electrode tip is an important process variable in precision arc welding. A 
good selection of tip/flat size will balance the need for several advantages. The bigger the flat, the 
more likely arc wander will occur and the more difficult it will be to arc start. However, increasing the 
flat to the maximum level that still allows arc start and eliminates arc wonder will improve the weld 
penetration and increase the electrode life. Some welders still grind electrodes to a sharp point, which 
makes arc starting easier. However, they risk decreased welding performance from melting at the tip 
and the possibility of the point falling off into the weld pool.

Electrode Included Angle/Taper

DC Welding Tungsten electrodes for DC welding should be ground longitudinally and concentrically 
with diamond wheels to a specific included angle in conjunction with the tip/flat preparation. Different 
angles produce different arc shapes and offer different weld penetration capabilities. In general, 
blunter electrodes that have a larger included angle provide the following benefits

• Last Longer
• Have better weld penetration
• Have a narrower arc shape
• Can handle more amperage without eroding. 
   Sharper electrodes with smaller included angle provide:
• Offer less arc weld
• Have a wider arc
• Have a more consistent arc 
   The included angle determines weld bead shape and size. Generally, as the included angle 
   increases, penetration increases and bead width decreases.


Tungsten 

Diameter 

Diameter at the 

Tip - mm 

Constant Included  

Angle - Degrees 

Current Range 

Amps 

Current Range 

Pulsed Amps 

1.0mm 

.250 

20 

05 - 30 

05 - 60 

1.6mm 

.500 

25 

08 - 50 

05 - 100 

1.6mm 

.800 

30 

10 - 70 

10 - 140 

2.4mm 

.800 

35 

12 - 90 

12 - 180 

2.4mm 

1.100 

45 

15 - 150 

15 - 250 

3.2mm 

1.100 

60 

20 - 200 

20 - 300 

3.2mm 

1.500 

90 

25 - 250 

25 - 350 


Tungsten Electrode Preparation 

Содержание GRAND TIG 200 DC

Страница 1: ...es GRAND TIG 200 DC IMPORTANT Read this OPERATOR MANUAL together with PRESCRIPTION AND COMPLIANCE MANUAL before to use this equipment In case of loss one of two parts contact immediately your dealer A...

Страница 2: ...Set up installation for MMA Welding 3 3 2 Operation for MMA Welding 3 3 3 MMA Welding 3 3 4 MMA Welding trouble shooting 3 4 Installation Operation for TIG Welding 3 4 1 Set up installation for TIG We...

Страница 3: ...ly system Consideration should be given to shielding the supply cable of permanently installed arc welding equipment in metallic conduit or equivalent Shielding should be electrically continuous throu...

Страница 4: ...nsors for high protection Weight Extremely low weight and versatility Generator friendly Designed to work with diesel generators and to avoid failures due to its voltage spikes 2 2 Technical Data Mode...

Страница 5: ...h frequency and high voltage for arc igniting to ensure the success ratio of igniting arc This machine has wide range of applications Given its small size light weight easy and flexible operation it c...

Страница 6: ...ing The circuit adopts current feedback control technology to insure current output stability Meanwhile the welding current parameters can be adjusted continuously and steplessly to meet with the requ...

Страница 7: ...mode the trigger is pulled and held on to activate the welding circuit when the trigger is released the welding circuit stops 4T is known as latching mode The trigger is pulled once and released to ac...

Страница 8: ...ctrode connected to output socket DCEN Electrode connected to output socket 1 Connect the earth lead to tighten clockwise 2 Connect the earth clamp to the work piece Contact with the work piece must b...

Страница 9: ...ckly reversed to joints If the work piece distance from the welding machine the second line electrode holder and ground is longer so choose the appropriate conductor cross sectional area should be lar...

Страница 10: ...ry electrodes 3 Excessive Spatter Amperage too high Decrease the amperage or choose a larger electrode Arc length too long Shorten the arc length 4 Weld sits on top lack of fusion Insufficient heat in...

Страница 11: ...wrong voltage 10 With the corresponding input power supply terminal or socket good contact and prevent oxidation 11 With a multi meter measure the input voltage is within the fluctuation range 12 The...

Страница 12: ...ule applies to all the other forms of DC welding as well DC TIG welding is a process in which an arc is struck between a TUNGSTEN electrode and the metal work piece The weld area is shielded by an ine...

Страница 13: ...eld in place until a weld pool is created a circular movement of the tungsten will assist is creating a weld pool of the desired size Once the weld pool is established tilt the torch at about a 75 ang...

Страница 14: ...e flat to the maximum level that still allows arc start and eliminates arc wonder will improve the weld penetration and increase the electrode life Some welders still grind electrodes to a sharp point...

Страница 15: ...e tungsten is off of the work piece 2 5mm Touching the filler wire to the tungsten Keep the filler wire from touching the tungsten during welding feed the filler wire into the leading edge of the weld...

Страница 16: ...ng whistle calling or peculiar smell If there is one of the above problems find out the reason and clear it If you can t find out the reason please contact your local service repair station or distrib...

Страница 17: ...the welder s output The welding cable damaged Repair or change it The earth cable connected unstably Check the earth cable The welding cable is too long Use an appropriate welding cable There is oil o...

Страница 18: ...on always on Welding machine E10 Phase loss Yellow lamp thermal protection always on E13 Under voltage Yellow lamp thermal protection always on E14 Over voltage Yellow lamp thermal protection always o...

Страница 19: ...4 4 Electrical schematic drawing...

Страница 20: ...LOKERMANN Srl Via Produzione 16 18 37044 Cologna Veneta VR Italy Tel 39 0442 1722469 lokermann lokermann eu www lokermann eu...

Отзывы: