background image

OWNER’S MANUAL

21

Compact Scooter

Important:

To preserve battery power there is a “sleep timer” feature built into the controller. Should the 

scooter be left ON, but not operated for 15 minutes the scooter will go into “sleep mode”. To 

reset this, switch the scooter OFF and then back ON again.

Note: The user’s visual standards must be higher than 0.5.

Hill climbing

This scooter has been tested to climb an incline of no more 

than 10° with a maximum user weight of up to 120kg (264 lbs) 

(Photo 12.1). Do not attempt to climb inclines in excess of this.

Always reduce your speed when reversing on slopes. Do not 

reverse down hills in excess of 8° and always use extreme 

caution when reversing down hills.

Do not attempt to drive along with the wheels at different 

levels, e.g. along the footpath and road simultaneously.

Hill climbing capability and distance travelled between 

battery charges will be adversely affected by such things as:

1. The weight of the user.

2. Terrain (e.g. grass or gravel).

3. Steepness of hills.

4. Level of charge and the age of the batteries.

5. Extremes of temperature.

6. Use and weight of accessories.

Traveling across slopes

Care should be taken traversing across a slope, always reduce your speed. Do not traverse 

across the face of a slope in excess of 10° (Photo 12.2).

Note: Where possible always travel up or down hills or ramps directly facing the slope of the 

hill.

Do not traverse across the face of a slope in excess of 10°. Disregard of this advice could result 

in your scooter tipping.

Braking

To bring the scooter to a standstill simply let go of the throttle control lever (Photo 12.3).

Remember to keep both of your hands on the handlebars whilst the scooter is braking.

Release the control lever will stop your scooter in seconds.

20


15minutes the scooter will go into “sleep mode”. To reset this, switch 

the scooter OFF and then back ON again. 


Note: The user’s visual standards m ust be higher than 0.5.


Hill climbing 

This  scooter  has  been  tested  to  climb  an 

incline of no more than 10° with a maximum user 

weight of up to 120kg (264 lbs) (Photo 12.1). Do 

not attempt to climb inclines in excess of this.   

Always  reduce  your  speed  when  reversing 

on slopes. Do not reverse down hills in excess of 

8°  and  always  use  extreme  caution  when 

reversing   

down hills.   

Do  not  attempt  to  drive  along  with  the 

wheels at different levels, e.g. along the footpath 

and road simultaneously. 

Hill  climbing  capability  and  distance 

travelled  between  battery  charges  will  be 

adversely affected by such things as: 

1. The weight of the user. 

2. Terrain (e.g. grass or gravel). 

3. Steepness of hills. 

4.  Level  of  charge  and  the  age  of  the 

batteries. 

5. Extremes of temperature. 

6. Use and weight of accessories.   


Traveling across slopes


Care should be taken traversing across a slope, always reduce your speed. 

Do not traverse across the face of a slope in excess of 

10° (Photo 12.2)

Note: Where possible always travel up or down hills or ramps directly 

facing the slope of the hill. 


Do not traverse across the face of a slope in excess of 10°. Disregard 

of this advice could result in your scooter tipping. 


Braking


To bring the scooter to a standstill simply let go of the throttle control lever 
(Photo 12.3). 
Remember to keep both of your hands on the handlebars whilst the scooter 

is braking. 

Release the control lever will stop your scooter in seconds. 

P12.1 

P12.2 

P12.3 

ver 2019.05.30E

Содержание Limosa

Страница 1: ...OWNER S MANUAL Compact Scooter ver 2019 05 30E...

Страница 2: ...our scooter will reach you in excellent condition having been personally inspected before leaving the factory By following the guidelines for maintenance your scooter will maintain its first class con...

Страница 3: ...Battery and Charging page14 11 Transportation page17 12 Guidance for Safe Operation and Use page19 13 Battery and Charging Information page23 14 General Warnings page26 15 EMC EMI Warnings page30 16 S...

Страница 4: ...3 42 EEC the radio interference requirements of EEC Directive 89 336 EEC and the battery charger requirements of EEC Directive 73 23 EEC and89 336 EEC Electro Magnetic fields such as those emitted by...

Страница 5: ...raints seat positioning straps posture correction or other positional aids and accessories it is the obligation of the qualified healthcare professional in conjunction with the dealer to ensure the su...

Страница 6: ...efore first use Do not be tempted to use the scooter unless the battery has been fully charged as failure to do this will result in battery damage Connect the battery charger to the mains supply and t...

Страница 7: ...ng knob to its lowest setting locking in the basket Make sure that there is at least 30mm between Tiller and battery pack 5 Using the lifting handles provided carefully lift the scooter safely and sec...

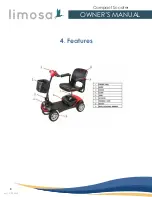
Страница 8: ...7 4 Features OWNER S MANUAL 8 Compact Scooter 4 Features ver 2019 05 30E...

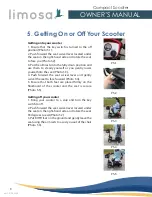
Страница 9: ...ground and gently leave the seat using the arm rests to assist you out of the chair Photo 5 3 8 Getting on to your scooter 1 Ensure that the key switch is turned to the off position Photo 5 1 2 Push...

Страница 10: ...p up and down this is normal For a more accurate indication stop the scooter and note the reading In cold damp weather the gauge will dip more often as the capacity and efficiency of all batteries dro...

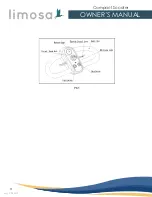
Страница 11: ...10 P6 1 OWNER S MANUAL 11 Compact Scooter ver 2019 05 30E...

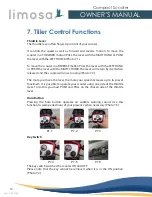
Страница 12: ...N and OFF Please note that the key cannot be removed when it is in the ON position Photo 7 4 11 Throttle Lever The throttle lever offers finger tip control of your scooter It controls the speed as wel...

Страница 13: ...stop as continual use of this function could Result in damage to the scooter Off Board Charging Socket The socket to connect the off board charger is located on the battery pack Photo 7 6 To use the...

Страница 14: ...ion and refit the seat pin 3 Refit the seat Photo 9 6 P9 5 P9 6 9 Seat Removal and Adjustment OWNER S MANUAL 14 Compact Scooter 9 Seat Removal Adjustment Removing the Seat Please note that these instr...

Страница 15: ...teries Lift battery vertically out of its battery tray using the handle provided Photo 10 4 14 Armrest Adjustment 1 Pull the lock pin out from the seat base photo 9 7 2 Loose the adjustable bolt photo...

Страница 16: ...is helps prevent water getting into the socket Photo 10 6 15 Remember to keep the knees bent and the back straight Battery Replacement To replace the batteries reverse the sequence above Important Rem...

Страница 17: ...eating device which may cause the battery to explode Don t press the battery or stab it or let it endure any high pressure which may cause short circuit or overheating NO SMOKING OR NAKED FLAMES WHEN...

Страница 18: ...our scooters 4 Turn on the scooter and check whether it is normally operated 17 Packaging We package the mobility scooter may prevent it from removing in the package shaking in the package or any scra...

Страница 19: ...n 20 C 45 C temperature and humidity less than 93 no congeal or corrosive air with good ventilation 18 Transportation Your scooter may be disassembled quickly and simply for transportation 1 Switch of...

Страница 20: ...al Be sure to remember to allow enough clearance when turning corners so that the rear wheels clear any obstacle 5 Shortcutting a pavement corner can cause the back wheel to go off the pavement causin...

Страница 21: ...e control lever Photo 12 3 Remember to keep both of your hands on the handlebars whilst the scooter is braking Release the control lever will stop your scooter in seconds 20 15minutes the scooter will...

Страница 22: ...when safe to do so drive across without stopping Note Heavier users will require higher speed settings 21 Note Automatic braking is not instantaneous and will engage within 1 2 a wheel turn once the...

Страница 23: ...c systems If mobile phones or mobile radios are required to be used the vehicle must be brought to a halt and the power turned off before any such device is used Tires Your scooter has solid tires all...

Страница 24: ...eater the distance you can travel Batteries Your scooter is fitted with batteries that require no maintenance other than regular charging If a battery is physically damaged please use extreme caution...

Страница 25: ...e day 3 Do not interrupt the charging cycle 4 If your mobility device is not required for use it should remain on charge This will not damage the batteries so long as the mains socket plug is left swi...

Страница 26: ...Consumption Theoretical Range The range figures stated should be seen as a theoretical maximum and could be reduced if any single or combination of the following circumstances occur 1 User weight hea...

Страница 27: ...to the person or both DO NOT use an escalator to move the mobility scooter between floors as serious bodily injury could arise from such actions DO NOT drive on the road dual carriageways or motorways...

Страница 28: ...eriously impaired If you have any doubts about medical conditions health problems or treatments that may affect your ability to operate the mobility scooter safely please consult your healthcare profe...

Страница 29: ...D or REVERSE motion the scooter will ROLLBACK approximately 30cms 1ft before the brake engages DO NOT under any circumstances disconnect cut extend or otherwise modify ANY of the wiring harnesses inst...

Страница 30: ...dations 29 Electric Wheelchairs The test provides the scooter user or their attendant sufficient time to remove the mobility scooter from a rain storm whilst retaining normal operation of the mobility...

Страница 31: ...nity level The higher the immunity level the greater the protection Current technology offers useful protection of at least 20 V m which provides protection from the more common sources of radiated EM...

Страница 32: ...te hand held transceivers such as CB radio or turn ON cellular phones whilst your mobility scooter is turned ON 2 Be aware of nearby radio or television transmitters and try to avoid coming too close...

Страница 33: ...000S 3 2 Class A Voltage fluctuation flicker emissions IEC 61000S 3 3 complies OWNER S MANUAL 33 Compact Scooter Warnings This device or system should be kept away from other equipment If they must be...

Страница 34: ...power quality should be that of a typical commercial or hospital environment OWNER S MANUAL 34 Compact Scooter Guidance and manufacturer s declaration electromagnetic emission Limosa scooter is inten...

Страница 35: ...t IEC 60601 test level Complian ce level electromagnetic environment guidanc e OWNER S MANUAL 35 Compact Scooter Voltage dips short interruptions and voltage variations on power supply input lines IEC...

Страница 36: ...ence may occur in the vicinity of the equipment marked with the following symbol OWNER S MANUAL 36 Compact Scooter Conducted RF IEC 61000S 4 6 Radiated RF IEC 61000S 4 3 3 Vrms 150 kHz to 80 MHz 3 V m...

Страница 37: ...ansmitter m 150 kHz 80 MHz d P 2 1 80 MHz 800 MHz d P 2 1 800 MHz 2 5 GHz d P 3 2 0 01 0 12 0 12 0 23 0 1 0 38 0 38 0 73 1 1 2 1 2 2 3 10 3 8 3 8 7 3 OWNER S MANUAL 37 Compact Scooter NOTE 1 At 80MHz...

Страница 38: ...gation is affected by absorption and reflection from structures objects and people OWNER S MANUAL 38 Compact Scooter For transmitters rated at a maximum output power not listed above the recommended s...

Страница 39: ...flammable gas conditions classify by the safety degree Not AP APG According to the operation pattern classification continuous operation volts of the mobility scooter power 24VDC 2 units Type of powe...

Страница 40: ...nd connectors for chafing and wear Battery terminals 17 Routine Maintenance OWNER S MANUAL 40 Compact Scooter 17 Routine Maintenance The following table gives an indication as to when routine maintena...

Страница 41: ...ng LED Wheels Note Wheels should only be removed and refitted by an authorized dealer OWNER S MANUAL 41 Compact Scooter Clean and protect with petroleum jelly Ensure parking brake where fitted is corr...

Страница 42: ...Bearings Levels Wheel nuts Connection s Test run 18 Service History OWNER S MANUAL 42 Compact Scooter 18 Service History This section is designed to assist you in keeping a record of any service and r...

Страница 43: ...d Dealer stamp Date Signed Dealer stamp Date Signed Dealer stamp Date Signed OWNER S MANUAL 43 Compact Scooter Discharge test Forwards Reverse Left turn Right turn List items repaired adjusted Over ob...

Страница 44: ...is not switched on with key Ensure the key is switched on 19 Trouble Shooting Guide OWNER S MANUAL 44 Compact Scooter 19 Troubleshooting Guide SYMPTOM Shortened range Battery pack not charging or bat...

Страница 45: ...overloading or climbing Decrease speed while climbing Check battery connection OWNER S MANUAL 45 Compact Scooter Motor runs irregularly and or noisily Battery pack not engaged properly Charger plugged...

Страница 46: ...nner issues in the controller Check all the connection and wirings 10 Pushing Slipping issues The speed of pushing or slipping is over limited Switch off and on the controller OWNER S MANUAL 46 Compac...

Страница 47: ...bject to it remaining within that ownership then the part or parts will be repaired or replaced completely free of charge if returned to the authorized service agent Note This guarantee is not transfe...

Страница 48: ...Agent s address and telephone number in the space provided In the event of a breakdown contact them and try to give all relevant details so they can help you quickly The scooter shown and described i...

Отзывы: