background image

Page 14

Installing the Wall Mount

Setup of your VFC400-WiFi is complete.

Attach the Wall Mount Bracket on the side of your refrigerator or 
freezer, preferably at eye-level with the adhesive strip provided with 
the Wall Mount.

Before sticking on the Wall Mount, make sure the sensor cable and 
the USB cable from the VFC400-WiFi can both reach the device 
comfortably without obstruction or at risk of being accidentally 
disconnected if knocked.

Insert the VFC400-WiFi into the Wall Mount, connect the USB and 
sensor cables.

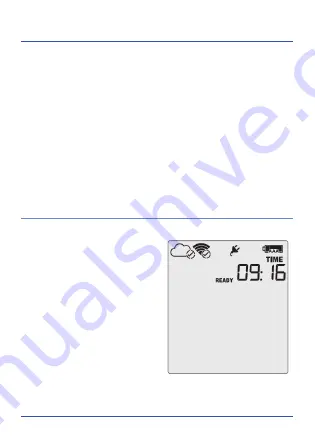
The display should show the 
word “

READY

” as seen in the 

image (right).

Note:

 both the cloud and WiFi 

symbols are showing in the top 
left with a tick in each to confirm 
successful setup of the device.

Содержание VFC400-WiFi

Страница 1: ...Quickstart Guide Version A www vfcdataloggers com...

Страница 2: ...ons VTMC 5 Configuring your VFC400 WiFi 6 Downloading the Connection Wizard 7 Running the Connection Wizard 8 Connecting to your WiFi Network 9 LogTag Online 12 Creating a Location 13 Installing the W...

Страница 3: ...u have each of the items shown below before continuing with setting up your VFC400 WiFi VFC400 WiFi USB Cable Installation Mounting Kit Wall mount bracket Included External Probe AC Adaptor 2x AAA Bat...

Страница 4: ...ided in the product Take note of the direction each battery must be installed 3 Once both batteries are securely installed replace the battery cover and secure via the screw provided AAA batteries is...

Страница 5: ...3 Follow the on screen prompts to install Control Solutions VTMC 4 Click Finish to exit the VTMC Setup Warning Please ensure no other LogTag software is currently running on your computer before runni...

Страница 6: ...seal 1 Open Control Solutions VTMC 2 Click Configure from the LogTag menu or click the Wizard icon 3 Adjust your logger configuration settings as required For more information on configuration setting...

Страница 7: ...www vfcdataloggers com content Software connectionwizard exe Connect your VFC400 WiFi to your computer via the USB cable provided The USB socket on the device is located on the bottom protected by a r...

Страница 8: ...lick the link below or alternatively open your browser type the following link into the address bar and follow the on screen instructions https logtagonline com signup or click Create a LogTag Online...

Страница 9: ...an doesn t find any devices double check the device is plugged in to your computer with the USB cable provided and click Scan Again As soon as a device has been identified it will appear in the table...

Страница 10: ...sensitive 3 Optional Once you have typed your password you can click the eye icon to reveal the password Incorrectly typed passwords is one of the most frequent reasons why device setup fails 4 Once y...

Страница 11: ...10 seconds The Connection Wizard is now checking that the VFC400 WiFi can connect to your WiFi network and to LogTag Online 1 Once the Wizard displays Connection Succeeded click Next to complete the...

Страница 12: ...that stores the data recorded from your logger against your account Signing in to your LogTag Online Account Open your browser and navigate to https logtagonline com 1 Type your Email and Password 2 T...

Страница 13: ...erver you will need to create a Location to the VFC400 WiFi For more information on completing the fields or to edit delete Location please refer to the LogTag Online user guide Tip You can pin unpin...

Страница 14: ...nt make sure the sensor cable and the USB cable from the VFC400 WiFi can both reach the device comfortably without obstruction or at risk of being accidentally disconnected if knocked Insert the VFC40...

Страница 15: ...Y Release the button once READY disappears The VFC400 WiFi now records temperature data The Logger will not start if you Release the button before READY disappears Keep holding the button for more tha...

Отзывы: