background image

GB

12

Pr

epar

ation

35..

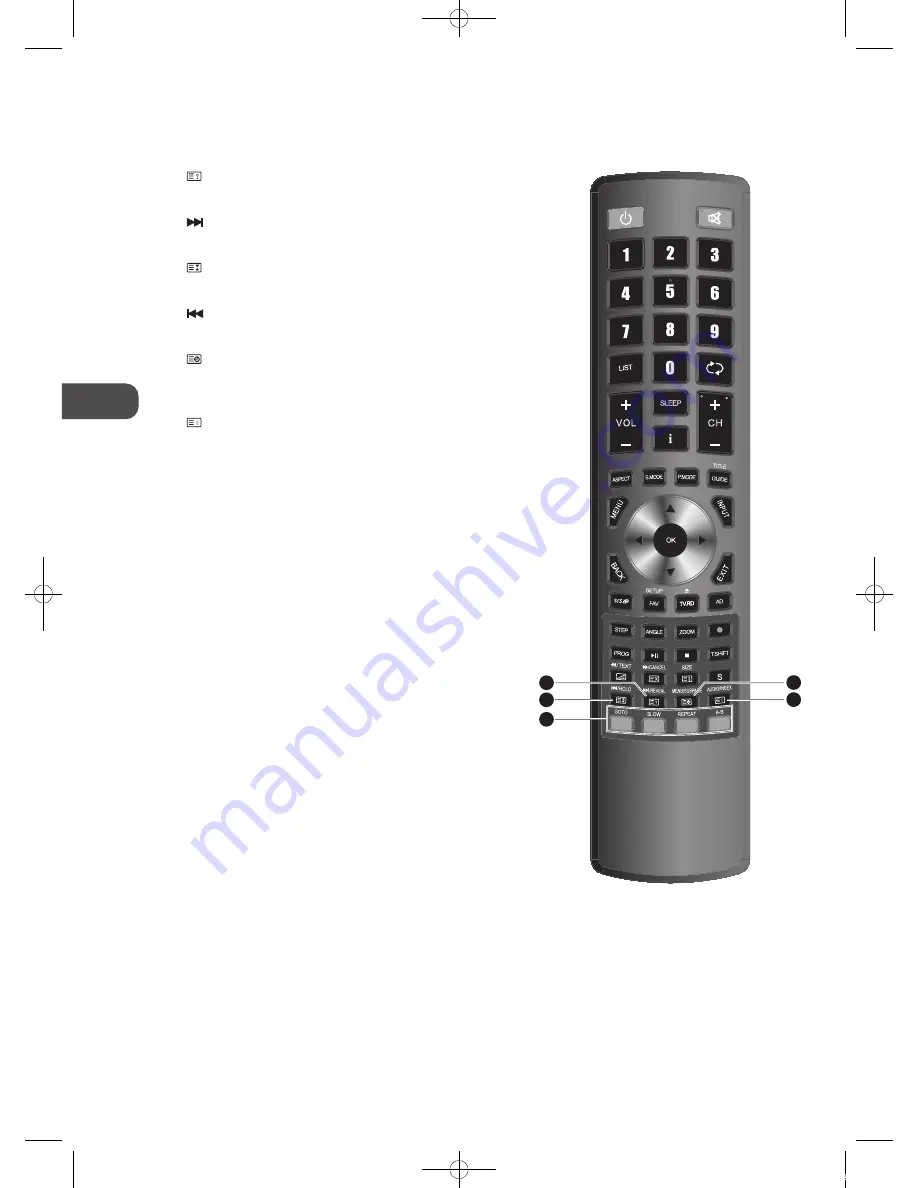
.REVEAL

Reveals hidden information such as the answer to a quiz 

in teletext. (ATV mode).

.

To skip to the beginning of the next chapter / track / 

photo. (DVD / Media mode)

36..

.HOLD

Freezes a multi-page passage on screen in teletext. (ATV 

mode)

.

To skip to the beginning of the previous chapter / track / 

photo. (DVD / Media mode)

37..

.SUBPAGE

Displays the subpage on the teletext screen. (ATV mode)

.

MENU

Display the DVD menu. (DVD mode)

38..

.INDEX

To select the page number of the index from teletext. 

(ATV mode)

.

AUDIO

•  Switches between the audio languages (only 

applicable when the TV programme / disc has this 

features.) (DTV / DVD mode)

•  Select stereo / Dual Sound Reception. (ATV mode)

39..Coloured.buttons

Access the TELETEXT items or channel edit when using 

Digital / Freeview TV Channels. (ATV / DTV mode)

.

GOTO.(RED)

To skip to a specific location on a DVD / CD. (DVD mode)

.

SLOW.(GREEN)

Play video slow. (DVD mode)

.

REPEAT.(YELLOW)

Select between different repeat modes. (DVD mode)

.

A–B.(BLUE)

Repeat a segment between A and B. (DVD mode)

38

37

36
39

35

L32DLCD11_IB_110607.indd   12

11年6月7日   下午3:12

Содержание L32DLCD11

Страница 1: ...32 HD Ready 1080p Digital LCD TV with DVD Player Instruction Manual L32DLCD11 L32DLCD11_IB_110607 indd 1 11年6月7日 下午3 12 ...

Страница 2: ...L32DLCD11_IB_110607 indd 2 11年6月7日 下午3 12 ...

Страница 3: ...nt 19 Using the Features 20 Customising the Channel Setting TV DTV or Radio Mode 20 Auto Tuning ATV DTV mode 20 ATV Manual Tuning ATV mode 21 DTV Manual Tuning DTV mode 21 Channel Edit ATV Mode 22 Channel Edit DTV Mode 23 Signal Information DTV Mode 24 CI Common Interface DTV Mode 24 Software Update Over Air Download DTV mode 25 Software Update USB 26 Customising the Picture Setting 26 Customising...

Страница 4: ...laying the DVD 54 Menu Playback for DVD 54 Stopping Playback 54 Previous Next for DVD CD Multimedia discs 54 Forward Backward for DVD CD Multimedia discs 54 Pause for DVD CD Multimedia discs 54 Repeat for DVD CD Multimedia discs 54 Info for DVD CD Multimedia discs 55 PROG for DVD CD Multimedia discs 55 Angle for DVD 55 Step for DVD 55 Zoom for DVD 55 Goto for DVD 55 Audio for DVD CD 56 Repeat A B ...

Страница 5: ...r purchasing your new Logik 32 HD Ready 1080p Digital LCD TV with DVD Player Your new TV has many features and incorporates the latest technology to enhance your viewing experience We recommend that you spend some time reading this instruction manual in order that you fully understand these features You will also find some hints and tips to help you resolve any issues Read all the safety instructi...

Страница 6: ...th the back side facing up Please make sure to place a soft cushioned material such as a pillow or thick piece of foam beneath the screen TV Front Base Stand Front screw unscrew Installing Removing the Base Stand Screws x 3 P N xxxxxxxxxxx Screw A x 6 P N I 03 TP4016A01 400 mm 200 mm Four mounting holes size M5 screw Please read this instruction manual carefully while setting up your TV If you req...

Страница 7: ...hoto DVD mode 5 Press to start playback or pause DVD mode 6 Press to eject disc DVD mode 7 VOL Adjusts the volume Press to select and adjust a setting in the OSD menu 8 CH Press to select a channel or select a sub menu from the OSD menu 9 MENU Displays the OSD on screen display menu 10 SOURCE Press to select among different input signal sources DTV ATV DVD AV1 AV2 SCART YPBPR HDMI1 HDMI2 HDMI3 PC ...

Страница 8: ...cess Module Refer to page 24 for details 7 SCART To connect to a VCR DVD Player or other AV device with a SCART output socket 8 COAXIAL To connect to the audio socket on the digital standard 5 1 audio system 9 Y PB PR AUDIO L R To connect to a DVD player Digital Set Top Box or other AV devices with component YPbPr video and audio output sockets 10 AV1 VIDEO AUDIO L R To connect to the Composite VI...

Страница 9: ...type indicated in this manual When the batteries are exhausted the remote will not function Replace both batteries at the same time with new ones Do not install new batteries with used ones and do not mix different types of batteries Do not dispose of used batteries as domestic waste Dispose of them in accordance with local regulations Handling the Remote Control Take care of your fingernails when...

Страница 10: ...S MODE Select sound mode Standard Music Movie Sports Personal 11 ASPECT Allows you to watch the screens in various formats Auto 4 3 16 9 Zoom Smart Zoom Dot to Dot Subtitle Dot to Dot only operates in YPBPR HDMI mode 12 GUIDE Displays the EPG Electronic Programme Guide DTV mode TITLE Displays the DVD title content DVD mode 13 P MODE Select picture mode Dynamic Standard Mild Personal 14 MENU Displa...

Страница 11: ...isplayed frame DVD mode 26 REC Record the current programme DTV mode 27 To start the timeshift playback DTV mode To start playback or pause Media DVD mode 28 PROG Programme the DVD DVD mode 29 Stop To stop the playback or recording DVD Media mode 30 T SHIFT Start the time shift function DTV mode 31 TEXT Turns on and off the teletext function ATV DTV mode To reverse playback rapidly DVD Media mode ...

Страница 12: ...ode 38 INDEX To select the page number of the index from teletext ATV mode AUDIO Switches between the audio languages only applicable when the TV programme disc has this features DTV DVD mode Select stereo Dual Sound Reception ATV mode 39 Coloured buttons Access the TELETEXT items or channel edit when using Digital Freeview TV Channels ATV DTV mode GOTO RED To skip to a specific location on a DVD ...

Страница 13: ...front right side of the TV or the button on the remote control to turn on your TV 4 Press the SOURCE button at the front right side of the TV or the INPUT button on the remote control to display the Source List Use the buttons to select HDMI1 or HDMI2 or HDMI3 and then press the OK button to confirm Making Video and Audio Connections Not all AV devices have the ability to connect to a TV please re...

Страница 14: ...dio output socket 2 Plug the connected devices into the mains socket before switching on the POWER ON OFF switch which is located at the rear of the TV next to the mains cable 3 Press the I button at the front right side of the TV or the button on the remote control to turn on your TV 4 Press the SOURCE button at the front right side of the TV or the INPUT button on the remote control to display t...

Страница 15: ... Cable 1 Use a SCART cable to connect the TV s SCART input socket to an external AV device s SCART output socket 2 Plug the connected devices into the mains socket before switching on the POWER ON OFF switch which is located at the rear of the TV next to the mains cable 3 Press the I button at the front right side of the TV or the button on the remote control to turn on your TV 4 The TV will chang...

Страница 16: ...the remote control to display the Source List Use the buttons to select any desired input source and then press the OK button to confirm Connecting Earphones Connect your earphones to the TV s socket Before putting on earphones turn the volume down then put the earphones on and slowly increase the volume until you reach a comfortable listening level Rear View of TV HDMI1 HDMI3 COMPONENT AV1 IN HDM...

Страница 17: ...ins supply until you have completed all the connections If a hard disk is used make sure its mains adapter is connected to the mains supply If a USB hub is used make sure its mains adapter is connected to the mains supply as the total current consumption may exceed 500mA The maximum supported storage space of the hard disk is 1 TB The file system only supports FAT32 format If you want to store the...

Страница 18: ...t the mains cable to the mains socket after you have completed all the connections 2 Switch on the POWER ON OFF switch which is located at the rear of the TV next to the mains cable At this stage the TV switches to standby mode The red LED indicator will illuminate on the front panel of the TV 3 In standby mode press the I button at the front right side of the TV or the button on the remote contro...

Страница 19: ...password screen will be displayed Press the 0 9 buttons to enter the password the channel will then be unlocked refer to page 22 23 for details on Channel Edit Press the FAV button to view the Favourite List Then use the buttons to highlight and select the channel Press the OK button to view the selected channel refer to page 22 23 for details on Channel Edit Press the button to return to the prev...

Страница 20: ... buttons to select the country where you will operate the TV Press the OK button to confirm 2 Press the buttons to select Auto Tuning and then press the OK button Customising the Channel Setting TV DTV or Radio Mode Auto Tuning ATV DTV mode Use this to automatically find and store all available channels This is normally recommended if some channels have been added or removed by the broadcaster or ...

Страница 21: ... menu DTV Manual Tuning DTV mode Allows you to make manual fine tuning adjustments of the channel under DTV mode 1 Press the MENU button and then press the buttons to select the CHANNEL menu and then press the OK button 2 Press the buttons to select ATV Manual Tuning and then press the OK button ATV Manual Tuning ATV mode Allows you to make manual fine tuning adjustments if the channel reception i...

Страница 22: ...e buttons to select Channel Edit and then press the OK button 3 A Channel Edit screen will pop up Press the buttons to select the programme you want to edit a Delete Press the RED button to delete the selected channel b Rename Press the GREEN button to rename the selected channel Press the buttons to select the characters to represent the station name Press the buttons to move to the next characte...

Страница 23: ... Press the BLUE button to select the channels that you want to skip when you are selecting channels Press the BLUE button again to undo it e FAV Favourite Press the FAV button to set the selected channel as one of the favourite programmes Press the FAV button again to undo it 4 Press the MENU button to return back to the main menu 5 Press the EXIT button to exit the menu Channel Edit DTV Mode Allo...

Страница 24: ...move the Common Access Module ensure that the TV is switched off 2 Pull the Common Access Module from the slot 3 Switch the TV on CI Common Interface DTV Mode The common interface allows the use of a Common Access Module to enable you to view scrambled pay to view services These services are provided by TopUp TV UK only and others The Common Access Module and viewing card can be obtained from the ...

Страница 25: ...s Main menu Press OK to select Press EXIT to quit CI Information Smart Card Information Language Software Download Module Information This screen is for illustration only 2 Press the buttons to select Software Update OAD and then press the OK button to select On 3 Press the BACK button to return to the previous menu or press the MENU button to return back to the main menu 4 Press the EXIT button t...

Страница 26: ...ate OAD 66 If you experience difficulties after the software update we recommend that you restore your TV to the factory default settings To do this follow the steps below 1 Press the MENU button to go to the MAIN menu Press the buttons to select OPTION and then press the OK button 2 Press the buttons to select Restore Factory Default and then press the OK button Press the button to select Yes to ...

Страница 27: ...r components independently to achieve a warm or cool for Personal mode Cold Increases blue tint Normal Warm Increases red tint Noise Reduction Press the buttons to select to reduce the noise level of the connected device Off Low Middle High and then press the OK button to confirm Screen Press the buttons to adjust the PC desktop content and then press the OK button to confirm PC mode only Auto Adj...

Страница 28: ... listening experience unlike any other technology that has been offered for a two speaker playback environment TruSurround HD builds upon its predecessor the industry leading surround sound virtualiser SRS TruSurround XT Not only does TruSurround HD process up to 6 1 channels for playback over two speakers or headphones but it also utilises additional proprietary algorithms from SRS Labs to optimi...

Страница 29: ...cast language to the loudspeakers DUAL I II Sends the primary and secondary broadcast languages to the loudspeakers Speaker Sound Output Selection DTV Mode While watching a DTV programme you can press the AUDIO button to display the audio language list only applicable when the TV programme has this feature Press the buttons to select an audio language or audio format if available and then press th...

Страница 30: ... 2 To cancel the sleep time press the SLEEP button repeatedly until Off appears Sleep Timer Off 10min 20min 30min 60min 90min BACK MENU EXIT Auto Standby The unit will automatically switch to standby mode 4 hours after the last time the remote control was used A reminder screen will pop up and count down before the unit switches to standby mode If you want to operate the TV for a long period of ti...

Страница 31: ...English West English 3 Press the buttons to navigate the menu and change the settings Press the OK button to confirm and return to the previous menu 4 Press the EXIT button to exit the menu TT Language Allows you to select your preferred Teletext language 1 Press the MENU button and then press the buttons to select the OPTION menu and then press the OK button CHANNEL PICTURE SOUND TIME OPTION LOCK...

Страница 32: ... the buttons to select Audio Language and then press the OK button Audio Language DTV Mode Allows you to select your desired audio language Available for digital channels if multiple audio languages are broadcast 1 Press the MENU button and then press the buttons to select the OPTION menu and then press the OK button CHANNEL PICTURE SOUND TIME OPTION LOCK EXIT Hearing Impaired Aspect Ratio Blue Sc...

Страница 33: ...exit the menu 2 Press the buttons to select Hearing Impaired and then press the OK button to select On Off and return to the previous menu 3 Press the EXIT button to exit the menu Hearing Impaired Allows you to show more information in subtitles for the hearing impaired in some programmes for DTV channels only if available 1 Press the MENU button and then press the buttons to select the OPTION men...

Страница 34: ...type between FAT32 and Hi Speed FS If you select Hi Speed FS press the button and then press the buttons to select your preferred file size Press the OK button to confirm and then press the button to start formatting This may take awhile depending on the size of your USB storage device Warning All data will be lost Start Exit Format disk Format disk File System Size PVR File System Type PVR File S...

Страница 35: ... alteration while filling the entire screen However the top and bottom of the picture will be cropped This selection will allow you to zoom in the picture without any alteration while the 4 sides of the picture will be cropped Smart Zoom This selection is similar to 16 9 mode but the picture slightly stretches vertically and clips off a little from the top and bottom This selection is similar to 1...

Страница 36: ...h English West English CHANNEL PICTURE SOUND TIME OPTION LOCK EXIT Backlight Allows you to adjust the backlight setting of your TV This controls the brightness and display performance of the screen 1 Press the MENU button and then press the buttons to select the OPTION menu and then press the OK button Hearing Impaired Aspect Ratio Blue Screen HDMI CEC Restore Factory Default OSD Language Audio La...

Страница 37: ...spect Ratio Blue Screen HDMI CEC Restore Factory Default OSD Language Audio Language TT Language PVR File System Subtitle Language Off Auto On Back Light 8 English English West English This unit can only communicate with HDMI CEC compatible devices To be sure that the HDMI CEC device has this feature check to see if there is HDMI CEC compatible logo on it Auto Turn Off HDMI CEC Device Menu Off Off...

Страница 38: ... the LOCK menu you must enter the password Enter the default password 0000 for first time use To change the password please refer to page 39 Set Password Lock System The Lock System is designed to prevent accidental retuning of the TV losing channels and prevent children watching unsuitable programmes The Lock System must be set to On for this function to operate If the Lock System is set to On a ...

Страница 39: ... forget the new password press the master password 8899 2 Press the buttons to select Set Password and then press the OK button Lock System Set Password Block Channel Parental Guidance Off Key Lock Off Off Set Password 1 Press the MENU button and then press the buttons to select the LOCK menu and then press the OK button CHANNEL PICTURE SOUND TIME OPTION LOCK EXIT 3 Use the 0 9 buttons to input th...

Страница 40: ...password be sure to remember the new password If you forget the new password press the master password 8899 Lock System Set Password Block Channel Parental Guidance Off Key Lock Off Off 5 A Block Channel screen will pop up Press the buttons to select a channel Press the GREEN button on the remote control to lock or unlock the channel Press the GREEN button again to unblock 6 Press the BACK button ...

Страница 41: ...ss the buttons to select Lock System and then press the OK button 5 Press the buttons to select an age rating Off 4 18 Then press the OK button to confirm to return to the previous menu 6 Press the EXIT button to exit the menu 4 Press the buttons to select Parental Guidance and then press the OK button Lock System Set Password Block Channel Parental Guidance Off Key Lock Off Off Parental Guidance ...

Страница 42: ... 3 Use the 0 9 buttons to input a 4 digit password to enter the LOCK menu and then press the OK button to turn the Lock System On Please enter password The default password is 0000 If you change the password be sure to remember the new password If you forget the new password press the master password 8899 Key Lock Key Locked is designed to prevent children from pressing the buttons on the TV The L...

Страница 43: ... a TV programme press the TEXT button twice The text will be superimposed over the TV programme Double height text If you have difficulty reading the text on the TV you can double the height of the text Press the SIZE button The top half of the page will be displayed in double height text Press the SIZE button again The bottom half of the page will be displayed in double height text Press the SIZE...

Страница 44: ...u navigate through all the possible viewing options The EPG supplies information such as programme listings start and end times for all available services In addition detailed information about the programme is often available in the EPG the availability and amount of programme information will vary depending on the particular broadcaster This function can be used only when the EPG information is ...

Страница 45: ...nd Press the BLUE button while on the selected programme the Reminder setting menu will be displayed Press the buttons to adjust the settings and then press the OK button to confirm the settings After confirmation the Schedule list will then be displayed with your preset reminders shown Press the GREEN button to return to the EPG The TV will automatically tune to the selected programme when it sta...

Страница 46: ...MEDIA mode and then press the OK button to display the functions bar 2 Press the buttons to select MUSIC and then press the OK button 3 Press the buttons to select your storage device and then press the OK button Photo 1 Press the SOURCE button at the front right side of the TV or the INPUT button on the remote control then press the buttons to select the MEDIA mode and then press the OK button to...

Страница 47: ...ss the OK button Some audio file formats will not be supported Supported file formats MPEG1 2 5 Select the music you want to play it will show the music information Album Title Bit Rate Artist Sampling Year Size 6 Press the buttons and then press the OK button to select the function Pause FB FF Prev Next Stop Repeat All Playlist Goto Time 7 Press the EXIT button to return back to the previous menu...

Страница 48: ...ice and then press the OK button Text 1 Press the SOURCE button at the front right side of the TV or the INPUT button on the remote control then press the buttons to select the MEDIA mode and then press the OK button to display the root menu 2 Press the buttons to select TEXT and then press the OK button If this folder also contains music file You can select a music rack to play at the same time w...

Страница 49: ...rent live broadcast press the button and then press the button to confirm Time Shift Mode and Recording functions may not work if the signal strength is weak Stop the time shift function before switching to another input source PVR Personal Video Recorder The PVR Time Shift Progress Bar 1 Indicates the status of the currently displayed video 2 Indicates the time lagging behind the live broadcast D...

Страница 50: ...ess the GUIDE button on the remote control The EPG menu will appear 10 00 11 00 Pinky and perky Frankenstei No information 2 BBC TWO My Fair Lady 7 BBC THREE This is BBC THREE 70 CBBC Channel Bear Behaving Badly Shaun the No information 80 BBC NEWS BBC News Our World Stormchaser 105 BBC Red Button BBC Red Button PROGRAMME GUDIE 1 BBC ONE 25 Dec 2008 10 06 10 00 10 15 Pinky and Perky 25 Dec 1 BBC O...

Страница 51: ...00 Schedule List 15 30 10th Mar Delete Time Date Programme Title Channel Name Back 4 Press the buttons to select the MY PVR folder and then press the OK button Press the buttons to navigate in the MY PVR folder Select your recorded programme and then press the OK button to view 3 Press the buttons to select your storage device and then press the OK button Play Recorded Programme You can play a rec...

Страница 52: ...ion bar 6 Press the buttons and then press the OK button to select the function Pause FB FF Prev Next Stop Repeat All Set A Playlist Info 7 Press the EXIT button or the Stop button to stop the current playback and to return back to the previous menu L32DLCD11_IB_110607 indd 52 11年6月7日 下午3 14 ...

Страница 53: ... or JPEG files DVD R AUDIO VIDEO JPEG CD R CD Recordable Audio Video format or JPEG files AUDIO VIDEO JPEG CD RW CD Rewritable Audio Video format or JPEG files AUDIO VIDEO JPEG AUDIO CD Compact Disc Digital Audio AUDIO Supported Formats JPEG The file extensions has to be jpg and not jpeg Pictures encoding must comply with JPEG ISO format This DVD player can only display DCF standard still pictures...

Страница 54: ...n will stop the playback If the current track is the last one pressing the button will stop the playback The sound will be off during Forward or Backward For DVD discs the above functions may very due to different DVD disc s structure Forward Backward for DVD CD Multimedia discs There are 4 speeds for forward Press the button to toggle between the different forward options in sequence FORWARD x 2 ...

Страница 55: ...ly to select the different angle you want Only for the dics has this characture Step for DVD Allows you to watch program in datails of every frame Press the STEP button repeatly to watch every frame Press the button to exit the step mode Zoom for DVD Allows you to select the video size of programme stream Press the ZOOM button to select the size you want Goto for DVD This function allows you to pl...

Страница 56: ...into Music Picture Video folders 1 Press the buttons to navigate through the folders and files 2 Press the 0 9 buttons to select the contents directly for example to select track 23 press the LIST button twice followed by 3 3 When playing or pausing with picture playback you may use the buttons to flip rotate the picture Audio for DVD CD Press the AUDIO button to toggle between different audio mod...

Страница 57: ...ts and this is the default setting SCREEN SAVER When the player stops or the picture becomes motionless for a couple of minutes there will be a screen saver to prevent damage to the display screen ON To activate screen saver OFF To disable screen saver TV TYPE 4 3 Pan Scan Widescreen picture shown in the full screen with some part cut 4 3 Letter box Widescreen picture shown in the full screen with...

Страница 58: ... the correct password DEFAULT DEFAULT To restore all setup parameters to the factory settings EXCEPT the password This function is available in stop state or when the tray is opened If you forget your DVD password please enter the master password 2009 This function is available only when the discs have ratings encoded on them Using the DVD Language Setup Page In the DVD mode press the DVD SETUP bu...

Страница 59: ...efault language is English Using the DVD Audio Setup Page In the DVD mode press the DVD SETUP button on the remote control Press the buttons to select the Audio Setup menu and the buttons to select the menu options Press the DVD Setup button to exit the menu Option Description TONE Adjust the tone setting In Setup mode the disc playback function will not be available L32DLCD11_IB_110607 indd 59 11...

Страница 60: ...lby Digital Setup Page In the DVD mode press the DVD SETUP button on the remote control Press the buttons to select the Digital Setup menu and the buttons to select the menu options Press the DVD Setup button to exit the menu Option Description DYNAMIC RANGE When the dynamic range is set to FULL the audio level during quiet and loud parts of the movie will be automatically adjusted DUAL MONO STERE...

Страница 61: ...ry cloth Do not use any type of solvent such as thinner benzine commercially available cleaners or antistatic spray They may damage the disc Storing Discs Do not store discs in places subjected to direct sunlight or near heat sources Do not store discs in places subjected to moisture and dust such as a bathroom or near a humidifier Storing discs vertically in a case stacking discs or placing objec...

Страница 62: ...t your service centre if the picture has not appeared after five minutes No or poor colour or poor picture Adjust the settings in the PICTURE menu Try another channel The problem may be caused by the broadcaster Check if the video cables are connected properly Horizontal Vertical bar or picture shaking Check for local interference such as an electrical appliance or power tool Poor reception on som...

Страница 63: ...u may need to get your aerial checked Talk to your retailer or contact your local aerial installer Why do I get blocking on my digital picture In most cases blocking is caused by a reception problem either the signal is too weak or there is some kind of interference Talk to your retailer or contact your local aerial installer Blocking can also be caused by a digital signal that is too strong If yo...

Страница 64: ... 576 50 576P 720 x 576 720P 1280 x 720 50 60 1080I 1920 x 1080 50 60 1080P 1920 x 1080 50 60 PC Mode Please check the display settings of your computer before connecting to the TV If the display setting of your computer does not match the TV there may be no video Resolution Vertical Frequency Hz Aspect Ratio 640 x 480 60 4 3 16 9 72 75 800 x 600 60 72 75 1024 x 768 60 70 75 1360 x 768 60 1920 x 10...

Страница 65: ...430 cd m2 Contrast Ratio 2500 5000 1 Inputs Output SCART 1 HDMI 3 VGA 1 PC AUDIO 1 YPbPr 1 Common Interface 1 AV 2 USB 1 Output 5V 500mA AUDIO IN RCA 1 L R COAXIAL 1 RF 75 Ω 1 Speaker Power 6 W 6 W Earphone 3 5mm 1 Power Source 100 240V 50 60Hz Dimension W x D x H with base 797 x 209 x 582 mm Weight Net 17 kg Features and specifications are subject to change without notice Specifications L32DLCD11...

Страница 66: ...or moving the unit Unplug the unit from the mains socket during a lightning storm Mains Cable Make sure the unit or unit stand is not resting on top of the mains cable as the weight of the unit may damage the mains cable and create a safety hazard If the mains cable is damaged it must be replaced by the manufacturer its service agent or similarly qualified persons in order to avoid a hazard Interf...

Страница 67: ...this could result in a fatal electric shock DVD Class 1 Laser Product This unit utilises a laser Use of controls adjustments or performance of procedures other than those specified herein may result in hazardous radiation exposure Before moving the unit ensure the disc tray is empty Always remove the disc when the unit is not in use Failure to do so will risk severely damaging the disc and the uni...

Страница 68: ...n Reverse engineering and disassembly are prohibited Restriction on Use Rovi Trade Mark Rights Use of the copyright protection technology contained in this product must be authorised by Rovi Corporation and is intended for home and other limited viewing uses only unless otherwise authorised by Rovi Corporation The names Rovi Corporation and Macrovision are protected by trademarks HDMI the HDMI log...

Страница 69: ...L32DLCD11_IB_110607 indd 69 11年6月7日 下午3 14 ...

Страница 70: ...L32DLCD11_IB_110607 indd 70 11年6月7日 下午3 14 ...

Страница 71: ...L32DLCD11_IB_110607 indd 71 11年6月7日 下午3 14 ...

Страница 72: ...L32DLCD11_IB_110607 indd 72 11年6月7日 下午3 14 ...

Отзывы: