background image


12 

4.3.3  Enable and disable keylock 

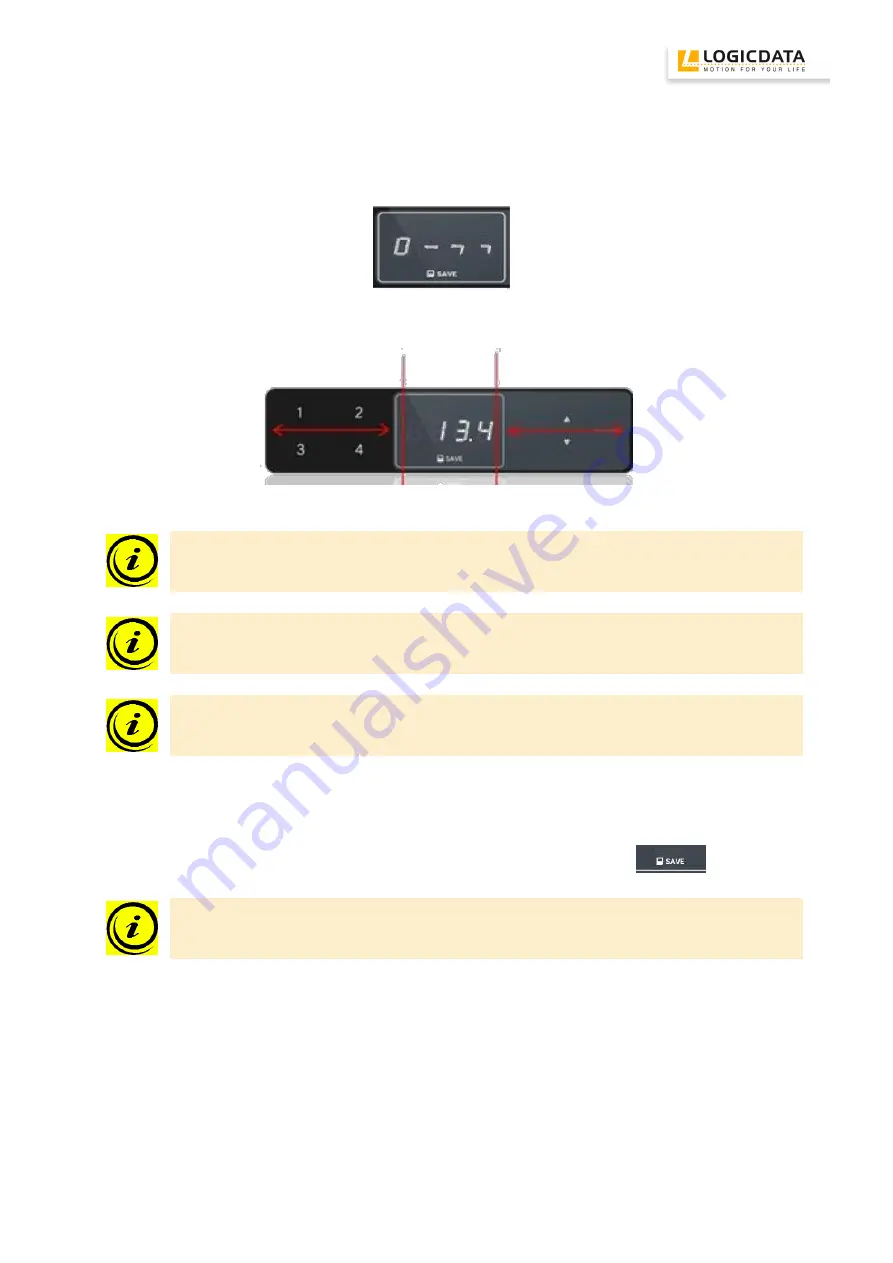
The keylock can be enabled and disabled by swiping the screen. After enabling the keylock a key will be 
shown on the display. 


Figure 12: The key indicates that the keylock is enabled 


Figure 13: Activating and deactivating the keylock can be done by swiping left or right underneath the display 


Note:

 the direction of movement is not relevant (see Figure 13) 


Note:

 you have to swipe the screen gently without pressing a button while swiping. 


Note:

 the display must be active during activation or deactivation of the keylock (e.g. showing 

the current height). To activate the display, press one key shortly (e.g. desktop up button). 

4.3.4  Menu function 

By pressing the 

memory


position key 1

 and 

2

 and the 

desk upwards


key

 at the same time for more 

approx. 5 seconds you will enter the menu. After you  release the keys, the display will show

  S  and  a 

number

, e.g. 

S 5

. To select a menu option you have to press the 

Memory key


Note:

 The available menu options  depend on the parameters of the control unit. For more 

information about menus please read the user manual of the control unit.


Содержание TOUCHdown LOGIC office

Страница 1: ...User Manual Cable Handswitch for installation below the desktop Document Rev1 LOGIC office...

Страница 2: ...2 Information regarding the user interface panel 8 4 Functions 9 4 1 Display 9 4 2 Basic Functions 9 4 3 Advanced Functions 10 4 3 1 Storing a position 10 4 3 2 Recalling a saved position 11 4 3 3 En...

Страница 3: ...Use other than described above is only allowed with permission of LOGICDATA Note for definitions and information concerning LOGICDATA control units please refer to the applicable user manual Aside of...

Страница 4: ...a danger of electric shock due to broken housing parts Note mounting screws are not within scope of delivery 2 4 Overview Desktop Up Key Desktop Down Key Memory Key Display Memory Position Key 1 Memo...

Страница 5: ...ials separate the plastic parts and cardboard for collection 2 Place the handswitch on the underside of your desktop on the desired position Note that the handswitch should be reached comfortably Its...

Страница 6: ...unction does not work properly The correct torque to tighten the screws must be checked depending on the used screw and wood type 4 Connect the handswitch to the control unit using the jack marked wit...

Страница 7: ...ntrol panel can get damaged Figure 6 links press the user interface panel so that it extends automatically right lift the user interface panel to a horizontal position and push it into the holder to r...

Страница 8: ...sed from the fixed part in case of too high forces applied to it To mount it again on the sliding mechanism proceed as follows 1 Put the ends of the springs into the sliding mechanism Figure 9 left sp...

Страница 9: ...e parameters of the control unit Figure 11 Display on TOUCH 4 2 Basic Functions Function Description Note Desk upwards For an upward adjustment of the desk push this button Push this button until the...

Страница 10: ...o the lowest desktop height minimum desktop position 1 Adjust the desktop to the position you want to save The display will show the desktop height e g 34 2 Press the memory key The display will read...

Страница 11: ...ition Option B with double click function Note availability of the double click function depends on the software configuration of the control unit 1 Double click the required memory position key e g 2...

Страница 12: ...a button while swiping Note the display must be active during activation or deactivation of the keylock e g showing the current height To activate the display press one key shortly e g desktop up butt...

Страница 13: ...cause Remedy Cable is defective Replace the handswitch Handswitch is defective Replace the handswitch Buttons are pressed during installation Disconnect and re connect the handswitch to the control un...

Страница 14: ...tic and electronic parts for collection Also ensure eco friendly disposal of all the other components drives cables etc Note this product is RoHS compliant according to directive 2002 95 EC Note this...

Отзывы: