background image

14 


  Always empty the hopper before any maintenance is carried out


7.1 - DAILY 


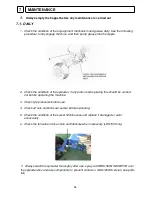
1.  Check the condition of the engagement mechanism and grease daily. Use the following 

procedure, firstly engage the drive, and then pump grease into the nipple. 


2.  Check the condition of the spreader, if any parts need replacing this should be carried 

out before operating the machine. 

 
3.  Check tyre pressures before use. 


4.  Check all nuts and bolts are secure before operating. 


5.  Check the condition of the swivel hitch bushes and replace if damaged or worn 

excessively.  


6.  Check the tension on drive chain and lubricate when necessary (LDS700 Only) 


7.   Always wash the spreader thoroughly after use, spray a CORROSION INHIBITOR over 
the spreader disc and axle components to prevent corrosion. (LDS120DS version, see parts 
list) 


MAINTENANCE  


Содержание LDS120

Страница 1: ...LDS120 120DS 240 360 700 OPERATORS MANUAL WM1 LDS120 LDS GROUND DRIVE SPREADER...

Страница 2: ...djustment 10 6 4 Calibration 10 6 5 Calibration charts LDS120 240 360 700 11 6 6 Calibration charts LDS120DS 12 7 Maintenance 7 1 Daily maintenance 14 7 2 Seasonal 15 8 Exploded Parts Diagram 8 1 Main...

Страница 3: ...if accurate spread patterns and accurate quantities are to be achieved therefore an accurate speedometer may be required The Ground Drive Spreader has a mild steel framework with a galvanised finish t...

Страница 4: ...Agriculture Sheet No 11 Centre of gravity Stability of the ATV is improved if there is A low centre of gravity which is within the wheel base A wide wheel base A long draw bar Means for holding detac...

Страница 5: ...ability the need for care and concentration and how to recognise the conditions which may affect the safety of operation It is important for trainees to familiarise themselves with the handling and co...

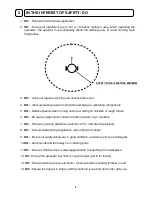
Страница 6: ...NOT Travel at speeds in excess of 20 Mph 32Kph when travelling to and from the spreading area 12 DO NOT Exceed 10 Mph 16 Kph in working conditions 13 DO NOT Engage or disengage the disc drive whilst...

Страница 7: ...after operation e g Gearbox 7 DO Follow any towing guidelines stated by ATV Vehicle manufacturer 8 DO Follow suitable lifting regulations when filling the hopper 9 DO Ensure all safety decals are in...

Страница 8: ...NING DECALS 4 The above decals should be located on your LDS Ground Drive Spreader If any of the above decals are not located on your LDS or are damaged in any way contact Logic for some replacement d...

Страница 9: ...ow diagram Never lift the spreaders with material in the hopper And ensure pedestrians are clear from danger 3 Ensure all straps are the same length and comply with EN1492 1 4 All LDS unladen weights...

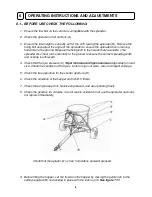
Страница 10: ...at the tyre pressure C 10psi minimum to 25psi maximum dependant on load size Check the condition of the tyres Look for signs of wear cuts and impact damage 5 Check the free operation for the shutter a...

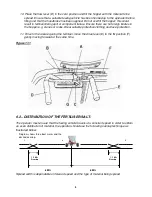
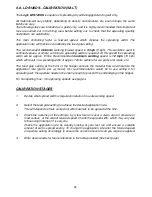
Страница 11: ...ctive clothing and face protection 11 Drive to the area requiring the fertiliser move the drive lever E to the IN position F gently moving forward at the same time Figure 11 1 6 2 DISTRIBUTION OF THE...

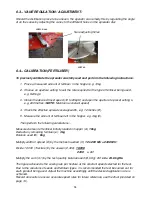
Страница 12: ...metres D 5 Measure the amount of fertiliser left in the hopper e g 4kg E Then perform the following calculations Measured amount of fertiliser initially loaded in hopper A 10kg Deduct any remaining fe...

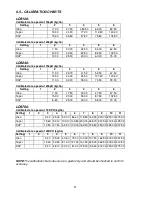
Страница 13: ...0kpH kg ha Setting 1 2 3 4 5 6 Urea 7 50 17 50 30 00 47 50 67 50 Super 15 00 30 00 55 00 87 50 102 50 DAP 8 80 25 00 40 00 55 00 70 00 LDS700 Calibrated at a speed of 15 KPH kg ha Setting 1 2 3 4 5 6...

Страница 14: ...etc The feed gate setting at the front of the hopper controls the material flow and therefore the application rate grams per sq metre Our recommendation would be to use setting 6 for spreading salt th...

Страница 15: ...13 LDS SPREADER SETTINGS CHART MATERIAL TOWING VEHICLE OPERATING SPEED mph SPREAD WIDTH m FEED GATE SETTING...

Страница 16: ...this should be carried out before operating the machine 3 Check tyre pressures before use 4 Check all nuts and bolts are secure before operating 5 Check the condition of the swivel hitch bushes and re...

Страница 17: ...ce the agitator Ensure the retaining pin is re fitted and held in place by the spring clip 6 Check the oil level in the gearbox To check turn the spreader on its side remove the filler plug located in...

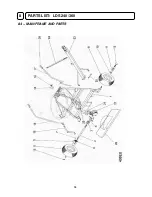
Страница 18: ...16 8 1 MAIN FRAME AND PARTS PARTS LIST LDS120 LDS120DS 8...

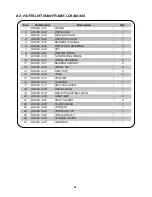
Страница 19: ...ING WHEEL 1 10 LDS120 1010 WHEEL BEARINGS 4 11 LDS120 1011 BEARING SPACER 2 12 LDS120 1012 WHEEL NUT 2 13 LDS120 1013 DUST CAP 2 14 LDS120 1014 TYRE 2 15 LDS120 1015 POINTER 1 16 LDS120 1016 STAR NUT...

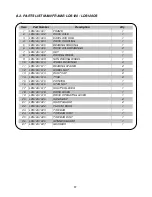
Страница 20: ...S120 1029 HOPPER LDS120 1 3 LDS120 1030 AGITATOR 1 4 LDS120 1031 AGITATOR BUSH 1 5 LDS120 1032 LOWER SHUTTER PLATE 1 6 LDS120 1033 CIRCLIP 1 7 LDS120 1034 SPINNER PLATE 1 8 LDS120 1035 SPINNER FIN 4 9...

Страница 21: ...19 8 4 MAIN FRAME AND PARTS PARTS LIST LDS 240 360 8...

Страница 22: ...WHEEL 1 10 LDS120 1010 WHEEL BEARINGS 4 11 LDS120 1011 BEARING SPACER 2 12 LDS120 1012 WHEEL NUT 2 13 LDS120 1013 DUST CAP 2 14 LDS240 1004 TYRE 2 15 LDS120 1015 POINTER 1 16 LDS120 1016 STAR NUT 1 1...

Страница 23: ...6 HOPPER LDS360 1 LDS360 1001 HOPPER EXTENSION LDS360 Not Shown 1 LDS360 1002 HOPPER FIXING BOLT C W NUT WASHER 6 3 LDS120 1030 AGITATOR 1 4 LDS120 1031 AGITATOR BUSH 1 5 LDS120 1032 LOWER SHUTTER PLA...

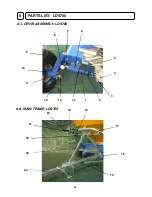
Страница 24: ...22 8 7 DRIVE ASSEMBLY LDS700 8 8 MAIN FRAME LDS700 8 7 6 9 11 12 13 14 1 2 3 4 5 20 19 18 17 16 24 15 21 22 23 10 PARTS LIST LDS700 8...

Страница 25: ...23 8 9 WHEELS AND TYRES LDS700 8 10 SPINNER AND AGITATOR LDS700 29 28 27 26 25 33 32 31 30 35 34 36 37 38 39 40 41 42 43...

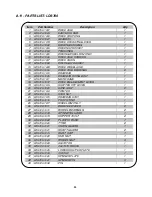
Страница 26: ...00 1011 MAIN FRAME 1 18 LDS700 1012 DRIVE ENGAGEMENT LEVER 1 19 LDS700 1013 SHUTTER OFF LEVER 1 20 LDS120 1020 HAND GRIP 2 21 LDS700 1014 POINTER 1 22 LDS120 1016 STAR NUT 1 23 LDS700 1015 DRAWBAR STA...

Страница 27: ...parts must be kept for inspection and if requested sent to the factory or dealer The customer must bring equipment for repair to the dealer This guarantee becomes void if unauthorised modifications ha...

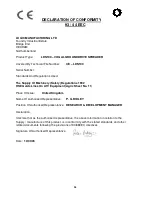
Страница 28: ...92 HSE Guide Lines On ATV Equipment Agric Sheet No 11 Place Of Issue United Kingdom Name Of Authorised Representative P G RIDLEY Position Of Authorised Representative RESEARCH DEVELOPMENT MANAGER Decl...

Отзывы: