background image

SETTING THE VISION CONNECT HUB

Step 11


28

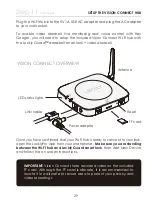
The Vision Connect Hub connects directly to your Wi-Fi router using the provided 

LAN cable. Choose an appropriate location for the hub for optimum 

performance (see below). For optimum connectivity, it is recommended 

to set up the hub 

LESS than 100 feet (30 meters)

 away from the lock, and 

elevated 3 feet (1 meter)

 off the ground.

During the setup process position yourself between the lock and the Vision 

Connect hub—ideally no more than 100 feet (30 meters) apart. Ensure your 

iOS or Android

 device has both Bluetooth

®

 and Wi-Fi enabled

TIP: 

Sometimes distances between hub and lock can vary due to 

circumstances. If you are having difficulty setting up optimal range 

of 100/ft or less, we’re here to help. Call our customer care team: 

(855) 562-5599 or by email: [email protected], or visit http:// 

locklypro.com/support for suggestions and troubleshooting tips.

100 Feet (30 meters) or less

You

Vision Connect

Wi-Fi Router

3 feet (1 meters)

off the ground

Lockly Guard Smart Lock

Содержание 698D

Страница 1: ...INTERCONNECTED EDITION INSTALLATION GUIDE VISION DUO 698D FOR COMMERCIAL USE PROFESSIONAL INSTALLATION WWW LOCKLYPRO COM PGD698D a p p l i c a t i o n i n p r o g r e s s...

Страница 2: ...GET THE MOST OUT OF YOUR LOCKLY GUARD Get the latest user installation manuals instructional videos and FAQs SCAN or VISIT Locklypro com 698D...

Страница 3: ...on back page Welcome This guide will walk you through step by step how to install and get Lockly Guard up and running Installation generally takes less than 30 minutes If you have any questions pleas...

Страница 4: ...rewdriver Tape measure or ruler Pliers Optional Screwdriver with drill bits Drilling maybe required to install this lock If you are installing your lock on a brand new door a drill is required if ther...

Страница 5: ...m Remove existing door hardware latch or deadbolts before installing the new lock Use provided template to bore new holes if needed 1 2 3 4 Measure and confirm that distance between front door holes i...

Страница 6: ...is extended hold the metal plate c and twist the dead bolt body d counter clock wise till it snaps to 2 3 4 2 3 4 70mm 2 3 8 60mm Note the shaft s horizontal and vertical aligment must be sustained d...

Страница 7: ...hotline 855 562 5599 or email prosales Lockly com PGA018 PGA019 PGA019S For mortise slot 5 5 4 3 2 After adjusting the latchbolt F determine the orientation of the latchbolt Determine the orientation...

Страница 8: ...GHT OUT SWING DOOR LEFT IN SWING DOOR INTERIOR EXTERIOR No need to change door handle orientation Skip Step 2 LEFT IN SWING and RIGHT OUT SWING DOORS require changing the door handle orientation Conti...

Страница 9: ...nd right side of the the lock to insert the handle back onto the lock Check that your handle works smoothly by giving it a turn up and down Confirm that your installation was complete by checking if t...

Страница 10: ...ANGING HANDLE FOR RIGHT OR LEFT SWING DOORS Step 2 continued 7 8 Align the screw hole on point L then insert the removed screw and tighten At the back of the exterior assembly remove the screw on poin...

Страница 11: ...Orientation 1 2 Remove the handle retaining screw and detach the handle Rotate the handle 180 as shown Insert the handle retaining screw and tighten using a screw driver CHANGING HANDLE FOR RIGHT OR L...

Страница 12: ...to the bottom door hole 4 or 5 5 Use a flathead screwdriver to secure tighten E clockwise Install Spindle C with the holes side into the base of the lock and align the holes locate in the 3 o clock an...

Страница 13: ...d N1 as shown 2 Use a screwdriver to secure the cables in the fire hood Ensure that the cables are routed out of the U shaped slot and the fire hood does not press cables 3 Pull the connecting wire in...

Страница 14: ...E to top door hole passing through below part J E B While aligning the lock straight up and down pass the wiring cable under the latchbolt F then ensure the Slotted Barrel Extension E passes through...

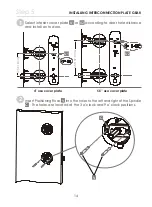
Страница 15: ...ver plate 4 101 6mm 5 5 139 7mm 2 Select interior cover plate U1 or U2 according to door hole distance and install on to door U1 U2 Insert Positioning Rods V into the holes to the left and right of th...

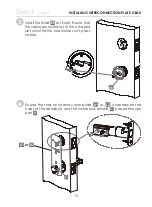
Страница 16: ...ll fire shield N1 as shown Ensure that the cables are routed out of the U shaped slot and the fire hood does not press cables Ensure the rods on interior cover plate U1 or U2 is inserted on the holes...

Страница 17: ...ed 5 Hole for O1 or O2 screw for 5 5 Hole for O1 or O2 screw for 4 Secure with O1 or O2 Remove the position rods V and replace them with screws O Tighten clockwise until the mounting plate is secure V...

Страница 18: ...left swing door The R side should be facing in front of you after inserting the torque blade The L side should be facing in front of you after inserting the torque blade Select the side of the interc...

Страница 19: ...TION PLATE GEAR Step 5 continued 7 X3 Install interconnection plate P onto door Ensure the torque blade AD is inserted horizontally to the deadbolt The spindle must pass through the plate Secure the p...

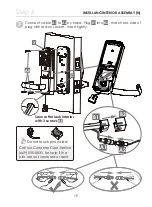
Страница 20: ...terior with 3 screws Do not touch pins inside Call our Customer Care Hotline 669 500 8835 for help if the pins are not centered or bent X C AE Connect cable A1 to A2 by hand Plug B1 into B2 match red...

Страница 21: ...as this may result in dam aging the lock Align the spindle C to the lock interior and attach the Interior lock to the interconnection plate Gently push some of the excess cable through the rectangula...

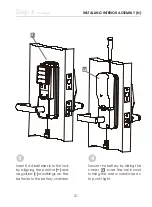
Страница 22: ...inued 21 Insert 8 AA batteries into the lock by aligning the positive and negative markings on the batteries to the battery chamber 4 Secure the battery by sliding the cover Q over the lock and turnin...

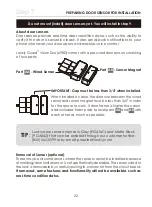
Страница 23: ...sales lockly com TIP About door sensors Door sensors provide real time door condition status such as the ability to verify if the door is securely closed It also sends push notifications to your phone...

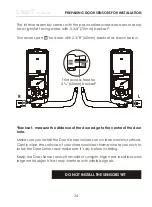
Страница 24: ...as much as possible 2 3 4 70mm 2 3 8 60mm 3 4 20mm EVA LEFT RIGHT When you are installing the door sensors make sure the arrow of the wired sensor AA is placed next to the arrow of the sensor magnet A...

Страница 25: ...etup for a right left swing doors with 2 3 4 70mm backset Trim excess part e for doors with 2 3 8 60mm backset as shown below R L Make sure you install the Door Sensor indoors on a clean and dry surfa...

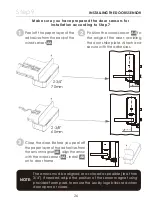
Страница 26: ...free of any binding or resistance Adjust appropriately as needed 2X 2X 2X Make sure the slanted side of Latchbolt F is closing against the slanted part of Strike Plate H IMPORTANT Check the alignment...

Страница 27: ...door avoiding the door strike plate Attach and secure with the adhesives Close the door Before you peel off the paper layer of the adhesives from the sensor magnet AB align the arrow with the wired s...

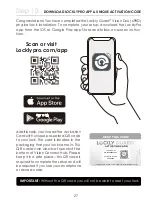
Страница 28: ...t be able to reset your lock Additionally you ll need the Activation Card with unique pre paired QR code to your lock The card is located in the packaging that your lock came in This QR code can also...

Страница 29: ...urself between the lock and the Vision Connect hub ideally no more than 100 feet 30 meters apart Ensure your iOS or Android device has both Bluetooth and Wi Fi enabled TIP Sometimes distances between...

Страница 30: ...ve confirmed that your Wi Fi Hub is ready to connect to your lock open the LocklyPro App from your smartphone Make sure you are standing between the Wi Fi hub and Lockly Guard smart lock then Add New...

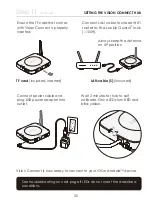
Страница 31: ...uter to the Lockly Guard lock 100ft LAN cable S included Connect power cable and plug USB power adapter into outlet Wait 2 minutes for hub to self calibrate Once LEDs turn RED and blink yellow Vision...

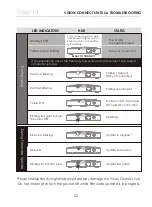
Страница 32: ...omer care team 855 562 5599 or visit http locklypro com support for suggestions and troubleshooting tips NOTE Power interruption during firmware update may damage the Vision Connect hub Do not interru...

Страница 33: ...oes to blue then turns OFF Blue slow blinking Update in progress Update Successful Update has failed Blue ON Blinking from red to blue After connecting LAN cable and power adapter wait for 2mins for V...

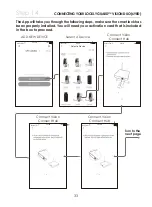
Страница 34: ...operly installed You will need your activation card that is included in the box to proceed AT T 9 41 AM 100 Select a Device ADD NEW DEVICE Select A Device Connect Vision Connect Hub Connect Vision Con...

Страница 35: ...have to identif y owner ship of your lock Please store this card in a safe place as this is require d to set up your Lockly Guard The Activa tion code will be require d if you lose your smartp hone or...

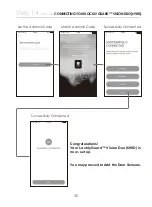
Страница 36: ...nued Successfully Connected Set the Admmin Code Match Admmin Code Successfully Connected AT T 9 47 AM 100 AT T 9 46 AM 100 Congratulations Your Lockly Guard Vision Duo 698D is now set up You may proce...

Страница 37: ...ent off and on the user is encouraged to try to correct the interference by one or more of the following measures Reorient or relocate the receiving antenna Increase the separation between the equipme...

Страница 38: ...nt IC Radiation Exposure Statement This equipment meets the exemption from the routine evaluation limits in section 2 5 of RSS 102 It should be installed and operated with a minimum distance of 20cm b...

Страница 39: ...ion RFID Card S N W Activation Card Strike Plate Spacer optional Deadbolt KA4 x 20MM Screw ST5 x 70MM Screw Deadbolt Strike Plate strengthen Strike Plate Wired Sensor Sensor Magnet Foam Pads Interconn...

Страница 40: ...ure to do so may also result in the smart lock not responding correctly to lock and unlocking commands and will require re installation This product is recommended for residential use Please check you...

Страница 41: ...2 AU Patent NO 2013403169 AU Patent NO 2014391959 AU Patent NO 2016412123 UK Patent NO EP3059689B1 UK Patent NO EP3176722B1 Other Patents Pending The Bluetooth word mark and logos are registered trade...

Отзывы: