10
5
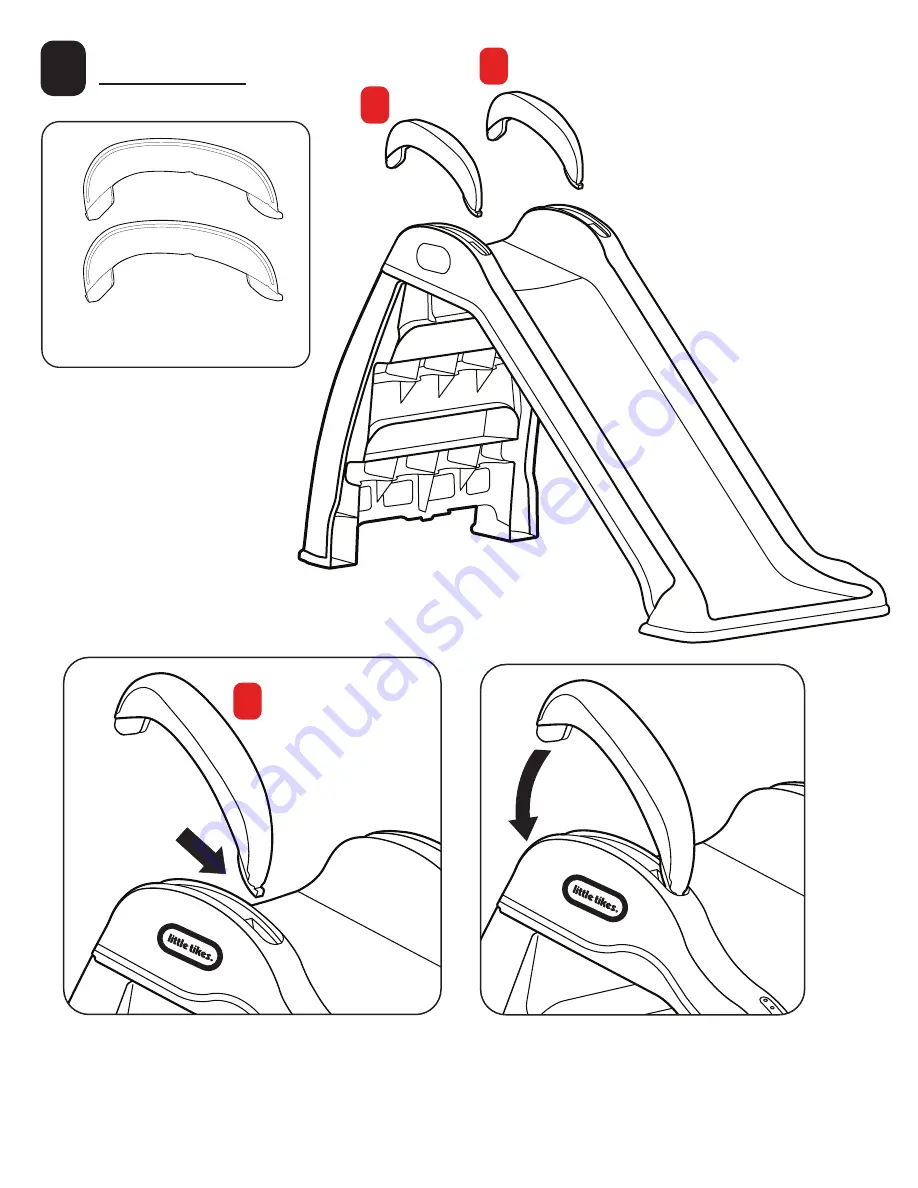
Handle it!
Front of
handle
Back of
Insert the FRONT of the handle into
the FRONT of the notched area at the
top of the slide.
Fit the BACK of the handle into the
back of the notched area.
C
Страница 1: ...BLY INSTRUCTIONS My First Light Up Slide XIM656040 11 20 1 Adult assembly required Approx assembly time 20min Look for video of assembly at littletikes com videoinstructions 656040M 656040MX1 11 2 6 y...
Страница 2: ...ude but are not limited to fences buildings overhead branches laundry lines or electrical wires It is recommended that the orientation of the assembled product be such that direct sunlight is minimize...
Страница 3: ...s warranty is valid only if the product has been assembled and maintained per the instructions This warranty does not cover abuse accident cosmetic issues such as fading or scratches from normal wear...
Страница 4: ...atteries not included Rechargeable batteries may be substituted The voltage of a fully charged rechargeable battery is often lower than that of a fresh alkaline battery Therefore it is recommended tha...
Страница 5: ...es of hardware may have extras pieces Questions We re here to help Little Tikes customer service team at 1 800 321 0183 Tool required not included Illustrations are for reference only Styles may vary...
Страница 6: ...inside the battery compartment 3 Replace the compartment cover and tighten the screws Tool required not included 1 Ready let s start Battery installation MUST be completed by an adult Modes Modes 1 C...
Страница 7: ...ecure the light up module using 2 1 2 screws 2 1 2 1 27 cm 7 2 It s time to add some lights Turn the slide part A over to access the underside Place the Light Up module part D onto the screw bosses A...
Страница 8: ...the LED strips into the crevice on each side of the slide Place a LED clip part E over the LED strip and onto the screw boss Secure using using 1 1 2 1 27 cm screws in the 6 locations circled 6 1 2 1...
Страница 9: ...9 4 Step it up While the slide is still turned over insert the steps part B into slide B...
Страница 10: ...0 5 Handle it Front of handle Back of handle Insert the FRONT of the handle into the FRONT of the notched area at the top of the slide Fit the BACK of the handle into the back of the notched area C C...
Страница 11: ...not pop off If it does pull off then you need to press down on the back again until you feel it click into place 2 CLICKS 6 2 CLICKS Push down on the BACK of the handle You MUST feel the handle CLICK...
Страница 12: ...2 7 LIGHTS LIGHTS LIGHTS When the switch is in the ON position all the way to the right the lights will run continuously To Select a Mode 1 The switch must be in the ON position 2 Press the Modes butt...
Страница 13: ...setautour del quipementduterraindejeux conform ment la Fiched informationsauconsommateursurles mat riauxdesurfacedesairesdejeux jointe Hauteur maximaledeprotectioncontreleschutesrequise jusqu 0 6m tre...
Страница 14: ...ace de protection afin d viter le compactage et de maintenir une profondeur appropri e Remplacez les si n cessaire Rentrez ce produit ou ne l utilisez pas lorsque la temp rature ext rieure tombe au de...
Страница 15: ...peut causer d interf rence nuisible et 2 cet appareil doit pouvoir fonctionner m me s il capte de l interf rence incluant celle pouvant provoquer un fonctionnement ind sirable Attention Les modificat...
Страница 16: ...renormaleou touteautre cause ne relevant pas de vices de mat riau ou de fabrication La p riode de garantie est de trois 3 moispourlesservicesdegarderieetlesacheteurscommerciaux tats UnisetCanada Pouro...
Страница 17: ...osjuegosdeplazaseg nla HojadeInformaci n alConsumidorsobreMaterialesparaSuperficiede Juego Serequiereprotecci nparaunaalturam xima deca dadehasta0 6m 2pies Se requiere la vigilancia de adultos No deje...
Страница 18: ...Estos l mites se dise aron para brindar protecci n razonable frente a la interferencia perjudicial en una instalaci n residencial Este equipo genera usa y puede irradiar energ a 18 Ind queles a los ni...
Страница 19: ...stornillador Phillips no se incluye extraiga el tornillo y la cubierta del compartimiento de la pila del m dulo de iluminaci n pieza D 2 Instale tres 3 pilas alcalinas AA no incluidas asegur ndose de...
Страница 20: ...ant aesv lida solamentesielproductohasidomontadoymantenidoseg nlasinstrucciones Estagarant anocubre abuso accidente aspectos cosm ticos tales como el descoloramiento o las rayas como consecuencia de u...
Страница 21: ...th of surfacing over time The surfacing will also compact displace and settle and should be periodically refilled to maintain at least a 9 inch 23 cm depth Use a minimum of 6 inches 15 cm of protectiv...
Страница 22: ...armi diff rents types de surface suivez cependant les directivessuivantes quelquesoitleproduitquevous s lectionnez MAT RIAUX EN VRAC Conservez une profondeur minimum de 23 cm 9 po de mat riaux en vrac...
Страница 23: ...icie debe aplicarse a una profundidad que sea apropiada a la altura del juego seg n la especificaci n F 1292 de ASTM Puede elegir entre diferentes tipos de materiales para superficie Pero cualquiera s...
Страница 24: ...la cual dicha superficie est dise ada para proteger al ni o contra lesiones de cabeza graves Dicha altura debe ser igual o mayor que la altura de ca da del juego La altura de ca da es la distancia ver...