littleseedskids.com
13
X 8
X 4
1
2
2
E
E
E
A
1
3
3
I
D
1
X 8
3
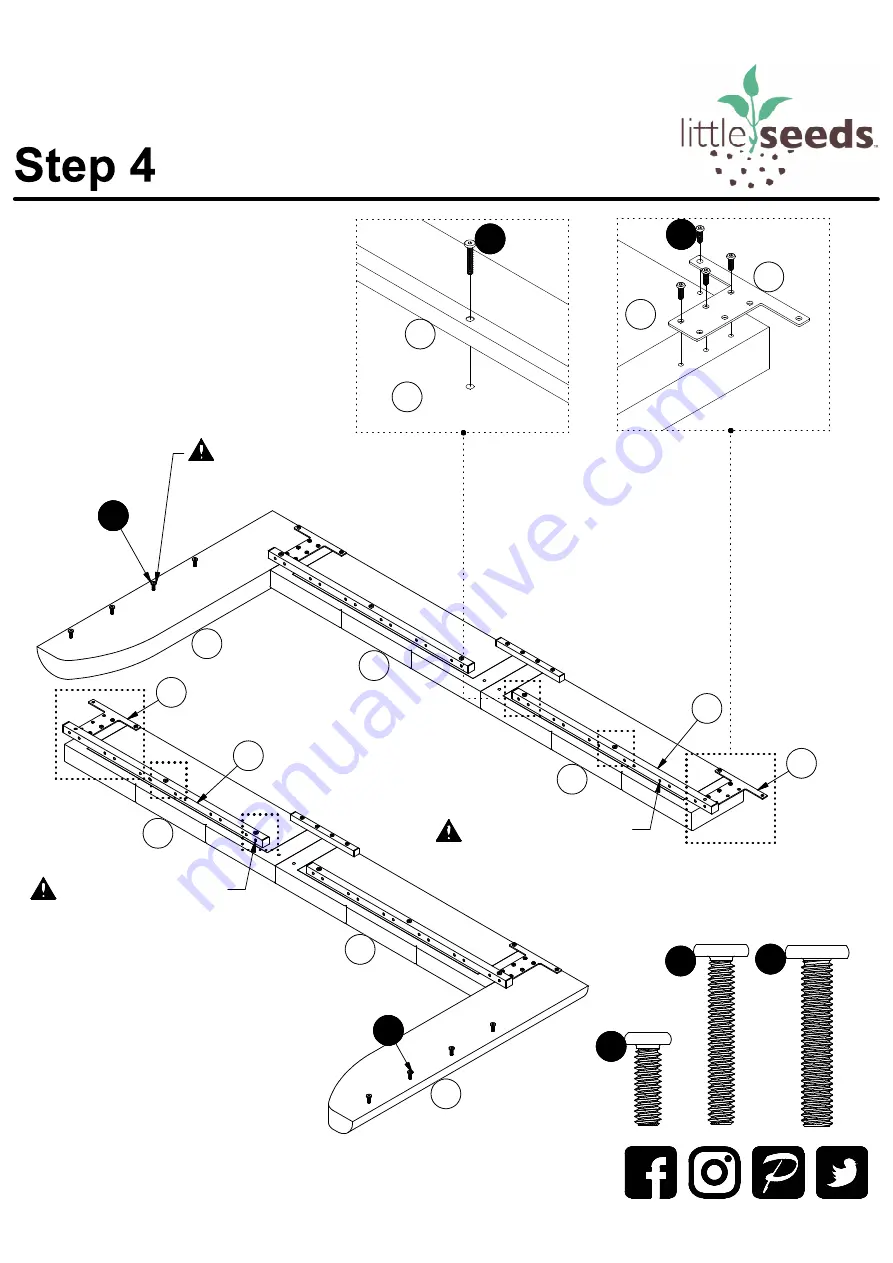
Do not completely tighten
the BOLTS, leave half of the
thread exposed.
Attach remaining
E
x 2 to
C
and
D
with
v
as illustrated.
Attach remaining
I
x 2 to
C
and
D
with
u
as illustrated.
Screw
w
to
A1
and
A2
,
leave half
of the thread exposed.
Do not completely tighten
the BOLTS in this step.
D
D
C
C
D
I
I
A
2
Slat holes on E must
be oriented towards
the top side of this bed
as indicated
.
Slat holes on E must
be oriented towards
the top side of this bed
as indicated
.
Содержание 4535429LS
Страница 1: ...inside for Assembly Manual Check us out Littleseedskids com ...
Страница 5: ...5 PARTS A H A2 A1 E K F G P B C D D C I Z X Y J L ...
Страница 10: ...littleseedskids com 10 A B Z Z Z Z A L Z Z L Attach Z x 4 and L x 4 to A B as illustrated below ...
Страница 14: ...littleseedskids com 14 1 X 4 1 J J G Attach J X 2 to G with u Then properly tighten all the Bolts in this step ...
Страница 16: ...littleseedskids com 16 X 2 1 2 X 8 1 2 C B E B C D E I I Attach E to B with v Attach I to B with u ...
Страница 17: ...littleseedskids com 17 X 4 1 C D C G G 1 Attach G to C D with D C D ...
Страница 20: ...littleseedskids com 20 Stick H to the back of A with Velcro as illustrated A H ...
Страница 22: ...Manual de Instrucciones Síguenos Littleseedskids com 22 ...
Страница 29: ...Manuel d Instructions Suivez nous Littleseedskids com 29 ...


